Course 1 - Hole 2: Difference between revisions
mNo edit summary |
No edit summary |
||
| Line 1: | Line 1: | ||
{{ | {{Good|page}} | ||
{{Infobox-KDCHole | {{Infobox-KDCHole | ||
|image= | |image= | ||
| Line 82: | Line 82: | ||
|[[Kick Panel]] | |[[Kick Panel]] | ||
|} | |} | ||
== Gallery == | |||
<gallery> | |||
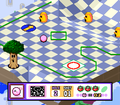
KDC Course 1 Hole 2 screenshot 01.png|Making the first move toward the Kick Panel | |||
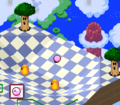
KDC Course 1 Hole 2 screenshot 02.png|Rolling around the Kabu in the back | |||
</gallery> | |||
{{clear}} | {{clear}} | ||
Revision as of 17:25, 24 January 2021
| ||||||||||
| ||||||||||
|
| ||||||||||


Course 1 - Hole 2 is the second hole of Course 1 in Kirby's Dream Course. It features a small slightly hilly landscape and introduces the Kick Panel.
Summary
This is a small hole taking place on a rectangular platform with mild slopes in the upper-right region creating a basin and bumpers guarding the lower-left. A small bumper island can be found in the middle between the flat area and the hilly region, which creates a potential split path. Kirby starts in the lower-most portion of the bumper area in a relatively isolated spot, and his targets are three Kabu which occupy the spaces above him; one being found just on the edge of the basin next to a Kick Panel and the other two inside the basin next to each-other. Three Whispy Woods can also be found on the course, but they can be ignored. Completing this hole is a straightforward matter if Kirby aims for the Kick Panel and plans his subsequent curve into the basin well enough.
Extra Game
In the Extra Game, the three Kabu are moved around to create a more difficult line-up, particularly since one of them has been moved all the way to the top of the slope on the upper-right portion of the board. One of the Whispy Woods has been moved into the basin, with a Gordo taking his place just outside the bumper walls. The Gordo's position makes him inconsequential to the hole strategy.
Enemies
|
Obstacles
| Sprite | Obstacle |
|---|---|
| Bumper | |
| Kick Panel |
Gallery
Making the first move toward the Kick Panel
Rolling around the Kabu in the back

