|
|
| (69 intermediate revisions by 19 users not shown) |
| Line 1: |
Line 1: |
| {{construction}}
| |
| {{image}}
| |
| {{Infobox-KRtDLLevel | | {{Infobox-KRtDLLevel |
| |image=[[File:Raisin Ruins.png|260px]] | | |image=[[File:KRtDLD Raisin Ruins select screenshot.png|350px]] |
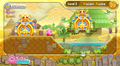
| |caption=Screenshot from ''Kirby's Return to Dream Land''. | | |caption=Screenshot of '''Raisin Ruins''' on the [[World Map]] from ''[[Kirby's Return to Dream Land Deluxe]]''. |
| |level=2 | | |level=2 |
| |world=[[Pop Star]] | | |world=[[Popstar]] |
| |stages=5 | | |stages=5 |
| |part=Right Wing | | |part=Right Wing |
| |spheres=16 | | |spheres=16 |
| |mid-boss=[[Bonkers]] (2-1), [[Sphere Doomer]] (2-2, 2-4), [[Water Galboros]] (2-4) | | |mid-boss=[[Bonkers]] (2-1), [[Sphere Doomer]] (2-2, 2-4), [[King Doo]] (2-3), [[Water Galboros]] (2-4) |
| |superability=[[Flare Beam]] (2-2), [[Ultra Sword]] (2-4) | | |superability=[[Flare Beam]] (2-2), [[Ultra Sword]] (2-4) |
| |boss= [[Mr. Dooter]] | | |boss= [[Mr. Dooter]] |
| |previous=[[Cookie Country]] | | |previous=[[Cookie Country]] |
| |next=[[Onion Ocean]] | | |next=[[Onion Ocean]] |
| }} | | |theme music=[[File:Raisin Ruins sample KRtDL.oga]] |
| Level 2: '''Raisin Ruins''' is the second level in ''[[Kirby's Return to Dream Land]]''. Raisin Ruins is a desert-like level with pyramids, ruins, and an oasis. Completion of the boss battle against [[Mr. Dooter]] yields the right wing to the [[Lor Starcutter]]. There are sixteen energy spheres in this level, three in stage 1, four each in stage 2 and 3, and five in stage 4. | | |theme title="[[Raisin Ruins (theme)|Raisin Ruins]]" |
| | | |description=The stage select theme for Raisin Ruins. |
| | }}{{Distinguish|the level in [[Kirby's Return to Dream Land]]|[[Radish Ruins]]}} |
| | {{Quote|You won't find many raisins here, but you will be surrounded by desert sand and ancient temples filled with obstacles.|Description of '''Raisin Ruins''' from the NA mobile website for ''Kirby's Return to Dream Land''<ref name="mobile site">[https://web.archive.org/web/20141014103409/http://kirby.nintendo.com/returntodreamland/mobile/explore-worlds.html NA mobile website for ''Kirby's Return to Dream Land'' (archive)]</ref>}} |
| | Level 2: '''Raisin Ruins''' is the second level in ''[[Kirby's Return to Dream Land]]'' and its remake ''[[Kirby's Return to Dream Land Deluxe]]''. Raisin Ruins is a desert-like level with pyramids, ruins, and an oasis. Completion of the boss battle against [[Mr. Dooter]] yields the right wing to the [[Lor Starcutter]]. There are sixteen [[Energy Sphere]]s in this level, three in stage 1, four each in stage 2 and 3, and five in stage 4. |
| | {{clear|left}} |
| ==Stages== | | ==Stages== |
| ===Stage 1===
| | For details on each stage individually, click the name of the stage. |
| The first stage of Raisin Ruins starts out on a sandy uphill climb, where Kirby will encounter a [[Whippy]]. From there, Kirby will encounter some [[Bronto Burt]]s and [[Waddle Dee]]s, as well as some towers of blocks, before going down a valley that will lead to a [[Pacto]]. From there, Kirby must proceed though a hilly area to find an area that resembles the top of some ruins, with another Pacto guarding it. Around the Pacto are two platforms that can lead Kirby down to a door in the ruins to a secret room. In the secret room is a [[Whip]] [[Copy Pedestal]], which will allow Kirby to reach the 1UP's across a wall of [[Gordo]]s. Kirby then must proceed to another uphill climb, where he will be met by another Whippy and more Pactos. After passing though the Pacto area, Kirby encounters another area that appears to be part of ruins, where Kirby can go down to a lower level and use his Whip ability to obtain some [[Food]] and a Red Star. Kirby then must proceed through another hill with a few [[Scarfy|Scarfies]] before reaching the door to the second section of the stage.
| | {| class="sortable wikitable" border=1 cellpadding=2 |
| | | !class=sortable|Stage |
| The second section of the stage starts out with some blocks with [[Flamer]]s rotating around them. Kirby then has to go up a hill while [[Nruff]]s are running down the hill. When Kirby goes farther up the hills into a place that starts to expose some ruins, a rope must be lit by [[Fire]] Kirby in order to activate a cannon. The cannon will shoot Kirby to some ruins high in the sky, where the first [[Energy Sphere]] of the level will be obtained. After returning to the stage, Kirby will have to go uphill a little again before reaching a large tunneled-out area blocked by a large block must be super-inhaled. The tunnel has a [[Needle]] Copy Pedestal, some food, and a Red Star. From the tunnel, Kirby has to deal with a Waddle Dee riding on a Nruff before he can enter the door to the third section
| | !class=sortable|Energy Spheres / Ship Parts |
| | | !class=sortable|Super Ability |
| The third section of the stage starts underground. After a [[Waddle Doo]], Kirby reaches a blocked path with a switch on the top. The switch must be hit, but in doing so, a boulder behind Kirby is released. Kirby must run away from the boulder going downhill, while also avoiding enemies such as Waddle Dees and [[Broom Hatter]]s in the way. Hitting another switch in a very narrow part of the tunnel later on will release a second boulder in front of Kirby, forcing Kirby to run in between the two boulders, though the boulder in front of Kirby will help get rid of enemies in the front. The boulder in front will eventually fall and break into a pit, where there is some food. After encountering a Scarfy, there will be yet another switch that will activate another boulder in front of Kirby. The boulder will run into some blocks and cause another boulder to fall, causing Kirby to end up either behind two boulders, or between two boulders. An Energy Sphere sits next to the wall where the boulder is going to break, so it is better for Kirby to be behind the boulders. The door to the next section is shortly above this part.
| | !class=sortable|Boss/Mid-Boss |
| | | |- |
| The fourth section of the stage starts uphill, with boulders falling ''toward'' Kirby. Kirby must hide in small areas either above or below the tunnel periodically while going uphill to prevent getting hit by the boulders. Passing this area leads directly to the door to the fifth section.
| | |{{center|[[File:KRtDLD Raisin Ruins Stage 1 select screenshot.png|200px]]<br>'''[[Raisin Ruins - Stage 1|Stage 1]]'''}} |
| | | |3 |
| The fifth section is above ground, and there is an [[Invincibility Candy]] available in the beginning. Using the candy, Kirby can pass through several enemies, mostly Nruffs, quite easily. At the end, there is a small area with two Nruffs ramming back and forth into walls, with some food, and below that is the door to the sixth section of the stage.
| | |{{N}} |
| | | |[[Bonkers]] |
| The sixth section starts off with some [[Parasol Waddle Dee]]s falling from higher platforms, with a [[Parasol]] Copy Pedestal. After that is are rather steeps steps of rock leading to a cliff, and some platforms that will lead Kirby gradually down, with some Parasol Waddle Dees (and a [[Parasol Waddle Doo]] falling from the sky. This will lead Kirby into a tunnel, where he will have the choice between a Whip and a [[Sword]] Copy Pedestal. After Kirby proceeds, he will reach a chamber where the mid-boss [[Bonkers]] is fought. Swallowing Bonkers will yield Kirby the [[Hammer]] ability. Kirby may then move further forward in a tunnel infested by [[Kabu]]s and full of breakable box rectangles with food in them. This will lead to a rectangle of metal boxes protecting the third [[Energy Sphere]] of the stage, which must be broken with the use of a hammer. After shortly exiting the tunnel, the stage completion door is reached.
| | |- |
| | | |{{center|[[File:KRtDLD Raisin Ruins Stage 2 select screenshot.png|200px]]<br>'''[[Raisin Ruins - Stage 2|Stage 2]]'''}} |
| ====Enemies, Mid-bosses, and Abilities====
| | |4 |
| {| style="border: 3px solid #E47575; {{round}};background: #F69D99" cellspacing="2" | | |[[Flare Beam]] |
| ! width="420px" | '''Regular Enemies''' | | |[[Sphere Doomer]] (Fire) |
| ! width="180px" | '''Mid-Boss''' | |
| |- bgcolor="E47575" | |
| | | |
| {{col-begin}}
| |
| {{col-break|width=33%}} | |
| *[[Bronto Burt]]
| |
| *[[Waddle Dee]]
| |
| *[[Pacto]]
| |
| *[[Scarfy]]
| |
| *[[Gordo]]
| |
| {{col-break|width=33%}} | |
| *[[Nruff]]
| |
| *[[Broom Hatter]]
| |
| *[[Cappy]]
| |
| *[[Kabu]]
| |
| *[[Whippy]]
| |
| {{col-break|width=34%}} | |
| *[[Hot Head]]
| |
| *[[Flamer]]
| |
| *[[Waddle Doo]]
| |
| *[[Sparky]]
| |
| *[[Parasol Waddle Dee]]
| |
| *[[Parasol Waddle Doo]]
| |
| {{col-end}}
| |
| | | |
| {{col-begin|width=50%}}
| |
| *[[Bonkers]]
| |
| {{col-end}}
| |
| |- | | |- |
| ! colspan="2" width="404px"| '''Abilities'''
| | |{{center|[[File:KRtDLD Raisin Ruins Stage 3 select screenshot.png|200px]]<br>'''[[Raisin Ruins - Stage 3|Stage 3]]'''}} |
| |- bgcolor="#E47575"
| | |4 |
| | colspan="2" |
| | |{{N}} |
| {{col-begin}} | | |[[King Doo]] |
| {{col-break|width=50%}}
| |
| *[[Whip]]
| |
| *[[Fire]]
| |
| *[[Needle]]
| |
| *[[Beam]]
| |
| {{col-break|width=50%}}
| |
| *[[Spark]]
| |
| *[[Parasol]]
| |
| *[[Sword]]
| |
| *[[Hammer]]
| |
| {{col-end}}
| |
| |}
| |
| | |
| ===Stage 2===
| |
| The second stage starts out in rather bowl shaped area, resembling an empty oasis; going right from there will get to an area with two trees that serve as steps, with a Noddy on it. Following that is a small oasis with a block with a [[Waddle Dee]] on it, then an empty bowl. A [[Water Galbo]] appears shortly after that. Kirby then has to traverse through an empty bowl and a oasis, a two trees are seen lined up with a [[Togekuki]], a spiky creature on top of a tall spiky vine, in between them. Kirby must get past this enemy, where he will reach a much larger oasis. From there he will reach another tree platform that will lead him up to an elevated area with the door to the next section, but if Kirby goes around a Togekuki on the bottom level, he can go under the elevated area to find a small tunnel siphon with water, where at the other side there is some food and a Red Star.
| |
| | |
| The second section of this stage starts out with an area with two [[Rocky|Rockies]] and a [[Stone]] [[Copy Pedestal]] on the top of a tree platform. From there, Kirby can proceed through a downwards sloping tunnel to an underground area. There, there are three dips in the ground with water and some blocks in it; Kirby can use the stone ability to get some stars on the first two dips; the third dip will have food in it. Kirby may then go farther left and can proceed through two downward slopes. At the end of the second downward slope, Kirby can find a stump connect to several metal blocks. Using the rock ability on the stump will break all the metal boxes and reveal a secret door. In the secret door, he will find another stump, which if pushed down by the Stone ability, will break the metal boxes blocking Kirby's way to an [[Energy Sphere]], but will also create new stone blocks, so Kirby must hurry through this section in order to obtain the first Energy Sphere in this stage. Upon re-entering the main path of the stage, Kirby will have to go down three more downward slopes, traversing though more enemies such as [[Gordo]]s and [[Puppet Waddle Dee]]s, before reaching the door to the next section of the stage, submerged in water.
| |
| | |
| The next section of the stage starts out completely underwater. Kirby must traverse through this water, avoiding any [[Glunk]]s, and proceed to dry land (though there is a section blocked by blocks that contains four easily accessible stars). On dry land, Kirby will encounter another Togekuki and Water Galbo. Below the Water Galbo is a side door that contains a room with a [[Bomb Block]], so that if it is pressed, a [[1UP]] will start falling that Kirby may catch before it falls into a pit. Back on the main path, Kirby will have to negotiate another Togekuki and a [[Blade Knight]], before continuing on to a very large lake, filled with Glunks and Blippers. Toward the {{center}} of the lake, there is a submerged secret door. In the secret door there is two bomb blocks, one on the left top and one on the right bottom. The one of the left top will break the metal barrier allowing Kirby to access the second Energy Sphere of the stage, and the one on the right bottom will break a metal barrier allowing Blippers and Gordos to escape. Back on the main, path, Kirby can get out of the lake where he will be met by [[Kabu]]s and a Togekuki, before reaching a [[Warp Star]], which will take him to the next section of the stage.
| |
| | |
| The Warp Star will land Kirby into a ruins area, with some Kabus and pulling a ceiling switch will allow Kirby to access a door to the fifth section of the stage.
| |
| | |
| The fifth section of the stage occurs within the ruins, and the stage starts out where Kirby must go upward, where on the sides there are stones with Kabu faces, some of which blow fire. Going up the third section, Kirby will encounter a [[Super Waddle Doo]] to obtain a [[Flare Beam]] Super Copy Ability. Using the Flare Beam, Kirby can destroy the Kabu-like stones around him. Kirby can then proceed upward and use the super ability to destroy Bomb Blocks guarding a metal spiral wall, as well as a Kabu rock in the middle hiding a [[Maxim Tomato]]. Going up farther will lead to another Kabu rock area, destroying the left-side Kabu blocks will open the interdimensional rift to the alternate dimension.
| |
| | |
| The alternate dimension starts off scrolling with several floating blocks of water, with some enemies such as Blippers and Bronto Burts around. Kirby will have to traverse through several of these floating blocks of water arranged in certain patterns. After the floating blocks of water, Kirby will have to traverse through a more difficult set of paths, still with floating water, but also more complex with large blocks and several enemies. After passing through the stage, the door to the next section of the alternate dimension can be seen in the middle of a large water block. Kirby then has the choice of a [[Whip]] and [[Parasol]] Copy Pedestals, and can proceed to fight a Fire Sphere Doomer on an "island" with two water areas on the side. Defeating the Sphere Doomer will yield Kirby the remaining two Energy Spheres. After returning to the normal world, Kirby may go straight upward to the stage completion door.
| |
| | |
| ====Enemies, Mid-bosses, and Abilities====
| |
| {| style="border: 3px solid #E47575; {{round}};background: #F69D99" cellspacing="2"
| |
| ! width="420px" | '''Regular Enemies'''
| |
| ! width="180px" | '''Mid-Boss'''
| |
| |- bgcolor="E47575"
| |
| |
| |
| {{col-begin}}
| |
| {{col-break|width=33%}}
| |
| *[[Waddle Dee]]
| |
| *[[Broom Hatter]]
| |
| *[[Bronto Burt]]
| |
| *[[Blipper]]
| |
| *[[Togekuki]]
| |
| {{col-break|width=33%}}
| |
| *[[Gordo]]
| |
| *[[Puppet Waddle Dee]]
| |
| *[[Glunk]]
| |
| *[[Kabu]]
| |
| *[[Super Waddle Doo]]
| |
| {{col-break|width=34%}}
| |
| *[[Noddy]]
| |
| *[[Water Galbo]]
| |
| *[[Rocky]]
| |
| *[[Blade Knight]]
| |
| {{col-end}} | |
| | | |
| {{col-begin|width=50%}}
| |
| *[[Sphere Doomer]] (Fire)
| |
| {{col-end}}
| |
| |- | | |- |
| ! width="420px"| '''Abilities'''
| | |{{center|[[File:KRtDLD Raisin Ruins Stage 4 select screenshot.png|200px]]<br>'''[[Raisin Ruins - Stage 4|Stage 4]]'''}} |
| ! width="180px" | '''Super Ability'''
| | |5 |
| |- bgcolor="#E47575"
| | |[[Ultra Sword]] |
| |
| | |[[Sphere Doomer]] (Fire)<br>[[Water Galboros]] |
| {{col-begin}} | |
| {{col-break|width=50%}}
| |
| *[[Sleep]]
| |
| *[[Water]]
| |
| *[[Rock]]
| |
| {{col-break|width=50%}}
| |
| *[[Sword]]
| |
| *[[Whip]]
| |
| *[[Parasol]]
| |
| {{col-end}}
| |
| |
| |
| {{col-begin}}
| |
| *[[Flare Beam]]
| |
| {{col-end}}
| |
| |}
| |
| | |
| ===Stage 3===
| |
| The stage starts out leading two several large steps with several enemies on it. Near the top of the large "staircase" is a section where Kirby can use the [[Stone]] ability (obtained from an earlier [[Rocky]] to obtain several stars. On the top of the giant staircase, some [[Bouncy|Bouncies]], as well as a [[Sister Bouncy]] can be found, and at the end there is a ladder up with a solid metal-blocked floor. Kirby must climb up halfway up the ladder, where he will find a [[Bomb Block]] to the right, which he needs to break before the metal blocks are broken; however breaking this floor will only lead to a pit with a few stars. Kirby may then go farther up this ladder until he reaches a platform with a [[Waddle Doo]], then there is another ladder up. Halfway up this ladder, though is an discreet opening on the side of the right wall. Going in here will lead to a ladder down into a small chamber with three Red Stars. Going up farther up will lead to the top of this section of this stage, with a Sister Bound blocking the door to the next section of the stage.
| |
| | |
| The second section of the stage is in a large vertical section, separated into two corridors. Each corridor consists of ladders and platforms (that can be gone through upwards but not downwards) leading up, the left corridor has a [[Gordo]], while the right corridor has [[Food]]. The section then splits into three thinner corridors. Where the left-most corridor has a 1UP, but the other two have [[Noddy|Noddies]]. Above all of this is the door to the next section of the stage.
| |
| | |
| The third section of the stage is outdoors again, and starts out with a moving step leading to an elevated section, and a [[Blade Knight]]. After that, a "staircase" continues, with various [[Mumbies]] around to pose as a threat to Kirby. Farther up is a [[Shotzo]] that is shooting up-left, so Kirby must be careful passing through. Directly after the Shotzo is a stair that moves up and down where when it is lowered, Kirby can obtain a Red Star. Right after that, there is a [[Gigatzo]] cannon firing large balls of lava, so Kirby must be careful with that, as well. After Kirby clears the Gigatzo, a [[Twister]] can be found on a block. Going farther up, there is a moving step where when it reaches the bottom, Kirby can super inhale a block which will allow him to go to a tunnel with a [[Tornado]] [[Copy Pedestal]] in it. Still in the hidden area, there is several blocks that Kirby can destroy to obtain the first [[Energy Sphere]] of this stage. Upon re-entering the main path of the stage, Kirby must deal with two more Gigatzoes; passing that will get Kirby to a checkerboarded pattern of star blocks, as well as a wall of gray blocks blocking some Food. After that, on a moving step, is the door to the next section of the stage.
| |
| | |
| The fourth section of the stage occurs in a vertical stage with several platforms, with a [[Starman]] at the bottom and a [[Hi-Jump]] Copy Pedestal shortly after that. Above that is a grid of blocks that can be pushed through using the Hi-Jump ability. Shortly after, the section of the stage splits into three corridors, the middle one containing the second Energy Sphere of the stage, and the other two containing just platforms, blocks, and a [[Waddle Dee]] on the right one. Above that is a very thin corridor guarded by Gordos; at the top of the corridor is the door to the fifth section of the stage.
| |
| | |
| The following section starts out in a chamber with [[Cutter]] and [[Fire]] Copy Pedestals, as well as a [[Maxim Tomato Cube]]. Walking further, Kirby will reach the mid-boss battle against [[King Doo]], which yields Kirby the [[Beam]] ability. Kirby then must proceed to a large "staircase", then a cannon, then another staircase to the left. There, Kirby will reach a large metal block chunk with a Bomb Block in the middle. Kirby must use his Beam Whip to get to the bomb block to break all the metal boxes, which will reveal the third [[Energy Sphere]], a 1UP, as well as several stars. Farther up is the door to the next section of the stage, guarded by a Kabu.
| |
| | |
| The sixth section starts out in a chamber with a cannon that points up. Kirby must use this cannon to go through a very narrow corridor to another cannon, which will have an array of cannons above it. The array of cannons will lead to three branches above the array of cannons. The right branch leads to the final Energy Sphere of the level, and the {{center}} one will lead farther up the stage to another cannon chamber guarded with two Gigatzoes, firing farther up will pass Kirby through a few [[Cerulean]]s and will eventually lead you to the top, where to the left there is a [[Whippy]] and some food, and to the right is the stage completion door.
| |
| | |
| ====Enemies, Mid-bosses, and Abilities====
| |
| {| style="border: 3px solid #E47575; {{round}};background: #F69D99" cellspacing="2"
| |
| ! width="420px" | '''Regular Enemies'''
| |
| ! width="180px" | '''Mid-Boss'''
| |
| |- bgcolor="E47575"
| |
| |
| |
| {{col-begin}}
| |
| {{col-break|width=33%}}
| |
| *[[Waddle Dee]]
| |
| *[[Bouncy]]
| |
| *[[Sister Bound]]
| |
| *[[Gordo]]
| |
| *[[Mumbies]]
| |
| *[[Shotzo]]
| |
| {{col-break|width=33%}}
| |
| *[[Gigatzo]]
| |
| *[[Bronto Burt]]
| |
| *[[Cerulean]]
| |
| *[[Kabu]]
| |
| *[[Scarfy]]
| |
| *[[Parasol Waddle Dee]]
| |
| {{col-break|width=34%}}
| |
| *[[Rocky]]
| |
| *[[Waddle Doo]]
| |
| *[[Noddy]]
| |
| *[[Blade Knight]]
| |
| *[[Twister]]
| |
| *[[Starman]]
| |
| *[[Whippy]]
| |
| {{col-end}}
| |
| |
| |
| {{col-begin|width=50%}}
| |
| *[[King Doo]]
| |
| {{col-end}}
| |
| |- | | |- |
| ! colspan="2" width="404px"| '''Abilities'''
| | |{{center|[[File:KRtDLD Raisin Ruins Stage 5 select screenshot.png|200px]]<br>'''[[Raisin Ruins - Stage 5|Stage 5]]'''}} |
| |- bgcolor="#E47575"
| | |[[Lor Starcutter|Right Wing]] |
| | colspan="2" |
| | |{{N}} |
| {{col-begin}}
| | |[[Mr. Dooter]] |
| {{col-break|width=50%}} | |
| *[[Parasol]]
| |
| *[[Stone]]
| |
| *[[Beam]]
| |
| *[[Sword]]
| |
| *[[Tornado]]
| |
| {{col-break|width=50%}} | |
| *[[Hi-Jump]]
| |
| *[[Cutter]]
| |
| *[[Fighter]]
| |
| *[[Whip]]
| |
| *[[Sleep]]
| |
| {{col-end}}
| |
| |} | | |} |
|
| |
|
| ===Stage 4=== | | == Trivia == |
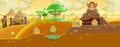
| The fourth stage starts out with a Key, and a Scarfy guarding it. Kirby must quickly move up a staircase with horizontally moving stairs, avoiding the Scarfy, in order to unlock a gate at the top of the staircase. Once Kirby unlocks the door, he will encounter a [[Poppy Bros. Jr]], and can proceed to the door leading to the next section of the stage. | | *The mobile North American website for ''Kirby's Return to Dream Land'' erroneously uses a screenshot from the lobby of [[Cookie Country]] to represent Raisin Ruins.<ref name="mobile site"></ref> |
|
| |
|
| The door leads an underground structure. Kirby must traverse over a spiked moat, then reach an reverse treadmilling area with [[Waddle Dee]]s and a [[Sir Kibble]]. After a short platform, Kirby must traverse through another reverse treadmilling platform, this one with [[Shotzo]]es. After this platform is a set of stone blocks blocking the pit leading to a side door. Kirby may use the [[Bomb]] ability obtained from a Poppy Bros. Jr. on the treadmill area and use it to break the blocks and get into the side door. Within the side door, there is a switch that will open the door to an [[Energy Sphere]], however, the switch does not turn on for long, so Kirby must drop a bomb next to the switch and reach the gate, guarded by a Kabu when the bomb explodes hitting the switch, in order to obtain the first [[Energy Sphere]] of the stage. After returning to the main path, Kirby will reach two ''forward''-treadmilling treadmill, guarded by [[Gordo]]s and Scarfies. At the end of the second treadmill is the door to the next section.
| | == Gallery == |
| | <gallery> |
| | KRtDL Raisin Ruins map screenshot.png|Raisin Ruins on the World Map in ''Kirby's Return to Dream Land'' |
| | KRtDL Raisin Ruins lobby screenshot.png|A section of the Raisin Ruins level hub in ''Kirby's Return to Dream Land'' |
| | KRTDL-map-A-2-0.jpg|Full view of the level hub in ''Kirby's Return to Dream Land'' |
| | </gallery> |
|
| |
|
| The third section of the stage is in the dark, after going down a ladder and across some distance, Kirby will find a Candle. Kirby must traverse through the rather bumpy path, which sometimes splits into a top and bottom, with some enemies. As Kirby proceeds across the course, there will be a section where the course divides two times, the first with the bottom being a dud area, and the second the top being the dud area, then an area infested with Gordos. An Energy Sphere will be visible soon, and Kirby must go around and left, then up (breaking blocks with the candle) to reach the second Energy Sphere of the stage. Kirby may then proceed forward, where he will find a [[Puppet Waddle Dee]] guarding the entrance to the door to the next section.
| | {{clear}} |
|
| |
|
| The next section has light again, starting with a long ladder downward. After traversing over some fire blocks, there will be a [[Cutter]] and a [[Beam]] [[Copy Pedestal]], with some food. This will lead to the [[Water Galboros]] (essentially a large [[Water Galbo]]) mid-boss battle, that, when defeated, will yield Kirby the [[Water]] ability. Using the Water ability enables Kirby to neutrali{{s}}e fiery blocks, and will give Kirby access to some food, and a 1UP after Kirby hits a bomb block. After a rather straightforward path, Kirby can get to the door to the next section of the stage.
| | ==Names in other languages== |
| | |
| The fifth section of the stage is rather dangerous, since there are [[Gigatzo]]es in the background firing fireballs that rain down on Kirby. Kirby must pass through this area, avoiding obstacles as well as several enemies. Some areas have platforms that Kirby can hide under, sometimes with stars or food, however Kirby must be careful of the [[Babut]]s that appear around the stage. Soon after, Kirby can find an Invisibility Crystal that can allow Kirby to pass through an area with Babuts and [[Mumbies]] quickly, which allows Kirby to enter a small chamber with food, and another chamber with a side door. In the side door, Kirby must use his Invisibility Crystal to pass through a barrier and Babuts to get to the third Energy Sphere of the stage. After Kirby returns to the main path, Kirby will have to up a staircase to the door to the next section of the stage.
| |
| | |
| The sixth section is relatively above ground, where Kirby will find a [[Sword]] Copy Pedestal , where Kirby can use it to cut ropes to access some Stars as well as drop Shotzoes so they are not a danger. Kirby has to go down a large staircase where he will encounter a [[Super Blade Knight]], which will yield Kirby the [[Ultra Sword]] Super Ability, where Kirby can traverse through a downward stage by cutting out ropes, obstacles, and enemies. After cutting some ropes, Kirby will have to get rid of some Kabu-faced blocks, and yet more ropes an enemies until the last set of two ropes, where an interdimensional rift will open.
| |
| | |
| The alternate dimension in this stage is leftward scrolling. The path on this alternate dimension is more sloped and stair-heavy in a zig-zag formation, and Kirby will deal with several Shotzoes in this area by removing the blocks where the Shotzoes (and later a Gigatzo) sit on. The end of the scrolling course ends in a large downward fall then right to the door to the next section of the alternate dimension, where the [[Sphere Doomer]] battle will be fought. Before Kirby fights the Sphere Doomer, he has a choice between [[Cutter]] and [[Sword]] Copy Pedestals. The Sphere Doomer is played on a stage where two sections are only existent as breakable blocks, so Kirby must be careful not to fall into the pits should these blocks be broken.
| |
| | |
| After the Sphere Doomer battle is completed, Kirby may go back on the main path, and go on a staircase downward to the stage completion door.
| |
| | |
| ====Enemies, Mid-bosses, and Abilities====
| |
| {| style="border: 3px solid #E47575; {{round}};background: #F69D99" cellspacing="2"
| |
| ! width="420px" | '''Regular Enemies'''
| |
| ! width="180px" | '''Mid-Bosses'''
| |
| |- bgcolor="E47575"
| |
| |
| |
| {{col-begin}}
| |
| {{col-break|width=33%}}
| |
| *[[Scarfy]]
| |
| *[[Poppy Bros. Jr]]
| |
| *[[Waddle Dee]]
| |
| *[[Broom Hatter]]
| |
| *[[Shotzo]]
| |
| *[[Kabu]]
| |
| *[[Gordo]]
| |
| {{col-break|width=33%}}
| |
| *[[Puppet Waddle Dee]]
| |
| *[[Gigatzo]]
| |
| *[[Babut]]
| |
| *[[Mumbies]]
| |
| *[[Sir Kibble]]
| |
| *[[Flamer]]
| |
| *[[Noddy]]
| |
| {{col-break|width=34%}}
| |
| *[[Tick]]
| |
| *[[Whippy]]
| |
| *[[Water Galbo]]
| |
| *[[Hot Head]]
| |
| *[[Super Blade Knight]]
| |
| {{col-end}}
| |
| |
| |
| {{col-begin|width=50%}}
| |
| *[[Water Galboros]]
| |
| *[[Sphere Doomer]] (Fire)
| |
| {{col-end}}
| |
| |-
| |
| ! width="420px"| '''Abilities'''
| |
| ! width="180px" | '''Super Ability'''
| |
| |- bgcolor="#E47575"
| |
| |
| |
| {{col-begin}}
| |
| {{col-break|width=50%}}
| |
| *[[Cutter]]
| |
| *[[Fire]]
| |
| *[[Needle]]
| |
| *[[Bomb]]
| |
| *[[Whip]]
| |
| {{col-break|width=50%}}
| |
| *[[Beam]]
| |
| *[[Water]]
| |
| *[[Sword]]
| |
| *[[Sleep]]
| |
| {{col-end}}
| |
| |
| |
| {{col-begin}}
| |
| *[[Ultra Sword]]
| |
| {{col-end}}
| |
| |}
| |
| | |
| ===Stage 5 (Boss: [[Mr. Dooter]])===
| |
| | |
| ==Names in Other Languages== | |
| {{Names | | {{Names |
| |ja=レーズンルインズ | | |ja=レーズンルインズ |
| |jaR=Rēzun Ruinzu | | |jaR=Rēzun Ruinzu |
| |jaM=Raisin Ruins | | |jaM=Raisin Ruins |
| | |esA=Oasis Orégano |
| | |esAM=Oregano Oasis |
| | |esE=Ruinas Remolacha |
| | |esEM=Beetroot Ruins |
| | |frA=Arène aride |
| | |frAM=Arid arena |
| | |frE=Arène Aride |
| | |frEM=Arid Arena |
| |de=Rosinen-Ruinen | | |de=Rosinen-Ruinen |
| |deM=Raisin-Ruins}} | | |deM=Raisin-Ruins |
| <br clear=all> | | |it=Deserto Dattero |
| {{KirbyRtDL}} | | |itM=Date Desert |
| | |ko=건포도 유적지 |
| | |koR=Geonpodo Yujeokji |
| | |koM=Raisin Historic Site<br><small>In the Korean version of ''Kirby's Return to Dream Land'' and its remake, the name is written in English as "Raisin Ruins".</small> |
| | |pt=Oásis Oliva |
| | |ptM=Olive Oasis |
| | |zhTrad=熱浪如火 |
| | |zhTradR=rè làng rú huǒ |
| | |zhSimp=热浪如火 |
| | |zhSimpR=rè làng rú huǒ |
| | |zhM=Fiery heat wave<br><small>In the Chinese versions of ''Kirby's Return to Dream Land Deluxe'', the name is written in English as "Raisin Ruins".</small> |
| | |nl=Oliebolopgraving |
| | |nlM=Doughnut excavation |
| | }} |
| | |
| | {{clear}} |
| | {{ref}} |
| | |
| | {{Navbox-KRtDL/KRtDLD}} |
| | [[Category:Popstar locations]] |