Please remember that WiKirby contains spoilers, which you read at your own risk! See our general disclaimer for details.

Rainbow Route: Difference between revisions

From WiKirby, your independent source of Kirby knowledge.
Jump to navigationJump to search
m (Text replacement - "\|theme title=\[\[(.*)\]\]" to "|theme title="$1"")
 
(50 intermediate revisions by 10 users not shown)
Line 1: Line 1:
{{construction}}
{{Infobox-K&tAMLevel
[[File:KatAM S RainbowRoute1.PNG|thumb|The center of the '''Rainbow Route'''.]]
|image= [[File:KatAM S RainbowRoute1.png]]
'''Rainbow Route''' is a location found in and around the {{center}} of the [[Mirror World]], a dimension that lies parallel to [[Dream Land]]. It is mostly composed of an overgrown forest path that leads around the world in a circle. While mostly located in a forest, the Rainbow Route also features caves, tunnels, and mountain trails. At certain points, the path branches and connects to the many other locations of the Mirror World. In the {{center}} of the Rainbow Route there lies a giant rainbow from which a sanctuary-like building can be accessed. This building, which seems to be located in the sky since it is surrounded by clouds, serves as the resting place of an important mirror. During the [[Kirby (series)|''Kirby'' series]], Kirby visits this place only in one game, namely ''[[Kirby and the Amazing Mirror]]''.
|caption= The [[Rainbow Route - Central Circle|Central Circle]] in the middle of '''Rainbow Route'''.
|level= 1
|rooms= 51
|goal= 3
|connect= [[Moonlight Mansion]] <br> [[Cabbage Cavern]] <br> [[Mustard Mountain]] <br> [[Carrot Castle]]
|mid-boss= [[Batafire]] <br> [[Box Boxer]] <br> [[Master Hand]]
|boss= None
|theme music=[[File:KaTAM Forest & Nature Area Sample.mp3]]
|theme title="[[Forest/Nature Area]]"
|description=Clip of the "Forest/Nature Area" theme from ''[[Kirby & The Amazing Mirror]]''
|prev=
|next=[[Moonlight Mansion]]
}}
'''Rainbow Route''' is a location found in and around the center of the [[Mirror World]], a dimension that lies parallel to [[Dream Land]]. It is mostly composed of an overgrown forest path that leads around the land in a circle. While mostly located in a forest, Rainbow Route also features caves, tunnels, and mountain trails. At certain points, the path branches and connects to the many other locations of the Mirror World, making Rainbow Route the main hub from which most other areas are reached. In the center of the Rainbow Route there lies a giant rainbow from which a [[Rainbow Route - Central Circle|sanctuary-like building]] can be accessed. This building, which seems to be located in the sky since it is surrounded by clouds, serves as the resting place of [[Dimension Mirror|an important mirror]]. During the [[Kirby (series)|''Kirby'' series]], [[Kirby]] visits this place only in one game, namely ''[[Kirby & The Amazing Mirror]]''.


==General Description==
Kirby travels through the Rainbow Route while attempting to save the Mirror World from [[Dark Mind]] during ''Kirby and the Amazing Mirror''. When he first arrives at the world's sanctuary after pursuing the foe who split him into four, he witnesses a fight between [[Meta Knight]] and his counterpart [[Dark Meta Knight]], the latter being responsible for Kirby's split. Dark Meta Knight then manages to trap Meta Knight inside the mirror and breaks it into eight shards, which he spreads over the whole world.
Kirby travels through the Rainbow Route while attempting to save the Mirror World from [[Dark Mind]] during ''Kirby & The Amazing Mirror''. When he first arrives at the Central Circle after pursuing the foe who split him into four, he witnesses a fight between [[Meta Knight]] and his counterpart [[Dark Meta Knight]], the latter being responsible for Kirby's split. Dark Meta Knight then manages to trap Meta Knight inside the mirror and breaks it into eight shards, which he spreads over the whole world.


After that the Rainbow Route serves as the game's hub, connecting to all the areas Kirby needs to explore. Hidden throughout the different areas are several big switches which activate gateways between the areas and Rainbow Route's sanctuary. Kirby can use these gateways as shortcuts to travel faster through the Mirror World. After collecting all of the eight [[Mirror Shard]]s, the mirror in the {{center}} of the world becomes the passage leading to the final boss. After Kirby defeats Dark Mind, this is also the place where Meta Knight leaves [[Master|his sword]] behind.  
After that the Rainbow Route serves as the game's hub, connecting to all the areas Kirby needs to explore. Hidden throughout the different areas are several [[Big Switch]]es which activate [[Mirror Door]]s between the areas and the Central Circle. Kirby can use these gateways as shortcuts to travel faster through the Mirror World by jumping from hub to hub. After collecting all eight [[Mirror Shard]]s, the Dimension Mirror in the center of the world becomes the passage leading to [[Dark Mind|the final boss]]. After Kirby defeats this foe, Meta Knight leaves [[Master|his sword]] behind in front of the mirror, which Kirby can use from then on.  


From all nine areas found in ''Kirby and the Amazing Mirror'', Rainbow Route is the only one that features Mid Bosses, but no Bosses and therefore no Mirror Shards. It is also one of the two levels to be not named after a certain kind of food, the other one being [[Moonlight Mansion]].
From all nine areas found in ''Kirby & The Amazing Mirror'', Rainbow Route is the only one that features [[Mid-Boss]]es, but no [[Boss]]es and therefore no Mirror Shards. It is also one of the two levels to be not named after a certain kind of food, the other one being [[Moonlight Mansion]].


===Enemies, Bosses, and Abilities on Rainbow Route===
===Enemies and Mid-Bosses in Rainbow Route===
{| border=1
{| width=60%
!width="90%"|'''Regular Enemies on Rainbow Route'''
|<tabs>
!width="10%"|'''Mid-Bosses on Rainbow Route'''
<tab name="Enemies">
{| class="wikitable"
!Image
!Name
!style="border-style: solid; border-width: 1px 3px 1px 1px"|Copy Ability
!Image
!Name
!style="border-style: solid; border-width: 1px 3px 1px 1px"|Copy Ability
!Image
!Name
!style="border-style: solid; border-width: 1px 3px 1px 1px"|Copy Ability
!Image
!Name
!style="border-style: solid; border-width: 1px 3px 1px 1px"|Copy Ability
!Image
!Name
!Copy Ability
|-
|-
|
|align=center|[[File:KaTAM Bang Bang.png]]
{{col-begin}}
|[[Bang-Bang]]
{{col-break|width=20%}}
|style="border-style: solid; border-width: 1px 3px 1px 1px" align=center|[[Missile]]
*[[Bang-Bang]]
|align=center|[[File:KaTAM Cookin.png]]
*[[Batty]]
|[[Cookin]]
*[[Big Rocky]]
|style="border-style: solid; border-width: 1px 3px 1px 1px" align=center|[[Cook]]
*[[Big Waddle Dee]]
|align=center|[[File:KatAMHeavyKnight.png]]
*[[Blipper]]
|[[Heavy Knight]]
*[[Blockin]]
|style="border-style: solid; border-width: 1px 3px 1px 1px" align=center|[[Sword]]
*[[Bomber]]
|align=center|[[File:KatAMPrank.png]]
*[[Boxin]]
|[[Prank]]
{{col-break|width=20%}}
|style="border-style: solid; border-width: 1px 3px 1px 1px" align=center|None
*[[Bronto Burt]]
|align=center|[[File:KatAM Snooter.png]]
*[[Chip]]
|[[Snooter]]
*[[Cookin]]
|align=center|None
*[[Cupie]]
*[[Droppy]]
*[[Flamer]]
*[[Foley]]
*[[Golem]]
{{col-break|width=20%}}
*[[Gordo]]
*[[Heavy Knight]]
*[[Hot Head]]
*[[Laser Ball]]
*[[Leap]]
*[[Metal Guardian]]
*[[Mirra]]
*[[Noddy]]
{{col-break|width=20%}}
*[[Rocky]]
*[[Roly-Poly]]
*[[Shooty]]
*[[Shotzo]]
*[[Sir Kibble]]
*[[Snooter]]
*[[Soarar]]
*[[Sparky]]
{{col-break|width=20%}}
*[[Sword Knight]]
*[[Twister]]
*[[Waddle Dee]]
*[[Waddle Doo]]
*[[Wheelie]]
{{col-end}}
|
{{col-begin}}
*[[Batafire]]
*[[Box Boxer]]
*[[Master Hand]]
{{col-end}}
|}
 
{| border=1
!width="400px"|'''Abilities on Rainbow Route'''
|-
|-
|
|align=center|[[File:KaTAM Batty.png]]
{{col-begin}}
|[[Batty]]
{{col-break|width=33%}}
|style="border-style: solid; border-width: 1px 3px 1px 1px" align=center|None
*[[Beam]]
|align=center|[[File:KatAMCupie.png]]
*[[Bomb]]
|[[Cupie]]
*[[Burning]]
|style="border-style: solid; border-width: 1px 3px 1px 1px" align=center|[[Cupid]]
*[[Cook]]
|align=center|[[File:KNiDL Hot Head sprite.png]]
*[[Crash]]
|[[Hot Head]]
*[[Cupid]]
|style="border-style: solid; border-width: 1px 3px 1px 1px" align=center|[[Fire]]
*[[Cutter]]
|align=center|[[File:KNiDL Rocky sprite.png]]
{{col-break|width=33%}}
|[[Rocky]]
*[[Fighter]]
|style="border-style: solid; border-width: 1px 3px 1px 1px" align=center|[[Stone]]
*[[Fire]]
|align=center|[[File:KatAMSoarar.png]]
*[[Laser]]
|[[Soarar]]
*[[Missile]]
|align=center|None
*[[Parasol (ability)|Parasol]]
*[[Sleep]]
*[[Smash]]
{{col-break|width=33%}}
*[[Spark]]
*[[Stone]]
*[[Sword]]
*[[Tornado]]
*[[Wheel]]
{{col-end}}
|}
 
==Map==
{{construction}}
{{AMRRNavMap}}
Rainbow Route is one of the largest areas in the game, consisting of 51 separate rooms. It also bears the Grand Central Hub in the center, which, by the end of the game, links to all the other areas in the world. The area can be described as fairly circuitous, with a single primary path leading from the central zone to the surrounding areas.
 
Rainbow Route is bordered to the east by [[Moonlight Mansion]], to the south by [[Cabbage Cavern]], to the north-east by [[Mustard Mountain]], and to the west by [[Carrot Castle]]. Each border links to these areas by several routes, making access fairly straightforward.
 
Rainbow Route has three Goal rooms. Completing these rooms takes Kirby and his clones to the [[Goal Game]], then returns them to the Grand Central Hub. There is no Boss Room for this area.
 
==Full Synopsis==
{{spoilers}}
===Hub 3===
This hub connects from [[Rainbow_Route#Room_31|Room 31]] to the left and [[Rainbow_Route#Room_34|Room 34]] on the right. Once this room is reached, it also links back to the [[Rainbow_Route#Grand_Central_Hub|Grand Central Hub]]. Additionally, once the appropriate hub is reached, this room also links to [[Mustard Mountain]].
 
The [[Beam]] and [[Tornado]] abilities are available in this room on Copy Pedestals.
 
===Goal 3===
One door links to this area, from [[Rainbow_Route#Room_29|Room 29]] to the right. The right entrance is one-way, meaning that Kirby cannot return to Room 29 from this room.
 
This room consists of woody terrain. There are a few Flamers below the bomb blocks. If Kirby goes down a bit, he will see the three-star door with the Warp Star to initiate the [[Goal Game]]. If he goes all the way down, and to left, he will fight [[Box Boxer]].
====Enemies, Mid-Bosses, and Abilities====
{| style="border: 3px solid #E47575; {{round}};background: #F69D99" cellspacing="2"
! width="267px" | '''Regular Enemies'''
! width="133px" | '''Mid-Bosses'''
|- bgcolor="E47575"
|
{{col-begin}}
{{col-break|width=50%}}
*[[Flamer]]
{{col-break|width=50%}}
{{col-end}}
|
{{col-begin}}
*[[Box Boxer]]
{{col-end}}
|-
|-
! colspan="2" width="404px"| '''Abilities'''
|align=center|[[File:KaTAM Big Waddle Dee Sprite.png]]
|- bgcolor="#E47575"
|[[Big Waddle Dee]]
| colspan="2" |
|style="border-style: solid; border-width: 1px 3px 1px 1px" align=center|None
{{col-begin}}
|align=center|[[File:KaTAM Droppy.png]]
{{col-break|width=50%}}
|[[Droppy]]
*[[Burning]]
|style="border-style: solid; border-width: 1px 3px 1px 1px" align=center|None (default)
{{col-break|width=50%}}
|align=center|[[File:KNiDL Laser Ball sprite.png]]
*[[Fighter]]
|[[Laser Ball]]
{{col-end}}
|style="border-style: solid; border-width: 1px 3px 1px 1px" align=center|[[Laser]]
|}
|align=center|[[File:KatAMRolyPoly.png]]
 
|[[Roly-Poly]]
===Room 29===
|style="border-style: solid; border-width: 1px 3px 1px 1px" align=center|None
Two doors link to this area; [[Rainbow_Route#Goal_3|Goal 3]] to the left and [[Rainbow_Route#Room_28|Room 28]] from the right. The right entrance is one-way, meaning that Kirby cannot return directly to Room 28 from this room.
|align=center|[[File:KNiDL Sparky sprite.png]]
 
|[[Sparky]]
This level is linear, with Twisters, Waddle Doos, and a Sword Knight boxed in bomb blocks, along with food. A battery is not boxed in. The Twisters can leave the boxes. None of the bomb blocks block off any area when hit. The door at the end of the room leads to Goal room 3.
|align=center|[[Spark]]
 
====Enemies, Mid-Bosses, and Abilities====
{| style="border: 3px solid #E47575; {{round}};background: #F69D99" cellspacing="2"
! width="267px" | '''Regular Enemies'''
! width="133px" | '''Mid-Bosses'''
|- bgcolor="E47575"
|
{{col-begin}}
{{col-break|width=50%}}
*[[Twister]]
*[[Waddle Dee]]
{{col-break|width=50%}}
*[[Sword Knight]]
*[[Waddle Doo]]
{{col-end}}
|
{{col-begin}}
*None
{{col-end}}
|-
|-
! colspan="2" width="404px"| '''Abilities'''
|align=center|[[File:KNiDL Blipper sprite.png]]
|- bgcolor="#E47575"
|[[Blipper]]
| colspan="2" |
|style="border-style: solid; border-width: 1px 3px 1px 1px" align=center|None
{{col-begin}}
|align=center|[[File:KNiDL Flamer sprite.png]]
{{col-break|width=50%}}
|[[Flamer]]
*[[Beam]]
|style="border-style: solid; border-width: 1px 3px 1px 1px" align=center|[[Burning]]
*[[Sword]]
|align=center|[[File:KaTAM Leap.png]]
{{col-break|width=50%}}
|[[Leap]]
*[[Tornado]]
|style="border-style: solid; border-width: 1px 3px 1px 1px" align=center|None
{{col-end}}
|align=center|[[File:KNiDL Scarfy sprite.png]]
|}
|[[Scarfy]]
 
|style="border-style: solid; border-width: 1px 3px 1px 1px" align=center|N/A
===Room 30===
|align=center|[[File:KNiDL Sword Knight sprite.png]]
Two doors link to this area; [[Rainbow_Route#Room_27|Room 27]] from the left and [[Rainbow_Route#Room_31|Room 31]] to the right.
|[[Sword Knight]]
 
|align=center|[[Sword]]
To the left of the door are a series of bottomless pits, separated by small pieces of land, with small platforms above them. Some of the platforms are ground, some are star blocks. At the far left is a two way door to room 27. The room has a mountain and forest appearance.
 
====Enemies, Mid-Bosses, and Abilities====
{| style="border: 3px solid #E47575; {{round}};background: #F69D99" cellspacing="2"
! width="267px" | '''Regular Enemies'''
! width="133px" | '''Mid-Bosses'''
|- bgcolor="E47575"
|
{{col-begin}}
{{col-break|width=50%}}
*[[Chip]]
*[[Foley]]
*[[Scarfy]]
{{col-break|width=50%}}
*[[Bronto Burt]]
*[[Snooter]]
{{col-end}}
|
{{col-begin}}
*None
{{col-end}}
|-
|-
! colspan="2" width="404px"| '''Abilities'''
|align=center|[[File:KatAMBlockin.png]]
|- bgcolor="#E47575"
|[[Blockin]]
| colspan="2" |
|style="border-style: solid; border-width: 1px 3px 1px 1px" align=center|N/A
{{col-begin}}
|align=center|[[File:KatAMFoley.png]]
*[[Bomb]]
|[[Foley]]
{{col-end}}
|style="border-style: solid; border-width: 1px 3px 1px 1px" align=center|[[Bomb]]
|}
|align=center|[[File:KatAMMetalGuardian.png]]
 
|[[Metal Guardian]]
===Room 31===
|style="border-style: solid; border-width: 1px 3px 1px 1px" align=center|[[Laser]]
Two doors link to this area; [[Rainbow_Route#Room_30|Room 30]] from the left and [[Rainbow_Route#Hub_3|Hub 3]] to the right. Additionally, a cannon from [[Rainbow_Route#Room_32|Room 32]] will blast Kirby into this room.
|align=center|[[File:KatAMShadowKirby.png]]
 
|[[Shadow Kirby]]
Entering from Hub room 3, Kirby begins inside of a mountain. Hit the bomb block to open the large wall, then continue along to the left. The lower path ends in a tomato, and the upper path allows access to the outside of the mountain. Also along the upper path is a treasure chest which cannot be reached when entering from the cannon in room 32, due to the bomb blocks at the entrance to the mountain blocking the chest when destroyed. The area outside the mountain is where Kirby begins when entering this room by cannon. At the far left of the room, there is a two way door to Room 30.
|style="border-style: solid; border-width: 1px 3px 1px 1px" align=center|None
 
|align=center|[[File:KNiDL Twister sprite.png]]
====Enemies, Mid-Bosses, and Abilities====
|[[Twister]]
{| style="border: 3px solid #E47575; {{round}};background: #F69D99" cellspacing="2"
|align=center|[[Tornado]]
! width="267px" | '''Regular Enemies'''
! width="133px" | '''Mid-Bosses'''
|- bgcolor="E47575"
|
{{col-begin}}
{{col-break|width=50%}}
*[[Bronto Burt]]
*[[Hot Head]]
{{col-break|width=50%}}
*[[Waddle Dee]]
{{col-end}}
|
{{col-begin}}
*None
{{col-end}}
|-
|-
! colspan="2" width="404px"| '''Abilities'''
|align=center|[[File:KNiDL Bomber sprite.png]]
|- bgcolor="#E47575"
|[[Bomber]]
| colspan="2" |
|style="border-style: solid; border-width: 1px 3px 1px 1px" align=center|[[Crash]]
{{col-begin}}
|align=center|[[File:KatAMGiantRocky.png]]
*[[Fire]]
|[[Giant Rocky]]
{{col-end}}
|style="border-style: solid; border-width: 1px 3px 1px 1px" align=center|[[Stone]]
|}
|align=center|[[File:KatAMMirra.png]]
 
|[[Mirra]]
===Room 32===
|style="border-style: solid; border-width: 1px 3px 1px 1px" align=center|N/A
Two doors link to this area; [[Rainbow_Route#Room_31|Room 31]] from above and [[Rainbow_Route#Room_33|Room 33]] below. The lower-right entrance is one-way, meaning that Kirby cannot return directly to Room 33 from this room.
|align=center|[[File:KatAMShooty.png]]
 
|[[Shooty]]
The cave themed room begins in a small bottom area with a ladder leading to the next level. A [[Boxin]] and [[Bronto Burt]] are in this section. The next level has a floor almost covered in spikes, and above are star blocks arranged in a checkerboard pattern. Trapped in the star blocks are a [[Waddle Doo]] and two [[Sparky]]s. Their abilities are little more than a distraction, however, because at the uppermost level is a cannon with a Hot Head next to it. To use the cannon, Kirby will need to obtain the [[Fire]] ability to light the fuse to proceed to Room 31.
|style="border-style: solid; border-width: 1px 3px 1px 1px" align=center|None
 
|align=center|[[File:KNiDL Waddle Dee sprite.png]]
====Enemies, Mid-Bosses, and Abilities====
|[[Waddle Dee]]
{| style="border: 3px solid #E47575; {{round}};background: #F69D99" cellspacing="2"
|align=center|None
! width="267px" | '''Regular Enemies'''
! width="133px" | '''Mid-Bosses'''
|- bgcolor="E47575"
|
{{col-begin}}
{{col-break|width=50%}}
*[[Bronto Burt]]
*[[Hot Head]]
*[[Sparky]]
{{col-break|width=50%}}
*[[Boxin]]
*[[Waddle Doo]]
{{col-end}}
|
{{col-begin}}
*None
{{col-end}}
|-
|-
! colspan="2" width="404px"| '''Abilities'''
|align=center|[[File:KatAMBoxin.png]]
|- bgcolor="#E47575"
|[[Boxin]]
| colspan="2" |
|style="border-style: solid; border-width: 1px 3px 1px 1px" align=center|[[Fighter]]
{{col-begin}}
|align=center|[[File:KatAMGolemBrown.png]][[File:KatAMGolemYellow.png]]
{{col-break|width=50%}}
|[[Golem]]
*[[Beam]]
|style="border-style: solid; border-width: 1px 3px 1px 1px" align=center|[[Stone]], [[Wheel]]
*[[Fighter]]
|align=center|[[File:KNiDL Noddy sprite.png]]
{{col-break|width=50%}}
|[[Noddy]]
*[[Fire]]
|style="border-style: solid; border-width: 1px 3px 1px 1px" align=center|[[Sleep]]
*[[Spark]]
|align=center|[[File:KNiDL Shotzo sprite.png]]
{{col-end}}
|[[Shotzo]]
|}
|style="border-style: solid; border-width: 1px 3px 1px 1px" align=center|N/A
 
|align=center|[[File:KNiDL Waddle Doo sprite.png]]
===Room 33===
|[[Waddle Doo]]
Two doors link to this area; [[Rainbow_Route#Room_32|Room 32]] from above and [[Rainbow_Route#Room_14|Room 14]] to the lower-right. The lower-right entrance is one-way, meaning that Kirby cannot return directly to Room 14 from this room.
|align=center|[[Beam]]
 
This room is a cave area with a sideways U-shaped layout. The right side of the room, where Kirby enters from 14, begins with a passage that includes Chips and Soarars. There is a battery on the lower left of the room, and above, there are two Twisters trapped in blocks, allowing Kirby to get the Tornado ability. Now on the upper level of the room, to the right are two pits of spikes with Scarfies and a Cupie, and another Soarar. A battery and a [[Food|ham]] lie beyond a wall after the spike pits (the ham behind star blocks). The door at the upper right of the level is one way to room 32.
 
====Enemies, Mid-Bosses, and Abilities====
{| style="border: 3px solid #E47575; {{round}};background: #F69D99" cellspacing="2"
! width="267px" | '''Regular Enemies'''
! width="133px" | '''Mid-Bosses'''
|- bgcolor="E47575"
|
{{col-begin}}
{{col-break|width=50%}}
*[[Cupie]]
*[[Scarfy]]
*[[Soarar]]
{{col-break|width=50%}}
*[[Chip]]
*[[Twister]]
{{col-end}}
|
{{col-begin}}
*None
{{col-end}}
|-
|-
! colspan="2" width="404px"| '''Abilities'''
|align=center|[[File:KNiDL Bronto Burt sprite.png]]
|- bgcolor="#E47575"
|[[Bronto Burt]]
| colspan="2" |
|style="border-style: solid; border-width: 1px 3px 1px 1px" align=center|None
{{col-begin}}
|align=center|[[File:KNiDL Gordo sprite.png]]
{{col-break|width=50%}}
|[[Gordo]]
*[[Cupid]]
|style="border-style: solid; border-width: 1px 3px 1px 1px" align=center|N/A
{{col-break|width=50%}}
|align=center|[[File:KNiDL Parasol enemy sprite.png]]
*[[Tornado]]
|[[Parasol (enemy)|Parasol]]
{{col-end}}
|style="border-style: solid; border-width: 1px 3px 1px 1px" align=center|[[Parasol]]
|}
|align=center|[[File:KNiDL Sir Kibble sprite.png]]
 
|[[Sir Kibble]]
===Room 34===
|style="border-style: solid; border-width: 1px 3px 1px 1px" align=center|[[Cutter]]
====Enemies, Mid-Bosses, and Abilities====
|align=center|[[File:KNiDL Wheelie sprite.png]]
{| style="border: 3px solid #E47575; {{round}};background: #F69D99" cellspacing="2"
|[[Wheelie]]
! width="267px" | '''Regular Enemies'''
|align=center|[[Wheel]]
! width="133px" | '''Mid-Bosses'''
|- bgcolor="E47575"
|
{{col-begin}}
{{col-break|width=50%}}
*None.
{{col-break|width=50%}}
*None.
{{col-end}}
|
{{col-begin}}
*None.
{{col-end}}
|-
|-
! colspan="2" width="404px"| '''Abilities'''
|align=center|[[File:KatAMChip.png]]
|- bgcolor="#E47575"
|[[Chip]]
| colspan="2" |
|style="border-style: solid; border-width: 1px 3px 1px 1px" align=center|None
{{col-begin}}
|align=center|[[File:KatAMHaley.png]]
{{col-break|width=50%}}
|[[Haley]]
*None.
|style="border-style: solid; border-width: 1px 3px 1px 1px" align=center|None
{{col-break|width=50%}}
!colspan=9|
*None.
{{col-end}}
|}
|}
 
</tab>
===Room 35===
<tab name="Mid-Bosses">
====Enemies, Mid-Bosses, and Abilities====
{| class="wikitable"
{| style="border: 3px solid #E47575; {{round}};background: #F69D99" cellspacing="2"
!Sprite
! width="267px" | '''Regular Enemies'''
!Name
! width="133px" | '''Mid-Bosses'''
!Copy Ability
|- bgcolor="E47575"
|
{{col-begin}}
{{col-break|width=50%}}
*None.
{{col-break|width=50%}}
*None.
{{col-end}}
|
{{col-begin}}
*None.
{{col-end}}
|-
|-
! colspan="2" width="404px"| '''Abilities'''
|align=center|[[File:KatAMBatafire.png]]
|- bgcolor="#E47575"
|[[Batafire]]
| colspan="2" |
|[[Burning]]
{{col-begin}}
{{col-break|width=50%}}
*None.
{{col-break|width=50%}}
*None.
{{col-end}}
|}
 
===Room 36===
====Enemies, Mid-Bosses, and Abilities====
{| style="border: 3px solid #E47575; {{round}};background: #F69D99" cellspacing="2"
! width="267px" | '''Regular Enemies'''
! width="133px" | '''Mid-Bosses'''
|- bgcolor="E47575"
|
{{col-begin}}
{{col-break|width=50%}}
*None.
{{col-break|width=50%}}
*None.
{{col-end}}
|
{{col-begin}}
*None.
{{col-end}}
|-
|-
! colspan="2" width="404px"| '''Abilities'''
|align=center|[[File:KatAMBoxBoxer.png]]
|- bgcolor="#E47575"
|[[Box Boxer]]
| colspan="2" |
|[[Fighter]]
{{col-begin}}
{{col-break|width=50%}}
*None.
{{col-break|width=50%}}
*None.
{{col-end}}
|}
 
===Room 37===
====Enemies, Mid-Bosses, and Abilities====
{| style="border: 3px solid #E47575; {{round}};background: #F69D99" cellspacing="2"
! width="267px" | '''Regular Enemies'''
! width="133px" | '''Mid-Bosses'''
|- bgcolor="E47575"
|
{{col-begin}}
{{col-break|width=50%}}
*None.
{{col-break|width=50%}}
*None.
{{col-end}}
|
{{col-begin}}
*None.
{{col-end}}
|-
|-
! colspan="2" width="404px"| '''Abilities'''
|align=center|[[File:KatAMMasterHand.png]]
|- bgcolor="#E47575"
|[[Master Hand]]
| colspan="2" |
|[[Smash]]
{{col-begin}}
{{col-break|width=50%}}
*None.
{{col-break|width=50%}}
*None.
{{col-end}}
|}
|}
 
</tab>
===Room 38===
</tabs>
====Enemies, Mid-Bosses, and Abilities====
{| style="border: 3px solid #E47575; {{round}};background: #F69D99" cellspacing="2"
! width="267px" | '''Regular Enemies'''
! width="133px" | '''Mid-Bosses'''
|- bgcolor="E47575"
|
{{col-begin}}
{{col-break|width=50%}}
*None.
{{col-break|width=50%}}
*None.
{{col-end}}
|
{{col-begin}}
*None.
{{col-end}}
|-
! colspan="2" width="404px"| '''Abilities'''
|- bgcolor="#E47575"
| colspan="2" |
{{col-begin}}
{{col-break|width=50%}}
*None.
{{col-break|width=50%}}
*None.
{{col-end}}
|}
|}


===Room 39===
==Map==
====Enemies, Mid-Bosses, and Abilities====
{{Navmap-KaTAM-RRo}}
{| style="border: 3px solid #E47575; {{round}};background: #F69D99" cellspacing="2"
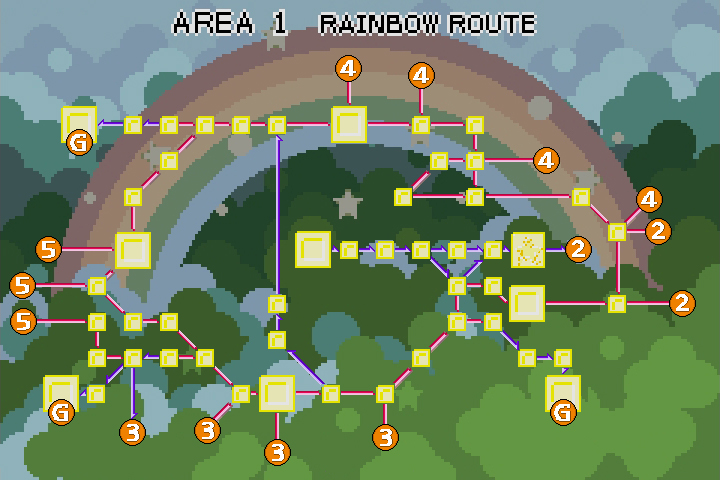
Rainbow Route is far and away the largest area in the game, consisting of 51 separate rooms. It also bears the Central Circle (appropriately) in the center, which, by the end of the game, links to all the other areas in the world. The area can be described as fairly circuitous, with a single primary path leading from the central zone to the surrounding areas.
! width="267px" | '''Regular Enemies'''
! width="133px" | '''Mid-Bosses'''
|- bgcolor="E47575"
|
{{col-begin}}
{{col-break|width=50%}}
*None.
{{col-break|width=50%}}
*None.
{{col-end}}
|
{{col-begin}}
*None.
{{col-end}}
|-
! colspan="2" width="404px"| '''Abilities'''
|- bgcolor="#E47575"
| colspan="2" |
{{col-begin}}
{{col-break|width=50%}}
*None.
{{col-break|width=50%}}
*None.
{{col-end}}
|}


===Room 40===
Rainbow Route is bordered to the east by [[Moonlight Mansion]], to the south by [[Cabbage Cavern]], to the north-east by [[Mustard Mountain]], and to the west by [[Carrot Castle]]. Each border links to these areas by several routes, making access fairly straightforward.
====Enemies, Mid-Bosses, and Abilities====
{| style="border: 3px solid #E47575; {{round}};background: #F69D99" cellspacing="2"
! width="267px" | '''Regular Enemies'''
! width="133px" | '''Mid-Bosses'''
|- bgcolor="E47575"
|
{{col-begin}}
{{col-break|width=50%}}
*None.
{{col-break|width=50%}}
*None.
{{col-end}}
|
{{col-begin}}
*None.
{{col-end}}
|-
! colspan="2" width="404px"| '''Abilities'''
|- bgcolor="#E47575"
| colspan="2" |
{{col-begin}}
{{col-break|width=50%}}
*None.
{{col-break|width=50%}}
*None.
{{col-end}}
|}


===Room 41===
Rainbow Route has three Goal rooms. Completing these rooms takes Kirby and his clones to the [[Goal Game]], then returns them to the [[Rainbow Route - Central Circle|Central Circle]]. There is no Boss Room for this area.
====Enemies, Mid-Bosses, and Abilities====
{| style="border: 3px solid #E47575; {{round}};background: #F69D99" cellspacing="2"
! width="267px" | '''Regular Enemies'''
! width="133px" | '''Mid-Bosses'''
|- bgcolor="E47575"
|
{{col-begin}}
{{col-break|width=50%}}
*None.
{{col-break|width=50%}}
*None.
{{col-end}}
|
{{col-begin}}
*None.
{{col-end}}
|-
! colspan="2" width="404px"| '''Abilities'''
|- bgcolor="#E47575"
| colspan="2" |
{{col-begin}}
{{col-break|width=50%}}
*None.
{{col-break|width=50%}}
*None.
{{col-end}}
|}


===Room 42===
For a full synopsis of what's in each room, click on any room on the map to head to the corresponding page.
====Enemies, Mid-Bosses, and Abilities====
{| style="border: 3px solid #E47575; {{round}};background: #F69D99" cellspacing="2"
! width="267px" | '''Regular Enemies'''
! width="133px" | '''Mid-Bosses'''
|- bgcolor="E47575"
|
{{col-begin}}
{{col-break|width=50%}}
*None.
{{col-break|width=50%}}
*None.
{{col-end}}
|
{{col-begin}}
*None.
{{col-end}}
|-
! colspan="2" width="404px"| '''Abilities'''
|- bgcolor="#E47575"
| colspan="2" |
{{col-begin}}
{{col-break|width=50%}}
*None.
{{col-break|width=50%}}
*None.
{{col-end}}
|}


==Gallery==
==Gallery==
<center>
{{center|
<gallery>
<gallery>
File:KatAM S RainbowRoute2.PNG|In the forest.
File:KatAM S RainbowRoute2.png|In the forest.
File:KatAM S RainbowRoute3.PNG|A grassy cave.
File:KatAM S RainbowRoute3.png|A grassy cave.
File:KatAM S RainbowRoute4.PNG|A mountain tunnel.
File:KatAM S RainbowRoute4.png|A mountain tunnel.
File:KatAM S RainbowRoute5.PNG|In the western pine woods.
File:KatAM S RainbowRoute5.png|In the western pine woods.
File:KatAM S RainbowRoute6.PNG|A small underground pond.
File:KatAM S RainbowRoute6.png|A small underground pond.
</gallery>
</gallery>
</center>
}}
<br clear=all>
 
==Names in other languages==
{{Names
|ja=レインボールート
|jaR=Reinbō Rūto
|jaM=Rainbow Route
|de=Regen-bogenroute
|deM=Rainbow Route
|es=Ruta Arco Iris
|esM=Rainbow Route
|fr=Route Arc-en-ciel
|frM=Rainbow Route
|it=Sentiero Arcobaleno
|itM=Rainbow Trail
}}
 
{{clear}}


{{AMNavmap}}
{{Navmap-KaTAM|coord1=70|coord2=112}}
{{KatAM}}
{{Navbox-KaTAM}}
[[Category:Places]]
[[Category:Mirror World locations]]
[[Category:Levels in Kirby & the Amazing Mirror]]

Latest revision as of 20:30, 19 January 2024

Rainbow Route
KatAM S RainbowRoute1.png
The Central Circle in the middle of Rainbow Route.
Details
Level Nr. 1
Room count 51
Goal Game count 3
Connected level(s) Moonlight Mansion
Cabbage Cavern
Mustard Mountain
Carrot Castle
Mid-Bosses Batafire
Box Boxer
Master Hand
Boss None
Theme music

Clip of the "Forest/Nature Area" theme from Kirby & The Amazing Mirror

Level progression
First level Moonlight Mansion
 This box: view  talk  edit 

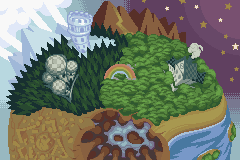
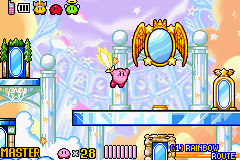
Rainbow Route is a location found in and around the center of the Mirror World, a dimension that lies parallel to Dream Land. It is mostly composed of an overgrown forest path that leads around the land in a circle. While mostly located in a forest, Rainbow Route also features caves, tunnels, and mountain trails. At certain points, the path branches and connects to the many other locations of the Mirror World, making Rainbow Route the main hub from which most other areas are reached. In the center of the Rainbow Route there lies a giant rainbow from which a sanctuary-like building can be accessed. This building, which seems to be located in the sky since it is surrounded by clouds, serves as the resting place of an important mirror. During the Kirby series, Kirby visits this place only in one game, namely Kirby & The Amazing Mirror.

General Description[edit]

Kirby travels through the Rainbow Route while attempting to save the Mirror World from Dark Mind during Kirby & The Amazing Mirror. When he first arrives at the Central Circle after pursuing the foe who split him into four, he witnesses a fight between Meta Knight and his counterpart Dark Meta Knight, the latter being responsible for Kirby's split. Dark Meta Knight then manages to trap Meta Knight inside the mirror and breaks it into eight shards, which he spreads over the whole world.

After that the Rainbow Route serves as the game's hub, connecting to all the areas Kirby needs to explore. Hidden throughout the different areas are several Big Switches which activate Mirror Doors between the areas and the Central Circle. Kirby can use these gateways as shortcuts to travel faster through the Mirror World by jumping from hub to hub. After collecting all eight Mirror Shards, the Dimension Mirror in the center of the world becomes the passage leading to the final boss. After Kirby defeats this foe, Meta Knight leaves his sword behind in front of the mirror, which Kirby can use from then on.

From all nine areas found in Kirby & The Amazing Mirror, Rainbow Route is the only one that features Mid-Bosses, but no Bosses and therefore no Mirror Shards. It is also one of the two levels to be not named after a certain kind of food, the other one being Moonlight Mansion.

Enemies and Mid-Bosses in Rainbow Route[edit]

Image Name Copy Ability Image Name Copy Ability Image Name Copy Ability Image Name Copy Ability Image Name Copy Ability
KaTAM Bang Bang.png Bang-Bang Missile KaTAM Cookin.png Cookin Cook KatAMHeavyKnight.png Heavy Knight Sword KatAMPrank.png Prank None KatAM Snooter.png Snooter None
KaTAM Batty.png Batty None KatAMCupie.png Cupie Cupid KNiDL Hot Head sprite.png Hot Head Fire KNiDL Rocky sprite.png Rocky Stone KatAMSoarar.png Soarar None
KaTAM Big Waddle Dee Sprite.png Big Waddle Dee None KaTAM Droppy.png Droppy None (default) KNiDL Laser Ball sprite.png Laser Ball Laser KatAMRolyPoly.png Roly-Poly None KNiDL Sparky sprite.png Sparky Spark
KNiDL Blipper sprite.png Blipper None KNiDL Flamer sprite.png Flamer Burning KaTAM Leap.png Leap None KNiDL Scarfy sprite.png Scarfy N/A KNiDL Sword Knight sprite.png Sword Knight Sword
KatAMBlockin.png Blockin N/A KatAMFoley.png Foley Bomb KatAMMetalGuardian.png Metal Guardian Laser KatAMShadowKirby.png Shadow Kirby None KNiDL Twister sprite.png Twister Tornado
KNiDL Bomber sprite.png Bomber Crash KatAMGiantRocky.png Giant Rocky Stone KatAMMirra.png Mirra N/A KatAMShooty.png Shooty None KNiDL Waddle Dee sprite.png Waddle Dee None
KatAMBoxin.png Boxin Fighter KatAMGolemBrown.pngKatAMGolemYellow.png Golem Stone, Wheel KNiDL Noddy sprite.png Noddy Sleep KNiDL Shotzo sprite.png Shotzo N/A KNiDL Waddle Doo sprite.png Waddle Doo Beam
KNiDL Bronto Burt sprite.png Bronto Burt None KNiDL Gordo sprite.png Gordo N/A KNiDL Parasol enemy sprite.png Parasol Parasol KNiDL Sir Kibble sprite.png Sir Kibble Cutter KNiDL Wheelie sprite.png Wheelie Wheel
KatAMChip.png Chip None KatAMHaley.png Haley None
Sprite Name Copy Ability
KatAMBatafire.png Batafire Burning
KatAMBoxBoxer.png Box Boxer Fighter
KatAMMasterHand.png Master Hand Smash

Map[edit]

Rainbow Route Area Map
Rainbow Route - Central CircleRainbow Route - Hub 1Rainbow Route - Hub 2Rainbow Route - Hub 3Rainbow Route - Hub 4Rainbow Route - Room 1Rainbow Route - Room 2Rainbow Route - Room 3Rainbow Route - Room 4Rainbow Route - Room 5Rainbow Route - Room 6Rainbow Route - Room 7Rainbow Route - Room 8Rainbow Route - Room 9Rainbow Route - Room 10Rainbow Route - Room 11Rainbow Route - Room 12Rainbow Route - Room 13Rainbow Route - Room 14Rainbow Route - Room 15Rainbow Route - Room 16Rainbow Route - Room 17Rainbow Route - Room 18Rainbow Route - Room 19Rainbow Route - Room 20Rainbow Route - Room 21Rainbow Route - Room 22Rainbow Route - Room 23Rainbow Route - Room 24Rainbow Route - Room 25Rainbow Route - Room 26Rainbow Route - Room 27Rainbow Route - Room 28Rainbow Route - Room 29Rainbow Route - Room 30Rainbow Route - Room 31Rainbow Route - Room 32Rainbow Route - Room 33Rainbow Route - Room 34Rainbow Route - Room 35Rainbow Route - Room 36Rainbow Route - Room 37Rainbow Route - Room 38Rainbow Route - Room 39Rainbow Route - Room 40Rainbow Route - Room 41Rainbow Route - Room 42Rainbow Route - WarpRainbow Route - Goal 1Rainbow Route - Goal 2Rainbow Route - Goal 3Moonlight Mansion - EntryMoonlight Mansion - Room 16Moonlight Mansion - Room 17Cabbage Cavern - Room 4Cabbage Cavern - Room 10Cabbage Cavern - Hub 2Cabbage Cavern - Room 11Mustard Mountain - HubMustard Mountain - Room 15Mustard Mountain - Room 1Mustard Mountain - Room 7Carrot Castle - Room 1Carrot Castle - Room 2Carrot Castle - HubRainbow Route Map.jpg
You are here
Click on any room

Rainbow Route is far and away the largest area in the game, consisting of 51 separate rooms. It also bears the Central Circle (appropriately) in the center, which, by the end of the game, links to all the other areas in the world. The area can be described as fairly circuitous, with a single primary path leading from the central zone to the surrounding areas.

Rainbow Route is bordered to the east by Moonlight Mansion, to the south by Cabbage Cavern, to the north-east by Mustard Mountain, and to the west by Carrot Castle. Each border links to these areas by several routes, making access fairly straightforward.

Rainbow Route has three Goal rooms. Completing these rooms takes Kirby and his clones to the Goal Game, then returns them to the Central Circle. There is no Boss Room for this area.

For a full synopsis of what's in each room, click on any room on the map to head to the corresponding page.

Gallery[edit]

Names in other languages[edit]

Language Name Meaning
Japanese レインボールート
Reinbō Rūto
Rainbow Route
French Route Arc-en-ciel Rainbow Route
German Regen-bogenroute Rainbow Route
Italian Sentiero Arcobaleno Rainbow Trail
Spanish Ruta Arco Iris Rainbow Route


Regions in the Mirror World
Rainbow RouteMoonlight MansionCabbage CavernMustard MountainCarrot CastleOlive OceanPeppermint PalaceRadish RuinsCandy ConstellationKatAM M MirrorWorld.png
You are here
Click on any area