|
|
| (110 intermediate revisions by 11 users not shown) |
| Line 1: |
Line 1: |
| {{construction}} | | {{Infobox-K&tAMLevel |
| [[File:KatAM S RainbowRoute1.PNG|thumb|The center of the '''Rainbow Route'''.]] | | |image= [[File:KatAM S RainbowRoute1.png]] |
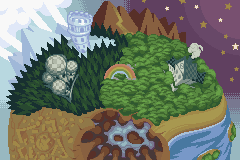
| '''Rainbow Route''' is a location found in and around the {{center}} of the [[Mirror World]], a dimension that lies parallel to [[Dream Land]]. It is mostly composed of an overgrown forest path that leads around the world in a circle. While mostly located in a forest, the Rainbow Route also features caves, tunnels, and mountain trails. At certain points, the path branches and connects to the many other locations of the Mirror World. In the {{center}} of the Rainbow Route there lies a giant rainbow from which a sanctuary-like building can be accessed. This building, which seems to be located in the sky since it is surrounded by clouds, serves as the resting place of an important mirror. During the [[Kirby (series)|''Kirby'' series]], Kirby visits this place only in one game, namely ''[[Kirby and the Amazing Mirror]]''. | | |caption= The [[Rainbow Route - Central Circle|Central Circle]] in the middle of '''Rainbow Route'''. |
| | |level= 1 |
| | |rooms= 51 |
| | |goal= 3 |
| | |connect= [[Moonlight Mansion]] <br> [[Cabbage Cavern]] <br> [[Mustard Mountain]] <br> [[Carrot Castle]] |
| | |mid-boss= [[Batafire]] <br> [[Box Boxer]] <br> [[Master Hand]] |
| | |boss= None |
| | |theme music=[[File:KaTAM Forest & Nature Area Sample.mp3]] |
| | |theme title="[[Forest/Nature Area]]" |
| | |description=Clip of the "Forest/Nature Area" theme from ''[[Kirby & The Amazing Mirror]]'' |
| | |prev= |
| | |next=[[Moonlight Mansion]] |
| | }} |
| | '''Rainbow Route''' is a location found in and around the center of the [[Mirror World]], a dimension that lies parallel to [[Dream Land]]. It is mostly composed of an overgrown forest path that leads around the land in a circle. While mostly located in a forest, Rainbow Route also features caves, tunnels, and mountain trails. At certain points, the path branches and connects to the many other locations of the Mirror World, making Rainbow Route the main hub from which most other areas are reached. In the center of the Rainbow Route there lies a giant rainbow from which a [[Rainbow Route - Central Circle|sanctuary-like building]] can be accessed. This building, which seems to be located in the sky since it is surrounded by clouds, serves as the resting place of [[Dimension Mirror|an important mirror]]. During the [[Kirby (series)|''Kirby'' series]], [[Kirby]] visits this place only in one game, namely ''[[Kirby & The Amazing Mirror]]''. |
|
| |
|
| ==General Description== | | ==General Description== |
| Kirby travels through the Rainbow Route while attempting to save the Mirror World from [[Dark Mind]] during ''Kirby and the Amazing Mirror''. When he first arrives at the world's sanctuary after pursuing the foe who split him into four, he witnesses a fight between [[Meta Knight]] and his counterpart [[Dark Meta Knight]], the latter being responsible for Kirby's split. Dark Meta Knight then manages to trap Meta Knight inside the mirror and breaks it into eight shards, which he spreads over the whole world. | | Kirby travels through the Rainbow Route while attempting to save the Mirror World from [[Dark Mind]] during ''Kirby & The Amazing Mirror''. When he first arrives at the Central Circle after pursuing the foe who split him into four, he witnesses a fight between [[Meta Knight]] and his counterpart [[Dark Meta Knight]], the latter being responsible for Kirby's split. Dark Meta Knight then manages to trap Meta Knight inside the mirror and breaks it into eight shards, which he spreads over the whole world. |
|
| |
|
| After that the Rainbow Route serves as the game's hub, connecting to all the areas Kirby needs to explore. Hidden throughout the different areas are several big switches which activate gateways between the areas and Rainbow Route's sanctuary. Kirby can use these gateways as shortcuts to travel faster through the Mirror World. After collecting all of the eight [[Mirror Shard]]s, the mirror in the {{center}} of the world becomes the passage leading to the final boss. After Kirby defeats Dark Mind, this is also the place where Meta Knight leaves [[Master|his sword]] behind. | | After that the Rainbow Route serves as the game's hub, connecting to all the areas Kirby needs to explore. Hidden throughout the different areas are several [[Big Switch]]es which activate [[Mirror Door]]s between the areas and the Central Circle. Kirby can use these gateways as shortcuts to travel faster through the Mirror World by jumping from hub to hub. After collecting all eight [[Mirror Shard]]s, the Dimension Mirror in the center of the world becomes the passage leading to [[Dark Mind|the final boss]]. After Kirby defeats this foe, Meta Knight leaves [[Master|his sword]] behind in front of the mirror, which Kirby can use from then on. |
|
| |
|
| From all nine areas found in ''Kirby and the Amazing Mirror'', Rainbow Route is the only one that features Mid Bosses, but no Bosses and therefore no Mirror Shards. It is also one of the two levels to be not named after a certain kind of food, the other one being [[Moonlight Mansion]]. | | From all nine areas found in ''Kirby & The Amazing Mirror'', Rainbow Route is the only one that features [[Mid-Boss]]es, but no [[Boss]]es and therefore no Mirror Shards. It is also one of the two levels to be not named after a certain kind of food, the other one being [[Moonlight Mansion]]. |
|
| |
|
| ===Enemies, Bosses, and Abilities on Rainbow Route=== | | ===Enemies and Mid-Bosses in Rainbow Route=== |
| {| border=1 | | {| width=60% |
| !width="90%"|'''Regular Enemies on Rainbow Route''' | | |<tabs> |
| !width="10%"|'''Mid-Bosses on Rainbow Route''' | | <tab name="Enemies"> |
| | {| class="wikitable" |
| | !Image |
| | !Name |
| | !style="border-style: solid; border-width: 1px 3px 1px 1px"|Copy Ability |
| | !Image |
| | !Name |
| | !style="border-style: solid; border-width: 1px 3px 1px 1px"|Copy Ability |
| | !Image |
| | !Name |
| | !style="border-style: solid; border-width: 1px 3px 1px 1px"|Copy Ability |
| | !Image |
| | !Name |
| | !style="border-style: solid; border-width: 1px 3px 1px 1px"|Copy Ability |
| | !Image |
| | !Name |
| | !Copy Ability |
| |- | | |- |
| | | | |align=center|[[File:KaTAM Bang Bang.png]] |
| {{col-begin}}
| | |[[Bang-Bang]] |
| {{col-break|width=20%}}
| | |style="border-style: solid; border-width: 1px 3px 1px 1px" align=center|[[Missile]] |
| *[[Bang-Bang]]
| | |align=center|[[File:KaTAM Cookin.png]] |
| *[[Batty]]
| | |[[Cookin]] |
| *[[Big Rocky]]
| | |style="border-style: solid; border-width: 1px 3px 1px 1px" align=center|[[Cook]] |
| *[[Big Waddle Dee]]
| | |align=center|[[File:KatAMHeavyKnight.png]] |
| *[[Blipper]]
| | |[[Heavy Knight]] |
| *[[Blockin]]
| | |style="border-style: solid; border-width: 1px 3px 1px 1px" align=center|[[Sword]] |
| *[[Bomber]]
| | |align=center|[[File:KatAMPrank.png]] |
| *[[Boxin]]
| | |[[Prank]] |
| {{col-break|width=20%}}
| | |style="border-style: solid; border-width: 1px 3px 1px 1px" align=center|None |
| *[[Bronto Burt]]
| | |align=center|[[File:KatAM Snooter.png]] |
| *[[Chip]]
| | |[[Snooter]] |
| *[[Cookin]]
| | |align=center|None |
| *[[Cupie]]
| |
| *[[Droppy]]
| |
| *[[Flamer]]
| |
| *[[Foley]]
| |
| *[[Golem]]
| |
| {{col-break|width=20%}}
| |
| *[[Gordo]]
| |
| *[[Heavy Knight]]
| |
| *[[Hot Head]]
| |
| *[[Laser Ball]]
| |
| *[[Leap]]
| |
| *[[Metal Guardian]]
| |
| *[[Mirra]]
| |
| *[[Noddy]]
| |
| {{col-break|width=20%}}
| |
| *[[Rocky]]
| |
| *[[Roly-Poly]]
| |
| *[[Shooty]]
| |
| *[[Shotzo]]
| |
| *[[Sir Kibble]]
| |
| *[[Snooter]]
| |
| *[[Soarar]]
| |
| *[[Sparky]]
| |
| {{col-break|width=20%}}
| |
| *[[Sword Knight]]
| |
| *[[Twister]]
| |
| *[[Waddle Dee]]
| |
| *[[Waddle Doo]]
| |
| *[[Wheelie]]
| |
| {{col-end}}
| |
| | | |
| {{col-begin}}
| |
| *[[Batafire]]
| |
| *[[Box Boxer]]
| |
| *[[Master Hand]]
| |
| {{col-end}}
| |
| |}
| |
| | |
| {| border=1
| |
| !width="400px"|'''Abilities on Rainbow Route'''
| |
| |- | | |- |
| | | | |align=center|[[File:KaTAM Batty.png]] |
| {{col-begin}}
| | |[[Batty]] |
| {{col-break|width=33%}}
| | |style="border-style: solid; border-width: 1px 3px 1px 1px" align=center|None |
| *[[Beam]]
| | |align=center|[[File:KatAMCupie.png]] |
| *[[Bomb]]
| | |[[Cupie]] |
| *[[Burning]]
| | |style="border-style: solid; border-width: 1px 3px 1px 1px" align=center|[[Cupid]] |
| *[[Cook]]
| | |align=center|[[File:KNiDL Hot Head sprite.png]] |
| *[[Crash]]
| | |[[Hot Head]] |
| *[[Cupid]]
| | |style="border-style: solid; border-width: 1px 3px 1px 1px" align=center|[[Fire]] |
| *[[Cutter]]
| | |align=center|[[File:KNiDL Rocky sprite.png]] |
| {{col-break|width=33%}}
| | |[[Rocky]] |
| *[[Fighter]]
| | |style="border-style: solid; border-width: 1px 3px 1px 1px" align=center|[[Stone]] |
| *[[Fire]]
| | |align=center|[[File:KatAMSoarar.png]] |
| *[[Laser]]
| | |[[Soarar]] |
| *[[Missile]]
| | |align=center|None |
| *[[Parasol (ability)|Parasol]]
| |
| *[[Sleep]]
| |
| *[[Smash]]
| |
| {{col-break|width=33%}}
| |
| *[[Spark]]
| |
| *[[Stone]]
| |
| *[[Sword]]
| |
| *[[Tornado]]
| |
| *[[Wheel]]
| |
| {{col-end}}
| |
| |} | |
| | |
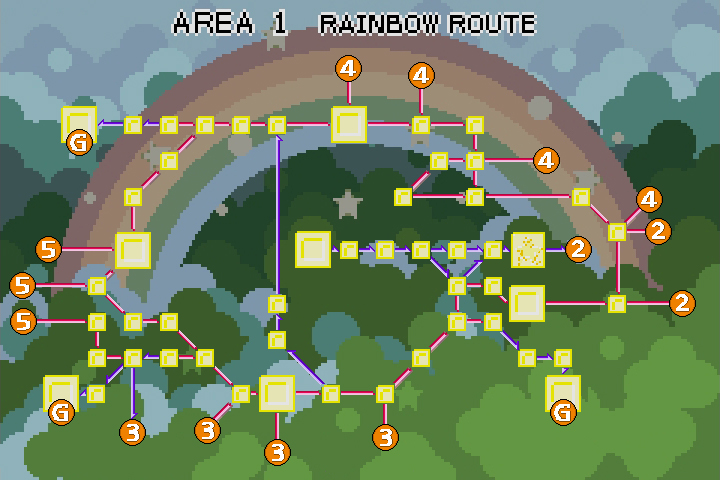
| ==Map== | |
| {{AMRRNavMap}}
| |
| Rainbow Route is one of the largest areas in the game, consisting of 51 separate rooms. It also bears the Grand Central Hub in the center, which, by the end of the game, links to all the other areas in the world. The area can be described as fairly circuitous, with a single primary path leading from the central zone to the surrounding areas.
| |
| | |
| Rainbow Route is bordered to the east by [[Moonlight Mansion]], to the south by [[Cabbage Cavern]], to the north-east by [[Mustard Mountain]], and to the west by [[Carrot Castle]]. Each border links to these areas by several routes, making access fairly straightforward.
| |
| | |
| Rainbow Route has three Goal rooms. Completing these rooms takes Kirby and his clones to the [[Goal Game]], then returns them to the Grand Central Hub.
| |
| | |
| ==Full Synopsis==
| |
| {{spoilers}}
| |
| ===Grand Central Hub===
| |
| This is the room that Kirby and his chromatic clones begin their adventure from, and to which they return after completing each Goal Game, defeating each Boss, and calling the Warp Star to return them here. The room itself consists of a wide open area, situated inside a shiny blue Colosseum-like structure atop a cloud. Several pillars and platforms adorn the area, and in the center, the great Dimension Mirror sits. At first, the mirror is broken, and the only way out of this room is the door directly to the right, which leads to [[Rainbow_Route#Room_1|Room 1]]. However, as Kirby ventures through this world, he will cause more doors to appear in this room, situated on the various platforms, which lead to all of the hubs in the other areas. One door in particular will appear in the upper-left corner on a cloud, which takes Kirby to a separate chamber containing pedestals for nearly all of the [[Copy Ability|Copy Abilities]]. Once all the pieces of the Great Mirror are found, it will lead to the final Boss confrontations.
| |
| | |
| After completing the game, the [[Master]] ability can be obtained in this room.
| |
| | |
| ===Hub 1=== | |
| This hub connects from [[Rainbow_Route#Room_7|Room 7]] to the left and [[Rainbow_Route#Room_42|Room 42]] on the right. Once this room is reached, it also links back to the [[Rainbow_Route#Grand_Central_Hub|Grand Central Hub]].
| |
| | |
| A large chest can be found in this room. Additionally, the [[Beam]] and [[Stone]] abilities are available on Copy Pedestals.
| |
| | |
| ===Hub 2=== | |
| This hub connects from [[Rainbow_Route#Room_15|Room 15]] to the left and [[Rainbow_Route#Room_14|Room 14]] on the right. Once this room is reached, it also links back to the [[Rainbow_Route#Grand_Central_Hub|Grand Central Hub]]. Additionally, once the appropriate hub is reached, this room also links to [[Cabbage Cavern]].
| |
| | |
| The [[Laser]] and [[Cutter]] abilities are available in this room on Copy Pedestals.
| |
| | |
| ===Hub 3=== | |
| This hub connects from [[Rainbow_Route#Room_31|Room 31]] to the left and [[Rainbow_Route#Room_34|Room 34]] on the right. Once this room is reached, it also links back to the [[Rainbow_Route#Grand_Central_Hub|Grand Central Hub]]. Additionally, once the appropriate hub is reached, this room also links to [[Mustard Mountain]].
| |
| | |
| The [[Beam]] and [[Tornado]] abilities are available in this room on Copy Pedestals.
| |
| | |
| ===Hub 4===
| |
| This hub connects from [[Rainbow_Route#Room_24|Room 24]] to the left and [[Rainbow_Route#Room_25|Room 25]] on the right. Once this room is reached, it also links back to the [[Rainbow_Route#Grand_Central_Hub|Grand Central Hub]]. Additionally, once the appropriate hub is reached, this room also links to [[Carrot Castle]].
| |
| | |
| The [[Parasol]] and [[Spark]] abilities are available in this room on Copy Pedestals.
| |
| | |
| ===Goal 1===
| |
| One door links to this area, from [[Rainbow_Route#Room_11|Room 11]] above. The top entrance is one-way, meaning that Kirby cannot return to Room 11 from this room.
| |
| | |
| This room consists of Rocky terrain underground. When Kirby reaches a ladder and go down through it, he will fight [[Master Hand]]. If Kirby inhales him after he is defeated, he will get the [[Smash]] ability. This room also contains multiple Waddle Doos, Chips and Snooters. The bottom of the room has a door with three stars. Entering it leads to the first of many [[Goal Game]]s that Kirby can partake in to obtain bonus items, then return to the Hub.
| |
| | |
| ====Enemies, Mid-Bosses, and Abilities====
| |
| {| style="border: 3px solid #E47575; {{round}};background: #F69D99" cellspacing="2"
| |
| ! width="267px" | '''Regular Enemies'''
| |
| ! width="133px" | '''Mid-Bosses'''
| |
| |- bgcolor="E47575"
| |
| |
| |
| {{col-begin}}
| |
| {{col-break|width=50%}}
| |
| *[[Chip]]
| |
| *[[Waddle Doo]]
| |
| {{col-break|width=50%}}
| |
| *[[Snooter]]
| |
| {{col-end}}
| |
| | | |
| {{col-begin}}
| |
| *[[Master Hand]]
| |
| {{col-end}}
| |
| |- | | |- |
| ! colspan="2" width="404px"| '''Abilities'''
| | |align=center|[[File:KaTAM Big Waddle Dee Sprite.png]] |
| |- bgcolor="#E47575"
| | |[[Big Waddle Dee]] |
| | colspan="2" | | | |style="border-style: solid; border-width: 1px 3px 1px 1px" align=center|None |
| {{col-begin}}
| | |align=center|[[File:KaTAM Droppy.png]] |
| {{col-break|width=50%}}
| | |[[Droppy]] |
| *[[Beam]]
| | |style="border-style: solid; border-width: 1px 3px 1px 1px" align=center|None (default) |
| {{col-break|width=50%}}
| | |align=center|[[File:KNiDL Laser Ball sprite.png]] |
| *[[Smash]]
| | |[[Laser Ball]] |
| {{col-end}}
| | |style="border-style: solid; border-width: 1px 3px 1px 1px" align=center|[[Laser]] |
| |} | | |align=center|[[File:KatAMRolyPoly.png]] |
| | | |[[Roly-Poly]] |
| ===Goal 2=== | | |style="border-style: solid; border-width: 1px 3px 1px 1px" align=center|None |
| One door links to this room, from [[Rainbow_Route#Room_19|Room 19]] to the right. The right entrance is one-way, meaning that Kirby cannot return to Room 19 from this room.
| | |align=center|[[File:KNiDL Sparky sprite.png]] |
| | | |[[Sparky]] |
| This goal room consists of woody terrain. Kirby starts at the top right of the room, with a Roly-Poly in front of him. If he goes all the way down, he will fight [[Batafire]]. He will get the [[Burning]] ability, if he inhales Batafire, after defeating him. To the right of where Batafire is fought, there is a treasure chest. There are also a few Blockins hiding in star blocks, so be careful. The top left of the room is where the three star door to initiate the Warp Star minigame is located.
| | |align=center|[[Spark]] |
| ====Enemies, Mid-Bosses, and Abilities====
| |
| {| style="border: 3px solid #E47575; {{round}};background: #F69D99" cellspacing="2"
| |
| ! width="267px" | '''Regular Enemies'''
| |
| ! width="133px" | '''Mid-Bosses'''
| |
| |- bgcolor="E47575" | |
| |
| |
| {{col-begin}}
| |
| {{col-break|width=50%}}
| |
| *[[Blockin]]
| |
| *[[Roly Poly]]
| |
| *[[Waddle Dee]]
| |
| {{col-break|width=50%}}
| |
| *[[Gordo]]
| |
| *[[Waddle Doo]]
| |
| {{col-end}}
| |
| | | |
| {{col-begin}}
| |
| *[[Batafire]]
| |
| {{col-end}}
| |
| |- | | |- |
| ! colspan="2" width="404px"| '''Abilities'''
| | |align=center|[[File:KNiDL Blipper sprite.png]] |
| |- bgcolor="#E47575" | | |[[Blipper]] |
| | colspan="2" | | | |style="border-style: solid; border-width: 1px 3px 1px 1px" align=center|None |
| {{col-begin}}
| | |align=center|[[File:KNiDL Flamer sprite.png]] |
| {{col-break|width=50%}}
| | |[[Flamer]] |
| *[[Burning]]
| | |style="border-style: solid; border-width: 1px 3px 1px 1px" align=center|[[Burning]] |
| {{col-break|width=50%}}
| | |align=center|[[File:KaTAM Leap.png]] |
| *[[Beam]]
| | |[[Leap]] |
| {{col-end}}
| | |style="border-style: solid; border-width: 1px 3px 1px 1px" align=center|None |
| |} | | |align=center|[[File:KNiDL Scarfy sprite.png]] |
| | | |[[Scarfy]] |
| ===Goal 3=== | | |style="border-style: solid; border-width: 1px 3px 1px 1px" align=center|N/A |
| One door links to this area, from [[Rainbow_Route#Room_29|Room 29]] to the right. The right entrance is one-way, meaning that Kirby cannot return to Room 29 from this room.
| | |align=center|[[File:KNiDL Sword Knight sprite.png]] |
| | | |[[Sword Knight]] |
| This room consists of woody terrain. There are a few Flamers below the bomb blocks. If Kirby goes down a bit, he will see the three-star door with the Warp Star to initiate the [[Goal Game]]. If he goes all the way down, and to left, he will fight [[Box Boxer]].
| | |align=center|[[Sword]] |
| ====Enemies, Mid-Bosses, and Abilities====
| |
| {| style="border: 3px solid #E47575; {{round}};background: #F69D99" cellspacing="2"
| |
| ! width="267px" | '''Regular Enemies'''
| |
| ! width="133px" | '''Mid-Bosses'''
| |
| |- bgcolor="E47575" | |
| | | |
| {{col-begin}}
| |
| {{col-break|width=50%}}
| |
| *[[Flamer]]
| |
| {{col-break|width=50%}}
| |
| {{col-end}}
| |
| | | |
| {{col-begin}}
| |
| *[[Box Boxer]]
| |
| {{col-end}}
| |
| |- | | |- |
| ! colspan="2" width="404px"| '''Abilities'''
| | |align=center|[[File:KatAMBlockin.png]] |
| |- bgcolor="#E47575" | | |[[Blockin]] |
| | colspan="2" | | | |style="border-style: solid; border-width: 1px 3px 1px 1px" align=center|N/A |
| {{col-begin}}
| | |align=center|[[File:KatAMFoley.png]] |
| {{col-break|width=50%}}
| | |[[Foley]] |
| *[[Fighter]]
| | |style="border-style: solid; border-width: 1px 3px 1px 1px" align=center|[[Bomb]] |
| {{col-break|width=50%}}
| | |align=center|[[File:KatAMMetalGuardian.png]] |
| *[[Burning]]
| | |[[Metal Guardian]] |
| {{col-end}}
| | |style="border-style: solid; border-width: 1px 3px 1px 1px" align=center|[[Laser]] |
| |} | | |align=center|[[File:KatAMShadowKirby.png]] |
| | | |[[Shadow Kirby]] |
| ===Warp=== | | |style="border-style: solid; border-width: 1px 3px 1px 1px" align=center|None |
| One door links to this area, from [[Rainbow_Route#Room_5|Room 5]] to the left. The left entrance is one-way, meaning that Kirby cannot return directly to Room 5 from this room.
| | |align=center|[[File:KNiDL Twister sprite.png]] |
| | | |[[Twister]] |
| This room consists of several elevated cliff faces in the deep forest, with a looming chasm to the far right. The left entrance is a flat part of the cliff-face, with rising areas to the right. [[Mirror-world Kirby|Shadow Kirby]] appears almost immediately with a dramatic music queue, though he does not actually attack. Hitting him will cause him to flee, leaving behind a [[1Up]]. otherwise, he will simply leave on his own, not leaving anything behind. If Kirby wishes to receive the gift, it is advisable not to inhale Shadow Kirby. If nothing else, a [[Sliding Kick]] or an air puff will do.
| | |align=center|[[Tornado]] |
| | |
| Up the hill, sandwiched in a valley can be found a [[Warp Star]]. Taking it will transport Kirby and any clones with him to the Entry point of [[Moonlight Mansion]].
| |
| ====Enemies, Mid-Bosses, and Abilities====
| |
| {| style="border: 3px solid #E47575; {{round}};background: #F69D99" cellspacing="2"
| |
| ! width="267px" | '''Regular Enemies'''
| |
| ! width="133px" | '''Mid-Bosses'''
| |
| |- bgcolor="E47575"
| |
| |
| |
| {{col-begin}}
| |
| {{col-break|width=50%}}
| |
| *[[Mirror-world Kirby|Shadow Kirby]]
| |
| *[[Waddle Dee]]
| |
| {{col-break|width=50%}}
| |
| *[[Cupie]]
| |
| {{col-end}}
| |
| |
| |
| {{col-begin}}
| |
| *None.
| |
| {{col-end}}
| |
| |- | | |- |
| ! colspan="2" width="404px"| '''Abilities'''
| | |align=center|[[File:KNiDL Bomber sprite.png]] |
| |- bgcolor="#E47575" | | |[[Bomber]] |
| | colspan="2" | | | |style="border-style: solid; border-width: 1px 3px 1px 1px" align=center|[[Crash]] |
| {{col-begin}}
| | |align=center|[[File:KatAMGiantRocky.png]] |
| {{col-break|width=50%}}
| | |[[Giant Rocky]] |
| *[[Cupid]]
| | |style="border-style: solid; border-width: 1px 3px 1px 1px" align=center|[[Stone]] |
| {{col-break|width=50%}}
| | |align=center|[[File:KatAMMirra.png]] |
| {{col-end}}
| | |[[Mirra]] |
| |} | | |style="border-style: solid; border-width: 1px 3px 1px 1px" align=center|N/A |
| | | |align=center|[[File:KatAMShooty.png]] |
| ===Room 1===
| | |[[Shooty]] |
| Two doors link to this area, from the [[Rainbow_Route#Grand_Central_Hub|Grand Central Hub]] to the left and to [[Rainbow_Route#Room_2|Room 2]] on the right. The left entrance is one-way, meaning that Kirby cannot return directly to the Hub from this room.
| | |style="border-style: solid; border-width: 1px 3px 1px 1px" align=center|None |
| | | |align=center|[[File:KNiDL Waddle Dee sprite.png]] |
| From the left, the room is an open path within a deep forest area. Along this path, a [[Waddle Doo]] and its binocular escorts greet Kirby with the usual welcome. A number of other ability-granting enemies patrol the path as it becomes more staggered, opening up to a small pit in the middle. This leads to a larger pit further right, bridged by a floating soft platform. The rightward door is guarded by a [[Sparky]], and a [[Food|cherry]] can be found on a floating rock block above the door.
| | |[[Waddle Dee]] |
| | | |align=center|None |
| ====Enemies, Mid-Bosses, and Abilities====
| |
| {| style="border: 3px solid #E47575; {{round}};background: #F69D99" cellspacing="2"
| |
| ! width="267px" | '''Regular Enemies'''
| |
| ! width="133px" | '''Mid-Bosses'''
| |
| |- bgcolor="E47575"
| |
| | | |
| {{col-begin}}
| |
| {{col-break|width=50%}}
| |
| *[[Bronto Burt]]
| |
| *[[Sparky]]
| |
| *[[Waddle Doo]]
| |
| {{col-break|width=50%}}
| |
| *[[Hot Head]]
| |
| *[[Waddle Dee]]
| |
| {{col-end}}
| |
| | | |
| {{col-begin}}
| |
| *None.
| |
| {{col-end}}
| |
| |- | | |- |
| ! colspan="2" width="404px"| '''Abilities'''
| | |align=center|[[File:KatAMBoxin.png]] |
| |- bgcolor="#E47575" | | |[[Boxin]] |
| | colspan="2" | | | |style="border-style: solid; border-width: 1px 3px 1px 1px" align=center|[[Fighter]] |
| {{col-begin}}
| | |align=center|[[File:KatAMGolemBrown.png]][[File:KatAMGolemYellow.png]] |
| {{col-break|width=50%}}
| | |[[Golem]] |
| *[[Beam]]
| | |style="border-style: solid; border-width: 1px 3px 1px 1px" align=center|[[Stone]], [[Wheel]] |
| *[[Fire]]
| | |align=center|[[File:KNiDL Noddy sprite.png]] |
| {{col-break|width=50%}}
| | |[[Noddy]] |
| *[[Spark]]
| | |style="border-style: solid; border-width: 1px 3px 1px 1px" align=center|[[Sleep]] |
| {{col-end}}
| | |align=center|[[File:KNiDL Shotzo sprite.png]] |
| |} | | |[[Shotzo]] |
| | | |style="border-style: solid; border-width: 1px 3px 1px 1px" align=center|N/A |
| ===Room 2=== | | |align=center|[[File:KNiDL Waddle Doo sprite.png]] |
| Two doors link to this area, from [[Rainbow_Route#Room_1|Room 1]] to the left and to [[Rainbow_Route#Room_3|Room 3]] on the right. The left entrance is one-way, meaning that Kirby cannot return directly to Room 1 from this room.
| | |[[Waddle Doo]] |
| | | |align=center|[[Beam]] |
| This room is a continuation of the forest walkway from Room 1. Enemies patrol on the ground and keep watch from floating soft platforms. From the left, the flat path eventually reaches a small hill, down which a [[Roly-Poly]] will tumble toward Kirby. From here, the path breaks up into several small platforms over an abyss. Along the way, a cache can be accessed under the main walkway, containing a [[Food|cherry]]. After a few more hills, a chest can be found in the open. Opening it reveals a [[1Up]]. At the right end of the path, two doors appear against a cliff. Both lead to Room 3, but take Kirby along different passageways.
| |
| ====Enemies, Mid-Bosses, and Abilities====
| |
| {| style="border: 3px solid #E47575; {{round}};background: #F69D99" cellspacing="2"
| |
| ! width="267px" | '''Regular Enemies'''
| |
| ! width="133px" | '''Mid-Bosses'''
| |
| |- bgcolor="E47575" | |
| | | |
| {{col-begin}}
| |
| {{col-break|width=50%}}
| |
| *[[Roly-Poly]]
| |
| *[[Waddle Doo]]
| |
| {{col-break|width=50%}}
| |
| *[[Bronto Burt]]
| |
| *[[Waddle Dee]]
| |
| {{col-end}}
| |
| |
| |
| {{col-begin}}
| |
| *None.
| |
| {{col-end}}
| |
| |- | | |- |
| ! colspan="2" width="404px"| '''Abilities'''
| | |align=center|[[File:KNiDL Bronto Burt sprite.png]] |
| |- bgcolor="#E47575" | | |[[Bronto Burt]] |
| | colspan="2" | | | |style="border-style: solid; border-width: 1px 3px 1px 1px" align=center|None |
| {{col-begin}}
| | |align=center|[[File:KNiDL Gordo sprite.png]] |
| {{col-break|width=50%}}
| | |[[Gordo]] |
| *[[Beam]]
| | |style="border-style: solid; border-width: 1px 3px 1px 1px" align=center|N/A |
| {{col-break|width=50%}}
| | |align=center|[[File:KNiDL Parasol enemy sprite.png]] |
| {{col-end}}
| | |[[Parasol (enemy)|Parasol]] |
| |} | | |style="border-style: solid; border-width: 1px 3px 1px 1px" align=center|[[Parasol]] |
| | | |align=center|[[File:KNiDL Sir Kibble sprite.png]] |
| ===Room 3=== | | |[[Sir Kibble]] |
| Four doors link to this area, two from [[Rainbow_Route#Room_2|Room 2]] to the left, one to [[Rainbow_Route#Room_4|Room 4]] on the upper-right, and one to [[Rainbow_Route#Room_6|Room 6]] on the lower-right. The left entrances are one-way, meaning that Kirby cannot return directly to Room 2 from this room.
| | |style="border-style: solid; border-width: 1px 3px 1px 1px" align=center|[[Cutter]] |
| | | |align=center|[[File:KNiDL Wheelie sprite.png]] |
| This room is characterized by its two separate paths, both continuing through the deep woods. While the two paths are stacked on top of each-other, and largely mirror each-other, they both go to different rooms. The upper path leads to Room 4, and the lower one leads to Room 6. Both are characterized as being composed of various dirt chambers and passageways, blocked off in places with Star Blocks and minor foes. On both paths, a [[Boxin]] can be seen trapped inside a wall, and can be swallowed for the [[Fighter]] ability. The doors to Rooms 4 and 6 are carved into a tree trunk.
| | |[[Wheelie]] |
| | | |align=center|[[Wheel]] |
| ====Enemies, Mid-Bosses, and Abilities====
| |
| {| style="border: 3px solid #E47575; {{round}};background: #F69D99" cellspacing="2"
| |
| ! width="267px" | '''Regular Enemies'''
| |
| ! width="133px" | '''Mid-Bosses'''
| |
| |- bgcolor="E47575" | |
| |
| |
| {{col-begin}}
| |
| {{col-break|width=50%}}
| |
| *[[Chip]]
| |
| *[[Waddle Dee]]
| |
| {{col-break|width=50%}}
| |
| *[[Big Waddle Dee]]
| |
| *[[Boxin]]
| |
| {{col-end}}
| |
| |
| |
| {{col-begin}}
| |
| *None.
| |
| {{col-end}}
| |
| |- | | |- |
| ! colspan="2" width="404px"| '''Abilities'''
| | |align=center|[[File:KatAMChip.png]] |
| |- bgcolor="#E47575" | | |[[Chip]] |
| | colspan="2" | | | |style="border-style: solid; border-width: 1px 3px 1px 1px" align=center|None |
| {{col-begin}}
| | |align=center|[[File:KatAMHaley.png]] |
| {{col-break|width=50%}}
| | |[[Haley]] |
| *[[Fighter]]
| | |style="border-style: solid; border-width: 1px 3px 1px 1px" align=center|None |
| {{col-break|width=50%}}
| | !colspan=9| |
| {{col-end}}
| |
| |} | | |} |
| | | </tab> |
| ===Room 4=== | | <tab name="Mid-Bosses"> |
| Two doors link to this area, from [[Rainbow_Route#Room_3|Room 3]] to the left and to [[Rainbow_Route#Room_5|Room 5]] on the right. The left entrance is one-way, meaning that Kirby cannot return directly to Room 3 from this room.
| | {| class="wikitable" |
| | | !Sprite |
| This room is another forest walkway, but littered with various obstacles, stones, trees and baddies, almost resembling a cemetery. A [[Sword Knight]] guards the left entrance-way, and other enemies can be seen patrolling the stones ahead. From there, a small pond can be found, in which a [[Maxim Tomato]] can be bobbed for. Another Sword Knight guards a dugout leading to Room 5.
| | !Name |
| | | !Copy Ability |
| ====Enemies, Mid-Bosses, and Abilities====
| |
| {| style="border: 3px solid #E47575; {{round}};background: #F69D99" cellspacing="2" | |
| ! width="267px" | '''Regular Enemies''' | |
| ! width="133px" | '''Mid-Bosses''' | |
| |- bgcolor="E47575"
| |
| |
| |
| {{col-begin}}
| |
| {{col-break|width=50%}}
| |
| *[[Hot Head]]
| |
| *[[Sword Knight]]
| |
| {{col-break|width=50%}}
| |
| *[[Bronto Burt]]
| |
| *[[Chip]]
| |
| {{col-end}}
| |
| |
| |
| {{col-begin}}
| |
| *None.
| |
| {{col-end}}
| |
| |- | | |- |
| ! colspan="2" width="404px"| '''Abilities'''
| | |align=center|[[File:KatAMBatafire.png]] |
| |- bgcolor="#E47575"
| | |[[Batafire]] |
| | colspan="2" | | | |[[Burning]] |
| {{col-begin}}
| |
| {{col-break|width=50%}}
| |
| *[[Sword]]
| |
| {{col-break|width=50%}}
| |
| *[[Fire]]
| |
| {{col-end}}
| |
| |}
| |
| | |
| ===Room 5===
| |
| Three doors link to this area, from [[Rainbow_Route#Room_4|Room 4]] and [[Rainbow_Route#Room_6|Room 6]] to the left and to the [[Rainbow_Route#Warp|Warp]] room on the right. The left entrances are one-way, meaning that Kirby cannot return directly to Room 4 or 6 from this room. Additionally, the Room 4 and 6 entrances both lead to the same point.
| |
| | |
| This room consists of a large cliff, leading upward from the left entrance-point. A [[Bang-Bang]] and [[Scarfy]] guard the base, as soft platforms lead up the cliff face. A [[Food|cherry]] can be found on the first of these platforms. More enemies patrol the area above, and the door to the Warp room can be found at the top of the cliff.
| |
| ====Enemies, Mid-Bosses, and Abilities====
| |
| {| style="border: 3px solid #E47575; {{round}};background: #F69D99" cellspacing="2"
| |
| ! width="267px" | '''Regular Enemies'''
| |
| ! width="133px" | '''Mid-Bosses'''
| |
| |- bgcolor="E47575"
| |
| |
| |
| {{col-begin}}
| |
| {{col-break|width=50%}}
| |
| *[[Bang-Bang]]
| |
| *[[Flamer]]
| |
| {{col-break|width=50%}}
| |
| *[[Rocky]]
| |
| *[[Scarfy]]
| |
| {{col-end}}
| |
| |
| |
| {{col-begin}}
| |
| *None.
| |
| {{col-end}}
| |
| |- | | |- |
| ! colspan="2" width="404px"| '''Abilities'''
| | |align=center|[[File:KatAMBoxBoxer.png]] |
| |- bgcolor="#E47575"
| | |[[Box Boxer]] |
| | colspan="2" |
| | |[[Fighter]] |
| {{col-begin}}
| |
| {{col-break|width=50%}}
| |
| *[[Missile]]
| |
| *[[Stone]]
| |
| {{col-break|width=50%}}
| |
| *[[Burning]]
| |
| {{col-end}}
| |
| |}
| |
| | |
| ===Room 6===
| |
| ====Enemies, Mid-Bosses, and Abilities====
| |
| {| style="border: 3px solid #E47575; {{round}};background: #F69D99" cellspacing="2"
| |
| ! width="267px" | '''Regular Enemies'''
| |
| ! width="133px" | '''Mid-Bosses'''
| |
| |- bgcolor="E47575"
| |
| |
| |
| {{col-begin}}
| |
| {{col-break|width=50%}}
| |
| *None.
| |
| {{col-break|width=50%}}
| |
| *None.
| |
| {{col-end}}
| |
| |
| |
| {{col-begin}}
| |
| *None.
| |
| {{col-end}}
| |
| |- | | |- |
| ! colspan="2" width="404px"| '''Abilities'''
| | |align=center|[[File:KatAMMasterHand.png]] |
| |- bgcolor="#E47575" | | |[[Master Hand]] |
| | colspan="2" | | | |[[Smash]] |
| {{col-begin}}
| |
| {{col-break|width=50%}}
| |
| *None.
| |
| {{col-break|width=50%}}
| |
| *None.
| |
| {{col-end}}
| |
| |} | | |} |
| | | </tab> |
| ===Room 7===
| | </tabs> |
| ====Enemies, Mid-Bosses, and Abilities====
| |
| {| style="border: 3px solid #E47575; {{round}};background: #F69D99" cellspacing="2"
| |
| ! width="267px" | '''Regular Enemies'''
| |
| ! width="133px" | '''Mid-Bosses'''
| |
| |- bgcolor="E47575"
| |
| |
| |
| {{col-begin}}
| |
| {{col-break|width=50%}}
| |
| *None.
| |
| {{col-break|width=50%}}
| |
| *None.
| |
| {{col-end}}
| |
| |
| |
| {{col-begin}}
| |
| *None.
| |
| {{col-end}}
| |
| |-
| |
| ! colspan="2" width="404px"| '''Abilities'''
| |
| |- bgcolor="#E47575"
| |
| | colspan="2" |
| |
| {{col-begin}}
| |
| {{col-break|width=50%}}
| |
| *None.
| |
| {{col-break|width=50%}}
| |
| *None.
| |
| {{col-end}}
| |
| |} | | |} |
|
| |
|
| ===Room 8=== | | ==Map== |
| ====Enemies, Mid-Bosses, and Abilities====
| | {{Navmap-KaTAM-RRo}} |
| {| style="border: 3px solid #E47575; {{round}};background: #F69D99" cellspacing="2"
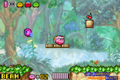
| | Rainbow Route is far and away the largest area in the game, consisting of 51 separate rooms. It also bears the Central Circle (appropriately) in the center, which, by the end of the game, links to all the other areas in the world. The area can be described as fairly circuitous, with a single primary path leading from the central zone to the surrounding areas. |
| ! width="267px" | '''Regular Enemies'''
| |
| ! width="133px" | '''Mid-Bosses'''
| |
| |- bgcolor="E47575"
| |
| |
| |
| {{col-begin}} | |
| {{col-break|width=50%}}
| |
| *None.
| |
| {{col-break|width=50%}}
| |
| *None.
| |
| {{col-end}}
| |
| |
| |
| {{col-begin}}
| |
| *None.
| |
| {{col-end}}
| |
| |-
| |
| ! colspan="2" width="404px"| '''Abilities'''
| |
| |- bgcolor="#E47575"
| |
| | colspan="2" |
| |
| {{col-begin}}
| |
| {{col-break|width=50%}}
| |
| *None.
| |
| {{col-break|width=50%}}
| |
| *None.
| |
| {{col-end}}
| |
| |}
| |
|
| |
|
| ===Room 9===
| | Rainbow Route is bordered to the east by [[Moonlight Mansion]], to the south by [[Cabbage Cavern]], to the north-east by [[Mustard Mountain]], and to the west by [[Carrot Castle]]. Each border links to these areas by several routes, making access fairly straightforward. |
| ====Enemies, Mid-Bosses, and Abilities====
| |
| {| style="border: 3px solid #E47575; {{round}};background: #F69D99" cellspacing="2"
| |
| ! width="267px" | '''Regular Enemies'''
| |
| ! width="133px" | '''Mid-Bosses'''
| |
| |- bgcolor="E47575"
| |
| |
| |
| {{col-begin}}
| |
| {{col-break|width=50%}}
| |
| *None.
| |
| {{col-break|width=50%}}
| |
| *None.
| |
| {{col-end}}
| |
| |
| |
| {{col-begin}}
| |
| *None.
| |
| {{col-end}}
| |
| |-
| |
| ! colspan="2" width="404px"| '''Abilities'''
| |
| |- bgcolor="#E47575"
| |
| | colspan="2" |
| |
| {{col-begin}}
| |
| {{col-break|width=50%}}
| |
| *None.
| |
| {{col-break|width=50%}}
| |
| *None.
| |
| {{col-end}}
| |
| |}
| |
|
| |
|
| ===Room 10===
| | Rainbow Route has three Goal rooms. Completing these rooms takes Kirby and his clones to the [[Goal Game]], then returns them to the [[Rainbow Route - Central Circle|Central Circle]]. There is no Boss Room for this area. |
| ====Enemies, Mid-Bosses, and Abilities====
| |
| {| style="border: 3px solid #E47575; {{round}};background: #F69D99" cellspacing="2"
| |
| ! width="267px" | '''Regular Enemies'''
| |
| ! width="133px" | '''Mid-Bosses'''
| |
| |- bgcolor="E47575" | |
| |
| |
| {{col-begin}}
| |
| {{col-break|width=50%}}
| |
| *None.
| |
| {{col-break|width=50%}}
| |
| *None.
| |
| {{col-end}}
| |
| |
| |
| {{col-begin}}
| |
| *None.
| |
| {{col-end}}
| |
| |-
| |
| ! colspan="2" width="404px"| '''Abilities'''
| |
| |- bgcolor="#E47575"
| |
| | colspan="2" |
| |
| {{col-begin}}
| |
| {{col-break|width=50%}}
| |
| *None.
| |
| {{col-break|width=50%}}
| |
| *None.
| |
| {{col-end}}
| |
| |}
| |
|
| |
|
| ===Room 11===
| | For a full synopsis of what's in each room, click on any room on the map to head to the corresponding page. |
| ====Enemies, Mid-Bosses, and Abilities====
| |
| {| style="border: 3px solid #E47575; {{round}};background: #F69D99" cellspacing="2"
| |
| ! width="267px" | '''Regular Enemies'''
| |
| ! width="133px" | '''Mid-Bosses'''
| |
| |- bgcolor="E47575"
| |
| |
| |
| {{col-begin}}
| |
| {{col-break|width=50%}}
| |
| *None.
| |
| {{col-break|width=50%}}
| |
| *None.
| |
| {{col-end}}
| |
| |
| |
| {{col-begin}}
| |
| *None.
| |
| {{col-end}}
| |
| |-
| |
| ! colspan="2" width="404px"| '''Abilities'''
| |
| |- bgcolor="#E47575"
| |
| | colspan="2" |
| |
| {{col-begin}}
| |
| {{col-break|width=50%}}
| |
| *None.
| |
| {{col-break|width=50%}}
| |
| *None.
| |
| {{col-end}}
| |
| |}
| |
| | |
| ===Room 12===
| |
| ====Enemies, Mid-Bosses, and Abilities====
| |
| {| style="border: 3px solid #E47575; {{round}};background: #F69D99" cellspacing="2"
| |
| ! width="267px" | '''Regular Enemies'''
| |
| ! width="133px" | '''Mid-Bosses'''
| |
| |- bgcolor="E47575"
| |
| |
| |
| {{col-begin}}
| |
| {{col-break|width=50%}}
| |
| *None.
| |
| {{col-break|width=50%}}
| |
| *None.
| |
| {{col-end}}
| |
| |
| |
| {{col-begin}}
| |
| *None.
| |
| {{col-end}}
| |
| |-
| |
| ! colspan="2" width="404px"| '''Abilities'''
| |
| |- bgcolor="#E47575"
| |
| | colspan="2" |
| |
| {{col-begin}}
| |
| {{col-break|width=50%}}
| |
| *None.
| |
| {{col-break|width=50%}}
| |
| *None.
| |
| {{col-end}}
| |
| |}
| |
| | |
| ===Room 13===
| |
| ====Enemies, Mid-Bosses, and Abilities====
| |
| {| style="border: 3px solid #E47575; {{round}};background: #F69D99" cellspacing="2"
| |
| ! width="267px" | '''Regular Enemies'''
| |
| ! width="133px" | '''Mid-Bosses'''
| |
| |- bgcolor="E47575"
| |
| |
| |
| {{col-begin}}
| |
| {{col-break|width=50%}}
| |
| *None.
| |
| {{col-break|width=50%}}
| |
| *None.
| |
| {{col-end}}
| |
| |
| |
| {{col-begin}}
| |
| *None.
| |
| {{col-end}}
| |
| |-
| |
| ! colspan="2" width="404px"| '''Abilities'''
| |
| |- bgcolor="#E47575"
| |
| | colspan="2" |
| |
| {{col-begin}}
| |
| {{col-break|width=50%}}
| |
| *None.
| |
| {{col-break|width=50%}}
| |
| *None.
| |
| {{col-end}}
| |
| |}
| |
| | |
| ===Room 14===
| |
| ====Enemies, Mid-Bosses, and Abilities====
| |
| {| style="border: 3px solid #E47575; {{round}};background: #F69D99" cellspacing="2"
| |
| ! width="267px" | '''Regular Enemies'''
| |
| ! width="133px" | '''Mid-Bosses'''
| |
| |- bgcolor="E47575"
| |
| |
| |
| {{col-begin}}
| |
| {{col-break|width=50%}}
| |
| *None.
| |
| {{col-break|width=50%}}
| |
| *None.
| |
| {{col-end}}
| |
| |
| |
| {{col-begin}}
| |
| *None.
| |
| {{col-end}}
| |
| |-
| |
| ! colspan="2" width="404px"| '''Abilities'''
| |
| |- bgcolor="#E47575"
| |
| | colspan="2" |
| |
| {{col-begin}}
| |
| {{col-break|width=50%}}
| |
| *None.
| |
| {{col-break|width=50%}}
| |
| *None.
| |
| {{col-end}}
| |
| |}
| |
| | |
| ===Room 15===
| |
| ====Enemies, Mid-Bosses, and Abilities====
| |
| {| style="border: 3px solid #E47575; {{round}};background: #F69D99" cellspacing="2"
| |
| ! width="267px" | '''Regular Enemies'''
| |
| ! width="133px" | '''Mid-Bosses'''
| |
| |- bgcolor="E47575"
| |
| |
| |
| {{col-begin}}
| |
| {{col-break|width=50%}}
| |
| *None.
| |
| {{col-break|width=50%}}
| |
| *None.
| |
| {{col-end}}
| |
| |
| |
| {{col-begin}}
| |
| *None.
| |
| {{col-end}}
| |
| |-
| |
| ! colspan="2" width="404px"| '''Abilities'''
| |
| |- bgcolor="#E47575"
| |
| | colspan="2" |
| |
| {{col-begin}}
| |
| {{col-break|width=50%}}
| |
| *None.
| |
| {{col-break|width=50%}}
| |
| *None.
| |
| {{col-end}}
| |
| |}
| |
| | |
| ===Room 16===
| |
| ====Enemies, Mid-Bosses, and Abilities====
| |
| {| style="border: 3px solid #E47575; {{round}};background: #F69D99" cellspacing="2"
| |
| ! width="267px" | '''Regular Enemies'''
| |
| ! width="133px" | '''Mid-Bosses'''
| |
| |- bgcolor="E47575"
| |
| |
| |
| {{col-begin}}
| |
| {{col-break|width=50%}}
| |
| *None.
| |
| {{col-break|width=50%}}
| |
| *None.
| |
| {{col-end}}
| |
| |
| |
| {{col-begin}}
| |
| *None.
| |
| {{col-end}}
| |
| |-
| |
| ! colspan="2" width="404px"| '''Abilities'''
| |
| |- bgcolor="#E47575"
| |
| | colspan="2" |
| |
| {{col-begin}}
| |
| {{col-break|width=50%}}
| |
| *None.
| |
| {{col-break|width=50%}}
| |
| *None.
| |
| {{col-end}}
| |
| |}
| |
| | |
| ===Room 17===
| |
| ====Enemies, Mid-Bosses, and Abilities====
| |
| {| style="border: 3px solid #E47575; {{round}};background: #F69D99" cellspacing="2"
| |
| ! width="267px" | '''Regular Enemies'''
| |
| ! width="133px" | '''Mid-Bosses'''
| |
| |- bgcolor="E47575"
| |
| |
| |
| {{col-begin}}
| |
| {{col-break|width=50%}}
| |
| *None.
| |
| {{col-break|width=50%}}
| |
| *None.
| |
| {{col-end}}
| |
| |
| |
| {{col-begin}}
| |
| *None.
| |
| {{col-end}}
| |
| |-
| |
| ! colspan="2" width="404px"| '''Abilities'''
| |
| |- bgcolor="#E47575"
| |
| | colspan="2" |
| |
| {{col-begin}}
| |
| {{col-break|width=50%}}
| |
| *None.
| |
| {{col-break|width=50%}}
| |
| *None.
| |
| {{col-end}}
| |
| |}
| |
| | |
| ===Room 18===
| |
| ====Enemies, Mid-Bosses, and Abilities====
| |
| {| style="border: 3px solid #E47575; {{round}};background: #F69D99" cellspacing="2"
| |
| ! width="267px" | '''Regular Enemies'''
| |
| ! width="133px" | '''Mid-Bosses'''
| |
| |- bgcolor="E47575"
| |
| |
| |
| {{col-begin}}
| |
| {{col-break|width=50%}}
| |
| *None.
| |
| {{col-break|width=50%}}
| |
| *None.
| |
| {{col-end}}
| |
| |
| |
| {{col-begin}}
| |
| *None.
| |
| {{col-end}}
| |
| |-
| |
| ! colspan="2" width="404px"| '''Abilities'''
| |
| |- bgcolor="#E47575"
| |
| | colspan="2" |
| |
| {{col-begin}}
| |
| {{col-break|width=50%}}
| |
| *None.
| |
| {{col-break|width=50%}}
| |
| *None.
| |
| {{col-end}}
| |
| |}
| |
| | |
| ===Room 19===
| |
| ====Enemies, Mid-Bosses, and Abilities====
| |
| {| style="border: 3px solid #E47575; {{round}};background: #F69D99" cellspacing="2"
| |
| ! width="267px" | '''Regular Enemies'''
| |
| ! width="133px" | '''Mid-Bosses'''
| |
| |- bgcolor="E47575"
| |
| |
| |
| {{col-begin}}
| |
| {{col-break|width=50%}}
| |
| *None.
| |
| {{col-break|width=50%}}
| |
| *None.
| |
| {{col-end}}
| |
| |
| |
| {{col-begin}}
| |
| *None.
| |
| {{col-end}}
| |
| |-
| |
| ! colspan="2" width="404px"| '''Abilities'''
| |
| |- bgcolor="#E47575"
| |
| | colspan="2" |
| |
| {{col-begin}}
| |
| {{col-break|width=50%}}
| |
| *None.
| |
| {{col-break|width=50%}}
| |
| *None.
| |
| {{col-end}}
| |
| |}
| |
| | |
| ===Room 20===
| |
| ====Enemies, Mid-Bosses, and Abilities====
| |
| {| style="border: 3px solid #E47575; {{round}};background: #F69D99" cellspacing="2"
| |
| ! width="267px" | '''Regular Enemies'''
| |
| ! width="133px" | '''Mid-Bosses'''
| |
| |- bgcolor="E47575"
| |
| |
| |
| {{col-begin}}
| |
| {{col-break|width=50%}}
| |
| *None.
| |
| {{col-break|width=50%}}
| |
| *None.
| |
| {{col-end}}
| |
| |
| |
| {{col-begin}}
| |
| *None.
| |
| {{col-end}}
| |
| |-
| |
| ! colspan="2" width="404px"| '''Abilities'''
| |
| |- bgcolor="#E47575"
| |
| | colspan="2" |
| |
| {{col-begin}}
| |
| {{col-break|width=50%}}
| |
| *None.
| |
| {{col-break|width=50%}}
| |
| *None.
| |
| {{col-end}}
| |
| |}
| |
| | |
| ===Room 21===
| |
| ====Enemies, Mid-Bosses, and Abilities====
| |
| {| style="border: 3px solid #E47575; {{round}};background: #F69D99" cellspacing="2"
| |
| ! width="267px" | '''Regular Enemies'''
| |
| ! width="133px" | '''Mid-Bosses'''
| |
| |- bgcolor="E47575"
| |
| |
| |
| {{col-begin}}
| |
| {{col-break|width=50%}}
| |
| *None.
| |
| {{col-break|width=50%}}
| |
| *None.
| |
| {{col-end}}
| |
| |
| |
| {{col-begin}}
| |
| *None.
| |
| {{col-end}}
| |
| |-
| |
| ! colspan="2" width="404px"| '''Abilities'''
| |
| |- bgcolor="#E47575"
| |
| | colspan="2" |
| |
| {{col-begin}}
| |
| {{col-break|width=50%}}
| |
| *None.
| |
| {{col-break|width=50%}}
| |
| *None.
| |
| {{col-end}}
| |
| |}
| |
| | |
| ===Room 22===
| |
| ====Enemies, Mid-Bosses, and Abilities====
| |
| {| style="border: 3px solid #E47575; {{round}};background: #F69D99" cellspacing="2"
| |
| ! width="267px" | '''Regular Enemies'''
| |
| ! width="133px" | '''Mid-Bosses'''
| |
| |- bgcolor="E47575"
| |
| |
| |
| {{col-begin}}
| |
| {{col-break|width=50%}}
| |
| *None.
| |
| {{col-break|width=50%}}
| |
| *None.
| |
| {{col-end}}
| |
| |
| |
| {{col-begin}}
| |
| *None.
| |
| {{col-end}}
| |
| |-
| |
| ! colspan="2" width="404px"| '''Abilities'''
| |
| |- bgcolor="#E47575"
| |
| | colspan="2" |
| |
| {{col-begin}}
| |
| {{col-break|width=50%}}
| |
| *None.
| |
| {{col-break|width=50%}}
| |
| *None.
| |
| {{col-end}}
| |
| |}
| |
| | |
| ===Room 23===
| |
| ====Enemies, Mid-Bosses, and Abilities====
| |
| {| style="border: 3px solid #E47575; {{round}};background: #F69D99" cellspacing="2"
| |
| ! width="267px" | '''Regular Enemies'''
| |
| ! width="133px" | '''Mid-Bosses'''
| |
| |- bgcolor="E47575"
| |
| |
| |
| {{col-begin}}
| |
| {{col-break|width=50%}}
| |
| *None.
| |
| {{col-break|width=50%}}
| |
| *None.
| |
| {{col-end}}
| |
| |
| |
| {{col-begin}}
| |
| *None.
| |
| {{col-end}}
| |
| |-
| |
| ! colspan="2" width="404px"| '''Abilities'''
| |
| |- bgcolor="#E47575"
| |
| | colspan="2" |
| |
| {{col-begin}}
| |
| {{col-break|width=50%}}
| |
| *None.
| |
| {{col-break|width=50%}}
| |
| *None.
| |
| {{col-end}}
| |
| |}
| |
| | |
| ===Room 24===
| |
| ====Enemies, Mid-Bosses, and Abilities====
| |
| {| style="border: 3px solid #E47575; {{round}};background: #F69D99" cellspacing="2"
| |
| ! width="267px" | '''Regular Enemies'''
| |
| ! width="133px" | '''Mid-Bosses'''
| |
| |- bgcolor="E47575"
| |
| |
| |
| {{col-begin}}
| |
| {{col-break|width=50%}}
| |
| *None.
| |
| {{col-break|width=50%}}
| |
| *None.
| |
| {{col-end}}
| |
| |
| |
| {{col-begin}}
| |
| *None.
| |
| {{col-end}}
| |
| |-
| |
| ! colspan="2" width="404px"| '''Abilities'''
| |
| |- bgcolor="#E47575"
| |
| | colspan="2" |
| |
| {{col-begin}}
| |
| {{col-break|width=50%}}
| |
| *None.
| |
| {{col-break|width=50%}}
| |
| *None.
| |
| {{col-end}}
| |
| |}
| |
| | |
| ===Room 25===
| |
| ====Enemies, Mid-Bosses, and Abilities====
| |
| {| style="border: 3px solid #E47575; {{round}};background: #F69D99" cellspacing="2"
| |
| ! width="267px" | '''Regular Enemies'''
| |
| ! width="133px" | '''Mid-Bosses'''
| |
| |- bgcolor="E47575"
| |
| |
| |
| {{col-begin}}
| |
| {{col-break|width=50%}}
| |
| *None.
| |
| {{col-break|width=50%}}
| |
| *None.
| |
| {{col-end}}
| |
| |
| |
| {{col-begin}}
| |
| *None.
| |
| {{col-end}}
| |
| |-
| |
| ! colspan="2" width="404px"| '''Abilities'''
| |
| |- bgcolor="#E47575"
| |
| | colspan="2" |
| |
| {{col-begin}}
| |
| {{col-break|width=50%}}
| |
| *None.
| |
| {{col-break|width=50%}}
| |
| *None.
| |
| {{col-end}}
| |
| |}
| |
| | |
| ===Room 26===
| |
| ====Enemies, Mid-Bosses, and Abilities====
| |
| {| style="border: 3px solid #E47575; {{round}};background: #F69D99" cellspacing="2"
| |
| ! width="267px" | '''Regular Enemies'''
| |
| ! width="133px" | '''Mid-Bosses'''
| |
| |- bgcolor="E47575"
| |
| |
| |
| {{col-begin}}
| |
| {{col-break|width=50%}}
| |
| *None.
| |
| {{col-break|width=50%}}
| |
| *None.
| |
| {{col-end}}
| |
| |
| |
| {{col-begin}}
| |
| *None.
| |
| {{col-end}}
| |
| |-
| |
| ! colspan="2" width="404px"| '''Abilities'''
| |
| |- bgcolor="#E47575"
| |
| | colspan="2" |
| |
| {{col-begin}}
| |
| {{col-break|width=50%}}
| |
| *None.
| |
| {{col-break|width=50%}}
| |
| *None.
| |
| {{col-end}}
| |
| |}
| |
| | |
| ===Room 27===
| |
| ====Enemies, Mid-Bosses, and Abilities====
| |
| {| style="border: 3px solid #E47575; {{round}};background: #F69D99" cellspacing="2"
| |
| ! width="267px" | '''Regular Enemies'''
| |
| ! width="133px" | '''Mid-Bosses'''
| |
| |- bgcolor="E47575"
| |
| |
| |
| {{col-begin}}
| |
| {{col-break|width=50%}}
| |
| *None.
| |
| {{col-break|width=50%}}
| |
| *None.
| |
| {{col-end}}
| |
| |
| |
| {{col-begin}}
| |
| *None.
| |
| {{col-end}}
| |
| |-
| |
| ! colspan="2" width="404px"| '''Abilities'''
| |
| |- bgcolor="#E47575"
| |
| | colspan="2" |
| |
| {{col-begin}}
| |
| {{col-break|width=50%}}
| |
| *None.
| |
| {{col-break|width=50%}}
| |
| *None.
| |
| {{col-end}}
| |
| |}
| |
| | |
| ===Room 28===
| |
| ====Enemies, Mid-Bosses, and Abilities====
| |
| {| style="border: 3px solid #E47575; {{round}};background: #F69D99" cellspacing="2"
| |
| ! width="267px" | '''Regular Enemies'''
| |
| ! width="133px" | '''Mid-Bosses'''
| |
| |- bgcolor="E47575"
| |
| |
| |
| {{col-begin}}
| |
| {{col-break|width=50%}}
| |
| *None.
| |
| {{col-break|width=50%}}
| |
| *None.
| |
| {{col-end}}
| |
| |
| |
| {{col-begin}}
| |
| *None.
| |
| {{col-end}}
| |
| |-
| |
| ! colspan="2" width="404px"| '''Abilities'''
| |
| |- bgcolor="#E47575"
| |
| | colspan="2" |
| |
| {{col-begin}}
| |
| {{col-break|width=50%}}
| |
| *None.
| |
| {{col-break|width=50%}}
| |
| *None.
| |
| {{col-end}}
| |
| |}
| |
| | |
| ===Room 29===
| |
| ====Enemies, Mid-Bosses, and Abilities====
| |
| {| style="border: 3px solid #E47575; {{round}};background: #F69D99" cellspacing="2"
| |
| ! width="267px" | '''Regular Enemies'''
| |
| ! width="133px" | '''Mid-Bosses'''
| |
| |- bgcolor="E47575"
| |
| |
| |
| {{col-begin}}
| |
| {{col-break|width=50%}}
| |
| *None.
| |
| {{col-break|width=50%}}
| |
| *None.
| |
| {{col-end}}
| |
| |
| |
| {{col-begin}}
| |
| *None.
| |
| {{col-end}}
| |
| |-
| |
| ! colspan="2" width="404px"| '''Abilities'''
| |
| |- bgcolor="#E47575"
| |
| | colspan="2" |
| |
| {{col-begin}}
| |
| {{col-break|width=50%}}
| |
| *None.
| |
| {{col-break|width=50%}}
| |
| *None.
| |
| {{col-end}}
| |
| |}
| |
| | |
| ===Room 30===
| |
| ====Enemies, Mid-Bosses, and Abilities====
| |
| {| style="border: 3px solid #E47575; {{round}};background: #F69D99" cellspacing="2"
| |
| ! width="267px" | '''Regular Enemies'''
| |
| ! width="133px" | '''Mid-Bosses'''
| |
| |- bgcolor="E47575"
| |
| |
| |
| {{col-begin}}
| |
| {{col-break|width=50%}}
| |
| *None.
| |
| {{col-break|width=50%}}
| |
| *None.
| |
| {{col-end}}
| |
| |
| |
| {{col-begin}}
| |
| *None.
| |
| {{col-end}}
| |
| |-
| |
| ! colspan="2" width="404px"| '''Abilities'''
| |
| |- bgcolor="#E47575"
| |
| | colspan="2" |
| |
| {{col-begin}}
| |
| {{col-break|width=50%}}
| |
| *None.
| |
| {{col-break|width=50%}}
| |
| *None.
| |
| {{col-end}}
| |
| |}
| |
| | |
| ===Room 31===
| |
| ====Enemies, Mid-Bosses, and Abilities====
| |
| {| style="border: 3px solid #E47575; {{round}};background: #F69D99" cellspacing="2"
| |
| ! width="267px" | '''Regular Enemies'''
| |
| ! width="133px" | '''Mid-Bosses'''
| |
| |- bgcolor="E47575"
| |
| |
| |
| {{col-begin}}
| |
| {{col-break|width=50%}}
| |
| *None.
| |
| {{col-break|width=50%}}
| |
| *None.
| |
| {{col-end}}
| |
| |
| |
| {{col-begin}}
| |
| *None.
| |
| {{col-end}}
| |
| |-
| |
| ! colspan="2" width="404px"| '''Abilities'''
| |
| |- bgcolor="#E47575"
| |
| | colspan="2" |
| |
| {{col-begin}}
| |
| {{col-break|width=50%}}
| |
| *None.
| |
| {{col-break|width=50%}}
| |
| *None.
| |
| {{col-end}}
| |
| |}
| |
| | |
| ===Room 32===
| |
| ====Enemies, Mid-Bosses, and Abilities====
| |
| {| style="border: 3px solid #E47575; {{round}};background: #F69D99" cellspacing="2"
| |
| ! width="267px" | '''Regular Enemies'''
| |
| ! width="133px" | '''Mid-Bosses'''
| |
| |- bgcolor="E47575"
| |
| |
| |
| {{col-begin}}
| |
| {{col-break|width=50%}}
| |
| *None.
| |
| {{col-break|width=50%}}
| |
| *None.
| |
| {{col-end}}
| |
| |
| |
| {{col-begin}}
| |
| *None.
| |
| {{col-end}}
| |
| |-
| |
| ! colspan="2" width="404px"| '''Abilities'''
| |
| |- bgcolor="#E47575"
| |
| | colspan="2" |
| |
| {{col-begin}}
| |
| {{col-break|width=50%}}
| |
| *None.
| |
| {{col-break|width=50%}}
| |
| *None.
| |
| {{col-end}}
| |
| |}
| |
| | |
| ===Room 33===
| |
| ====Enemies, Mid-Bosses, and Abilities====
| |
| {| style="border: 3px solid #E47575; {{round}};background: #F69D99" cellspacing="2"
| |
| ! width="267px" | '''Regular Enemies'''
| |
| ! width="133px" | '''Mid-Bosses'''
| |
| |- bgcolor="E47575"
| |
| |
| |
| {{col-begin}}
| |
| {{col-break|width=50%}}
| |
| *None.
| |
| {{col-break|width=50%}}
| |
| *None.
| |
| {{col-end}}
| |
| |
| |
| {{col-begin}}
| |
| *None.
| |
| {{col-end}}
| |
| |-
| |
| ! colspan="2" width="404px"| '''Abilities'''
| |
| |- bgcolor="#E47575"
| |
| | colspan="2" |
| |
| {{col-begin}}
| |
| {{col-break|width=50%}}
| |
| *None.
| |
| {{col-break|width=50%}}
| |
| *None.
| |
| {{col-end}}
| |
| |}
| |
| | |
| ===Room 34===
| |
| ====Enemies, Mid-Bosses, and Abilities====
| |
| {| style="border: 3px solid #E47575; {{round}};background: #F69D99" cellspacing="2"
| |
| ! width="267px" | '''Regular Enemies'''
| |
| ! width="133px" | '''Mid-Bosses'''
| |
| |- bgcolor="E47575"
| |
| |
| |
| {{col-begin}}
| |
| {{col-break|width=50%}}
| |
| *None.
| |
| {{col-break|width=50%}}
| |
| *None.
| |
| {{col-end}}
| |
| |
| |
| {{col-begin}}
| |
| *None.
| |
| {{col-end}}
| |
| |-
| |
| ! colspan="2" width="404px"| '''Abilities'''
| |
| |- bgcolor="#E47575"
| |
| | colspan="2" |
| |
| {{col-begin}}
| |
| {{col-break|width=50%}}
| |
| *None.
| |
| {{col-break|width=50%}}
| |
| *None.
| |
| {{col-end}}
| |
| |}
| |
| | |
| ===Room 35===
| |
| ====Enemies, Mid-Bosses, and Abilities====
| |
| {| style="border: 3px solid #E47575; {{round}};background: #F69D99" cellspacing="2"
| |
| ! width="267px" | '''Regular Enemies'''
| |
| ! width="133px" | '''Mid-Bosses'''
| |
| |- bgcolor="E47575"
| |
| |
| |
| {{col-begin}}
| |
| {{col-break|width=50%}}
| |
| *None.
| |
| {{col-break|width=50%}}
| |
| *None.
| |
| {{col-end}}
| |
| |
| |
| {{col-begin}}
| |
| *None.
| |
| {{col-end}}
| |
| |-
| |
| ! colspan="2" width="404px"| '''Abilities'''
| |
| |- bgcolor="#E47575"
| |
| | colspan="2" |
| |
| {{col-begin}}
| |
| {{col-break|width=50%}}
| |
| *None.
| |
| {{col-break|width=50%}}
| |
| *None.
| |
| {{col-end}}
| |
| |}
| |
| | |
| ===Room 36===
| |
| ====Enemies, Mid-Bosses, and Abilities====
| |
| {| style="border: 3px solid #E47575; {{round}};background: #F69D99" cellspacing="2"
| |
| ! width="267px" | '''Regular Enemies'''
| |
| ! width="133px" | '''Mid-Bosses'''
| |
| |- bgcolor="E47575"
| |
| |
| |
| {{col-begin}}
| |
| {{col-break|width=50%}}
| |
| *None.
| |
| {{col-break|width=50%}}
| |
| *None.
| |
| {{col-end}}
| |
| |
| |
| {{col-begin}}
| |
| *None.
| |
| {{col-end}}
| |
| |-
| |
| ! colspan="2" width="404px"| '''Abilities'''
| |
| |- bgcolor="#E47575"
| |
| | colspan="2" |
| |
| {{col-begin}}
| |
| {{col-break|width=50%}}
| |
| *None.
| |
| {{col-break|width=50%}}
| |
| *None.
| |
| {{col-end}}
| |
| |}
| |
| | |
| ===Room 37===
| |
| ====Enemies, Mid-Bosses, and Abilities====
| |
| {| style="border: 3px solid #E47575; {{round}};background: #F69D99" cellspacing="2"
| |
| ! width="267px" | '''Regular Enemies'''
| |
| ! width="133px" | '''Mid-Bosses'''
| |
| |- bgcolor="E47575"
| |
| |
| |
| {{col-begin}}
| |
| {{col-break|width=50%}}
| |
| *None.
| |
| {{col-break|width=50%}}
| |
| *None.
| |
| {{col-end}}
| |
| |
| |
| {{col-begin}}
| |
| *None.
| |
| {{col-end}}
| |
| |-
| |
| ! colspan="2" width="404px"| '''Abilities'''
| |
| |- bgcolor="#E47575"
| |
| | colspan="2" |
| |
| {{col-begin}}
| |
| {{col-break|width=50%}}
| |
| *None.
| |
| {{col-break|width=50%}}
| |
| *None.
| |
| {{col-end}}
| |
| |}
| |
| | |
| ===Room 38===
| |
| ====Enemies, Mid-Bosses, and Abilities====
| |
| {| style="border: 3px solid #E47575; {{round}};background: #F69D99" cellspacing="2"
| |
| ! width="267px" | '''Regular Enemies'''
| |
| ! width="133px" | '''Mid-Bosses'''
| |
| |- bgcolor="E47575"
| |
| |
| |
| {{col-begin}}
| |
| {{col-break|width=50%}}
| |
| *None.
| |
| {{col-break|width=50%}}
| |
| *None.
| |
| {{col-end}}
| |
| |
| |
| {{col-begin}}
| |
| *None.
| |
| {{col-end}}
| |
| |-
| |
| ! colspan="2" width="404px"| '''Abilities'''
| |
| |- bgcolor="#E47575"
| |
| | colspan="2" |
| |
| {{col-begin}}
| |
| {{col-break|width=50%}}
| |
| *None.
| |
| {{col-break|width=50%}}
| |
| *None.
| |
| {{col-end}}
| |
| |}
| |
| | |
| ===Room 39===
| |
| ====Enemies, Mid-Bosses, and Abilities====
| |
| {| style="border: 3px solid #E47575; {{round}};background: #F69D99" cellspacing="2"
| |
| ! width="267px" | '''Regular Enemies'''
| |
| ! width="133px" | '''Mid-Bosses'''
| |
| |- bgcolor="E47575"
| |
| |
| |
| {{col-begin}}
| |
| {{col-break|width=50%}}
| |
| *None.
| |
| {{col-break|width=50%}}
| |
| *None.
| |
| {{col-end}}
| |
| |
| |
| {{col-begin}}
| |
| *None.
| |
| {{col-end}}
| |
| |-
| |
| ! colspan="2" width="404px"| '''Abilities'''
| |
| |- bgcolor="#E47575"
| |
| | colspan="2" |
| |
| {{col-begin}}
| |
| {{col-break|width=50%}}
| |
| *None.
| |
| {{col-break|width=50%}}
| |
| *None.
| |
| {{col-end}}
| |
| |}
| |
| | |
| ===Room 40===
| |
| ====Enemies, Mid-Bosses, and Abilities====
| |
| {| style="border: 3px solid #E47575; {{round}};background: #F69D99" cellspacing="2"
| |
| ! width="267px" | '''Regular Enemies'''
| |
| ! width="133px" | '''Mid-Bosses'''
| |
| |- bgcolor="E47575"
| |
| |
| |
| {{col-begin}}
| |
| {{col-break|width=50%}}
| |
| *None.
| |
| {{col-break|width=50%}}
| |
| *None.
| |
| {{col-end}}
| |
| |
| |
| {{col-begin}}
| |
| *None.
| |
| {{col-end}}
| |
| |-
| |
| ! colspan="2" width="404px"| '''Abilities'''
| |
| |- bgcolor="#E47575"
| |
| | colspan="2" |
| |
| {{col-begin}}
| |
| {{col-break|width=50%}}
| |
| *None.
| |
| {{col-break|width=50%}}
| |
| *None.
| |
| {{col-end}}
| |
| |}
| |
| | |
| ===Room 41===
| |
| ====Enemies, Mid-Bosses, and Abilities====
| |
| {| style="border: 3px solid #E47575; {{round}};background: #F69D99" cellspacing="2"
| |
| ! width="267px" | '''Regular Enemies'''
| |
| ! width="133px" | '''Mid-Bosses'''
| |
| |- bgcolor="E47575"
| |
| |
| |
| {{col-begin}}
| |
| {{col-break|width=50%}}
| |
| *None.
| |
| {{col-break|width=50%}}
| |
| *None.
| |
| {{col-end}}
| |
| |
| |
| {{col-begin}}
| |
| *None.
| |
| {{col-end}}
| |
| |-
| |
| ! colspan="2" width="404px"| '''Abilities'''
| |
| |- bgcolor="#E47575"
| |
| | colspan="2" |
| |
| {{col-begin}}
| |
| {{col-break|width=50%}}
| |
| *None.
| |
| {{col-break|width=50%}}
| |
| *None.
| |
| {{col-end}}
| |
| |}
| |
| | |
| ===Room 42===
| |
| ====Enemies, Mid-Bosses, and Abilities====
| |
| {| style="border: 3px solid #E47575; {{round}};background: #F69D99" cellspacing="2"
| |
| ! width="267px" | '''Regular Enemies'''
| |
| ! width="133px" | '''Mid-Bosses'''
| |
| |- bgcolor="E47575"
| |
| |
| |
| {{col-begin}}
| |
| {{col-break|width=50%}}
| |
| *None.
| |
| {{col-break|width=50%}}
| |
| *None.
| |
| {{col-end}}
| |
| |
| |
| {{col-begin}}
| |
| *None.
| |
| {{col-end}}
| |
| |-
| |
| ! colspan="2" width="404px"| '''Abilities'''
| |
| |- bgcolor="#E47575"
| |
| | colspan="2" |
| |
| {{col-begin}}
| |
| {{col-break|width=50%}}
| |
| *None.
| |
| {{col-break|width=50%}}
| |
| *None.
| |
| {{col-end}}
| |
| |}
| |
|
| |
|
| ==Gallery== | | ==Gallery== |
| <center>
| | {{center| |
| <gallery> | | <gallery> |
| File:KatAM S RainbowRoute2.PNG|In the forest. | | File:KatAM S RainbowRoute2.png|In the forest. |
| File:KatAM S RainbowRoute3.PNG|A grassy cave. | | File:KatAM S RainbowRoute3.png|A grassy cave. |
| File:KatAM S RainbowRoute4.PNG|A mountain tunnel. | | File:KatAM S RainbowRoute4.png|A mountain tunnel. |
| File:KatAM S RainbowRoute5.PNG|In the western pine woods. | | File:KatAM S RainbowRoute5.png|In the western pine woods. |
| File:KatAM S RainbowRoute6.PNG|A small underground pond. | | File:KatAM S RainbowRoute6.png|A small underground pond. |
| </gallery> | | </gallery> |
| </center>
| | }} |
| <br clear=all>
| | |
| | ==Names in other languages== |
| | {{Names |
| | |ja=レインボールート |
| | |jaR=Reinbō Rūto |
| | |jaM=Rainbow Route |
| | |de=Regen-bogenroute |
| | |deM=Rainbow Route |
| | |es=Ruta Arco Iris |
| | |esM=Rainbow Route |
| | |fr=Route Arc-en-ciel |
| | |frM=Rainbow Route |
| | |it=Sentiero Arcobaleno |
| | |itM=Rainbow Trail |
| | }} |
| | |
| | {{clear}} |
|
| |
|
| {{AMNavmap}} | | {{Navmap-KaTAM|coord1=70|coord2=112}} |
| {{KatAM}} | | {{Navbox-KaTAM}} |
| [[Category:Mirror World locations]]
| |
| [[Category:Levels in Kirby & the Amazing Mirror]]
| |