Radish Ruins: Difference between revisions
No edit summary |
m (→Enemies, Bosses, and Abilities in Radish Ruins: Shadow Kirby grants Cutter in the Radish Ruins.) |
||
| (24 intermediate revisions by 8 users not shown) | |||
| Line 1: | Line 1: | ||
{{Infobox-K&tAMLevel | {{Infobox-K&tAMLevel | ||
|image= [[File:KatAMRadishRuins.png]] | |image= [[File:KatAMRadishRuins.png]] | ||
| Line 8: | Line 7: | ||
|connect= [[Cabbage Cavern]] <br> [[Carrot Castle]] | |connect= [[Cabbage Cavern]] <br> [[Carrot Castle]] | ||
|mid-boss= [[Bonkers]] <br> [[Boxy]] <br> [[Master Hand]] | |mid-boss= [[Bonkers]] <br> [[Boxy]] <br> [[Master Hand]] | ||
|theme music=[[File:KaTAM Ruins Area.mp3]] | |||
|theme title="[[Ruins Area]]" | |||
|description=Clip of the "Ruins Area" theme from ''[[Kirby & The Amazing Mirror]]'' | |||
|boss= [[Dark Meta Knight|???]] | |boss= [[Dark Meta Knight|???]] | ||
|previous= [[Peppermint Palace]] | |previous= [[Peppermint Palace]] | ||
|next=[[Candy Constellation]] | |next=[[Candy Constellation]] | ||
}} | }} | ||
'''Radish Ruins''' are a set of ruins in the [[Mirror World]] of ''[[Kirby & The Amazing Mirror]]''. [[Kirby]] explores the depths of Radish Ruins in order to obtain a [[Mirror Shard]] held by [[Dark Meta Knight]]. The style of artwork on the ruins bears many similarities to ancient Mayan stone works. An overhead view of the ruins can be seen in the southwest portion of the Mirror World map. This presumed ancient temple is an elaborate stone structure, despite its small size, navigating it is more difficult than expected as there are many one-way passages and areas requiring | {{Distinguish|the area in [[Kirby & The Amazing Mirror]]|[[Raisin Ruins]]}} | ||
'''Radish Ruins''' are a set of ruins in the [[Mirror World]] of ''[[Kirby & The Amazing Mirror]]''. [[Kirby]] explores the depths of Radish Ruins in order to obtain a [[Mirror Shard]] held by [[Dark Meta Knight]]. The style of artwork on the ruins bears many similarities to ancient Mayan stone works. An overhead view of the ruins can be seen in the southwest portion of the Mirror World map. This presumed ancient temple is an elaborate stone structure, and despite its small size, navigating it is more difficult than expected as there are many one-way passages and areas requiring specific [[Copy Ability|Copy Abilities]] to advance. | |||
A small outdoor | A small outdoor desert area can also be explored near the central upper most portion of the map. This region is full of enemies, sparse on [[food]], and leads to various end points; one being a [[Goal Game]], and the other being Kirby's fateful boss encounter. | ||
==Treasure== | ==Treasure== | ||
Kirby is able to obtain the [[Spray Paint|Emerald spray paint]], a [[Vitality | Kirby is able to obtain the [[Spray Paint|Emerald spray paint]], a [[Vitality]], one [[Notes|Sound File]], and the [[Map (item)|Area Map]] for the [[Collection Room]]. In addition, there are many [[1-Up]]s, [[Energy Drink]]s, [[Battery (Kirby & The Amazing Mirror)|batteries]], [[food|recovery items]], and [[Maxim Tomato|Maxim Tomatoes]]. | ||
====Enemies, Bosses, and Abilities in Radish Ruins==== | ====Enemies, Bosses, and Abilities in Radish Ruins==== | ||
| Line 37: | Line 40: | ||
!Copy Ability | !Copy Ability | ||
|- | |- | ||
|align=center|[[File: | |align=center|[[File:KaTAM Bang Bang.png]] | ||
|[[Bang-Bang]] | |[[Bang-Bang]] | ||
|style="border-style: solid; border-width: 1px 3px 1px 1px" align=center|[[Missile]] | |style="border-style: solid; border-width: 1px 3px 1px 1px" align=center|[[Missile]] | ||
| Line 46: | Line 49: | ||
|[[Mirra]] | |[[Mirra]] | ||
|style="border-style: solid; border-width: 1px 3px 1px 1px" align=center|N/A | |style="border-style: solid; border-width: 1px 3px 1px 1px" align=center|N/A | ||
|align=center|[[File: | |align=center|[[File:KNiDL Sir Kibble sprite.png]] | ||
|[[Sir Kibble]] | |[[Sir Kibble]] | ||
|style="border-style: solid; border-width: 1px 3px 1px 1px" align=center|[[Cutter]] | |style="border-style: solid; border-width: 1px 3px 1px 1px" align=center|[[Cutter]] | ||
| Line 56: | Line 59: | ||
|[[Golem]] | |[[Golem]] | ||
|style="border-style: solid; border-width: 1px 3px 1px 1px" align=center|[[Stone]], [[Wheel]], & [[Fighter]] | |style="border-style: solid; border-width: 1px 3px 1px 1px" align=center|[[Stone]], [[Wheel]], & [[Fighter]] | ||
|align=center|[[File: | |align=center|[[File:KNiDL Noddy sprite.png]] | ||
|[[Noddy]] | |[[Noddy]] | ||
|style="border-style: solid; border-width: 1px 3px 1px 1px" align=center|[[Sleep]] | |style="border-style: solid; border-width: 1px 3px 1px 1px" align=center|[[Sleep]] | ||
| Line 63: | Line 66: | ||
|style="border-style: solid; border-width: 1px 3px 1px 1px" align=center|None | |style="border-style: solid; border-width: 1px 3px 1px 1px" align=center|None | ||
|- | |- | ||
|align=center|[[File: | |align=center|[[File:KNiDL Bomber sprite.png]] | ||
|[[Bomber]] | |[[Bomber]] | ||
|style="border-style: solid; border-width: 1px 3px 1px 1px" align=center|[[Crash]] | |style="border-style: solid; border-width: 1px 3px 1px 1px" align=center|[[Crash]] | ||
|align=center|[[File: | |align=center|[[File:KNiDL Gordo sprite.png]] | ||
|[[Gordo]] | |[[Gordo]] | ||
|style="border-style: solid; border-width: 1px 3px 1px 1px" align=center|N/A | |style="border-style: solid; border-width: 1px 3px 1px 1px" align=center|N/A | ||
|align=center|[[File: | |align=center|[[File:KNiDL Parasol enemy sprite.png]] | ||
|[[Parasol (enemy)|Parasol]] | |[[Parasol (enemy)|Parasol]] | ||
|style="border-style: solid; border-width: 1px 3px 1px 1px" align=center|[[Parasol]] | |style="border-style: solid; border-width: 1px 3px 1px 1px" align=center|[[Parasol]] | ||
| Line 82: | Line 85: | ||
|[[Haley]] | |[[Haley]] | ||
|style="border-style: solid; border-width: 1px 3px 1px 1px" align=center|None | |style="border-style: solid; border-width: 1px 3px 1px 1px" align=center|None | ||
|align=center|[[File: | |align=center|[[File:KNiDL Pengi sprite.png]] | ||
|[[Pengy]] | |[[Pengy]] | ||
|style="border-style: solid; border-width: 1px 3px 1px 1px" align=center|[[Ice]] | |style="border-style: solid; border-width: 1px 3px 1px 1px" align=center|[[Ice]] | ||
|align=center|[[File: | |align=center|[[File:KNiDL Sparky sprite.png]] | ||
|[[Sparky]] | |[[Sparky]] | ||
|style="border-style: solid; border-width: 1px 3px 1px 1px" align=center|[[Spark]] | |style="border-style: solid; border-width: 1px 3px 1px 1px" align=center|[[Spark]] | ||
|- | |- | ||
|align=center|[[File: | |align=center|[[File:KNiDL Bronto Burt sprite.png]] | ||
|[[Bronto Burt]] | |[[Bronto Burt]] | ||
|style="border-style: solid; border-width: 1px 3px 1px 1px" align=center|None | |style="border-style: solid; border-width: 1px 3px 1px 1px" align=center|None | ||
| Line 98: | Line 101: | ||
|[[Roly-Poly]] | |[[Roly-Poly]] | ||
|style="border-style: solid; border-width: 1px 3px 1px 1px" align=center|None | |style="border-style: solid; border-width: 1px 3px 1px 1px" align=center|None | ||
|align=center|[[File: | |align=center|[[File:KNiDL Waddle Dee sprite.png]] | ||
|[[Waddle Dee]] | |[[Waddle Dee]] | ||
|style="border-style: solid; border-width: 1px 3px 1px 1px" align=center|None | |style="border-style: solid; border-width: 1px 3px 1px 1px" align=center|None | ||
| Line 105: | Line 108: | ||
|[[Chip]] | |[[Chip]] | ||
|style="border-style: solid; border-width: 1px 3px 1px 1px" align=center|None | |style="border-style: solid; border-width: 1px 3px 1px 1px" align=center|None | ||
|align=center|[[File: | |align=center|[[File:KNiDL Hot Head sprite.png]] | ||
|[[Hot Head]] | |[[Hot Head]] | ||
|style="border-style: solid; border-width: 1px 3px 1px 1px" align=center|[[Fire]] | |style="border-style: solid; border-width: 1px 3px 1px 1px" align=center|[[Fire]] | ||
|align=center|[[File: | |align=center|[[File:KNiDL Scarfy sprite.png]] | ||
|[[Scarfy]] | |[[Scarfy]] | ||
|style="border-style: solid; border-width: 1px 3px 1px 1px" align=center|N/A | |style="border-style: solid; border-width: 1px 3px 1px 1px" align=center|N/A | ||
|align=center|[[File: | |align=center|[[File:KNiDL Waddle Doo sprite.png]] | ||
|[[Waddle Doo]] | |[[Waddle Doo]] | ||
|style="border-style: solid; border-width: 1px 3px 1px 1px" align=center|[[Beam]] | |style="border-style: solid; border-width: 1px 3px 1px 1px" align=center|[[Beam]] | ||
|- | |- | ||
|align=center|[[File: | |align=center|[[File:KaTAM Droppy.png]] | ||
|[[Droppy]] | |[[Droppy]] | ||
|style="border-style: solid; border-width: 1px 3px 1px 1px" align=center|None (default) | |style="border-style: solid; border-width: 1px 3px 1px 1px" align=center|None (default) | ||
| Line 122: | Line 125: | ||
|style="border-style: solid; border-width: 1px 3px 1px 1px" align=center|None | |style="border-style: solid; border-width: 1px 3px 1px 1px" align=center|None | ||
|align=center|[[File:KatAMShadowKirby.png]] | |align=center|[[File:KatAMShadowKirby.png]] | ||
|[[ | |[[Shadow Kirby]] | ||
|style="border-style: solid; border-width: 1px 3px 1px 1px" align=center| | |style="border-style: solid; border-width: 1px 3px 1px 1px" align=center|[[Cutter]] | ||
|align=center|[[File: | |align=center|[[File:KNiDL Wheelie sprite.png]] | ||
|[[Wheelie]] | |[[Wheelie]] | ||
|style="border-style: solid; border-width: 1px 3px 1px 1px" align=center|[[Wheel]] | |style="border-style: solid; border-width: 1px 3px 1px 1px" align=center|[[Wheel]] | ||
|- | |- | ||
|align=center|[[File: | |align=center|[[File:KNiDL Flamer sprite.png]] | ||
|[[Flamer]] | |[[Flamer]] | ||
|style="border-style: solid; border-width: 1px 3px 1px 1px" align=center|[[Burning]] | |style="border-style: solid; border-width: 1px 3px 1px 1px" align=center|[[Burning]] | ||
|align=center|[[File: | |align=center|[[File:KaTAM Leap.png]] | ||
|[[Leap]] | |[[Leap]] | ||
|style="border-style: solid; border-width: 1px 3px 1px 1px" align=center|None | |style="border-style: solid; border-width: 1px 3px 1px 1px" align=center|None | ||
|align=center|[[File: | |align=center|[[File:KNiDL Shotzo sprite.png]] | ||
|[[Shotzo]] | |[[Shotzo]] | ||
|style="border-style: solid; border-width: 1px 3px 1px 1px" align=center|N/A | |style="border-style: solid; border-width: 1px 3px 1px 1px" align=center|N/A | ||
| Line 146: | Line 149: | ||
!Copy Ability | !Copy Ability | ||
|- | |- | ||
|align=center|[[File: | |align=center|[[File:KNiDL Bonkers sprite.png]] | ||
|[[Bonkers]] | |[[Bonkers]] | ||
|[[Hammer]] | |[[Hammer]] | ||
| Line 165: | Line 168: | ||
!Copy Ability | !Copy Ability | ||
|- | |- | ||
|align=center|[[File: | |align=center|[[File:KNiDL Meta Knight sprite.png]] | ||
|[[Dark Meta Knight|???]] | |[[Dark Meta Knight|???]] | ||
|N/A | |N/A | ||
| Line 174: | Line 177: | ||
==Map== | ==Map== | ||
{{ | {{Navmap-KaTAM-RRu}} | ||
Radish Ruins is a very segmented area, consisting of a primary circuitous region to the lower-right, and two separate one-way paths to the upper-left. There are 23 normal rooms, one Hub, two Chest rooms (one of which contains the area map), and two Goal rooms. The boss of this area is [[Dark Meta Knight]], disguised as [[Meta Knight]]. | Radish Ruins is a very segmented area, consisting of a primary circuitous region to the lower-right, and two separate one-way paths to the upper-left. There are 23 normal rooms, one Hub, two Chest rooms (one of which contains the area map), and two Goal rooms. The boss of this area is [[Dark Meta Knight]], disguised as [[Meta Knight]]. | ||
Radish Ruins connects only to [[Cabbage Cavern]] below, and [[Carrot Castle]] above. There are no other ways in or out, apart from Kirby's personal Warp Star. | Radish Ruins connects only to [[Cabbage Cavern]] below, and [[Carrot Castle]] above. There are no other ways in or out, apart from Kirby's personal [[Warp Star]]. | ||
Radish Ruins has two Goal rooms. Completing the Goal Game in each room will take Kirby and any friends with him back to the [[Rainbow Route - Central Circle|Central Circle]] in [[Rainbow Route]]. | Radish Ruins has two Goal rooms. Completing the Goal Game in each room will take Kirby and any friends with him back to the [[Rainbow Route - Central Circle|Central Circle]] in [[Rainbow Route]]. | ||
| Line 185: | Line 188: | ||
==Gallery== | ==Gallery== | ||
<gallery> | <gallery> | ||
Radish Ruins Room 2.png|Navigating past traps | KaTAM Radish Ruins Room 2.png|Navigating past traps | ||
Radish Ruins Room 4.png|Floating above spikes | KaTAM Radish Ruins Room 4.png|Floating above spikes | ||
Radish Ruins Room 6.png|Climbing chutes | KaTAM Radish Ruins Room 6.png|Climbing chutes | ||
Radish Ruins Room 8.png|Peering through blockades | KaTAM Radish Ruins Room 8.png|Peering through blockades | ||
Radish Ruins Room 10.png|Ascending slanted halls | KaTAM Radish Ruins Room 10.png|Ascending slanted halls | ||
Radish Ruins Room 13.png|Blasting from cannons | KaTAM Radish Ruins Room 13.png|Blasting from cannons | ||
Radish Ruins Room 16.png|Blasting Jack | KaTAM Radish Ruins Room 16.png|Blasting Jack | ||
Radish Ruins Room 19.png|Pummeling Golems | KaTAM Radish Ruins Room 19.png|Pummeling Golems | ||
Radish Ruins Room 22.png|Traveling through the wastes for treasure | KaTAM Radish Ruins Room 22.png|Traveling through the wastes for treasure | ||
K&TAM Mock Meta Knight.png|Battle with [[Dark Meta Knight|???]] | K&TAM Mock Meta Knight.png|Battle with [[Dark Meta Knight|???]] | ||
</gallery> | </gallery> | ||
{{ | ==Names in other languages== | ||
{{Navbox- | {{Names | ||
|ja=ラディッシュルインズ | |||
|jaR=Radisshu Ruinzu | |||
|jaM=Radish Ruins | |||
|de=Rettich-ruinen | |||
|deM=Radish Ruins | |||
|es=Ruinas del Rábano | |||
|esM=Radish Ruins | |||
|fr=Ruines Radis | |||
|frM=Radish Ruins | |||
|it=Rovine del Radicchio | |||
|itM=Radish Ruins | |||
}} | |||
{{Navmap-KaTAM|coord1=130|coord2=30}} | |||
{{Navbox-KaTAM}} | |||
Latest revision as of 14:44, 26 April 2024
| ||||||||||||||||||
| ||||||||||||||||||
| ||||||||||||||||||
|
| ||||||||||||||||||

- This article is about the area in Kirby & The Amazing Mirror, and should not be confused with Raisin Ruins.
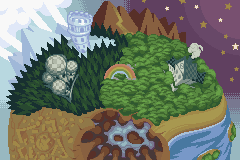
Radish Ruins are a set of ruins in the Mirror World of Kirby & The Amazing Mirror. Kirby explores the depths of Radish Ruins in order to obtain a Mirror Shard held by Dark Meta Knight. The style of artwork on the ruins bears many similarities to ancient Mayan stone works. An overhead view of the ruins can be seen in the southwest portion of the Mirror World map. This presumed ancient temple is an elaborate stone structure, and despite its small size, navigating it is more difficult than expected as there are many one-way passages and areas requiring specific Copy Abilities to advance.
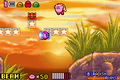
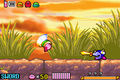
A small outdoor desert area can also be explored near the central upper most portion of the map. This region is full of enemies, sparse on food, and leads to various end points; one being a Goal Game, and the other being Kirby's fateful boss encounter.
Treasure[edit]
Kirby is able to obtain the Emerald spray paint, a Vitality, one Sound File, and the Area Map for the Collection Room. In addition, there are many 1-Ups, Energy Drinks, batteries, recovery items, and Maxim Tomatoes.
Enemies, Bosses, and Abilities in Radish Ruins[edit]
| ||||||||||||||||||||||||||||||||||||||||||||||||||||||||||||||||||||||||||||||||||||||||||||||||||||||||||||||||||
Map[edit]
| Radish Ruins Area Map | |
|---|---|
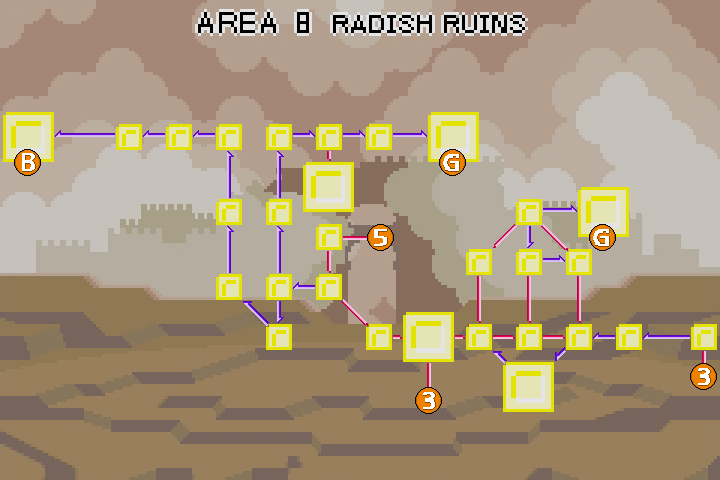 | |
Radish Ruins is a very segmented area, consisting of a primary circuitous region to the lower-right, and two separate one-way paths to the upper-left. There are 23 normal rooms, one Hub, two Chest rooms (one of which contains the area map), and two Goal rooms. The boss of this area is Dark Meta Knight, disguised as Meta Knight.
Radish Ruins connects only to Cabbage Cavern below, and Carrot Castle above. There are no other ways in or out, apart from Kirby's personal Warp Star.
Radish Ruins has two Goal rooms. Completing the Goal Game in each room will take Kirby and any friends with him back to the Central Circle in Rainbow Route.
For a full synopsis of what's in each room, click on any room on the map to head to the corresponding page.
Gallery[edit]
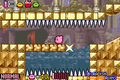
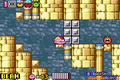
Navigating past traps
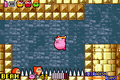
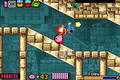
Floating above spikes
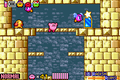
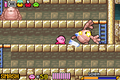
Climbing chutes
Peering through blockades
Ascending slanted halls
Blasting from cannons

Blasting Jack
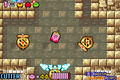
Pummeling Golems
Traveling through the wastes for treasure
Battle with ???


Names in other languages[edit]
| Language | Name | Meaning |
|---|---|---|
| Japanese | ラディッシュルインズ Radisshu Ruinzu |
Radish Ruins |
| French | Ruines Radis | Radish Ruins |
| German | Rettich-ruinen | Radish Ruins |
| Italian | Rovine del Radicchio | Radish Ruins |
| Spanish | Ruinas del Rábano | Radish Ruins |
| Regions in the Mirror World | |
|---|---|
 | |
| |||||||||||||||||||||||||||||