Mustard Mountain - Goal 2: Difference between revisions
m (Text replacement - "{{K&tAM}}" to "{{Navbox-K&TAM}}") |
m (Text replacement - "\|theme title=\[\[(.*)\]\]" to "|theme title="$1"") |
||
| (13 intermediate revisions by 5 users not shown) | |||
| Line 1: | Line 1: | ||
[[File:Mustard Mountain Goal 2. | {{Infobox-K&TAMRoom | ||
|image= [[File:KaTAM Mustard Mountain Goal 2.png]] | |||
|caption=[[Kirby]] smooches with [[Leap]] in '''Goal 2'''. | |||
|area=[[Mustard Mountain]] | |||
|from=[[Mustard Mountain - Room 19|Room 19]] | |||
|to=[[Rainbow Route - Central Circle]] (via [[Goal Game]]) | |||
|chest={{Y}} ([[Spray Paint|Cherry Spray Paint]]) | |||
|mid-boss=[[Bombar]] | |||
|theme music=[[File:KatAM Flame-Lava Area.mp3]] | |||
|theme title="[[Flame/Lava Area]]" | |||
|description=Clip of the "Flame/Lava Area" theme from ''[[Kirby & The Amazing Mirror]]'' | |||
}} | |||
'''Mustard Mountain - Goal 2''' is a room in [[Mustard Mountain]], the fourth area of ''[[Kirby & The Amazing Mirror]]''. | '''Mustard Mountain - Goal 2''' is a room in [[Mustard Mountain]], the fourth area of ''[[Kirby & The Amazing Mirror]]''. | ||
==Links== | ==Links== | ||
This room is one-way, leading directly into the Goal Game, then back to the [[Rainbow Route - | This room is one-way, leading directly into the Goal Game, then back to the [[Rainbow Route - Central Circle]]. | ||
== | ==Overview== | ||
This room begins on a number of platforms suspended over a windy abyss and patrolled by enemies. Eventually, this leads past a [[1-Up]] into a windless room patrolled by [[Sword Knight]]s. One of them guards a chest containing the Cherry Spray Paint. From there, breaking a Bomb Block leads into a wind-swept arena where Kirby must deal with the Mid-Boss [[Bombar]]. After it is defeated, Kirby can proceed to the right to a room containing the Goal Game door. Above the door is a Bomb Block which, if broken, will give Kirby a [[Maxim Tomato]] and another 1-Up. | This room begins on a number of platforms suspended over a windy [[bottomless pit|abyss]] and patrolled by enemies. Eventually, this leads past a [[1-Up]] into a windless room patrolled by [[Sword Knight]]s. One of them guards a chest containing the Cherry [[Spray Paint]]. From there, breaking a [[Bomb Block]] leads into a wind-swept arena where Kirby must deal with the Mid-Boss [[Bombar]]. After it is defeated, Kirby can proceed to the right to a room containing the Goal Game door. Above the door is a [[Bomb Block]] which, if broken, will give Kirby a [[Maxim Tomato]] and another 1-Up. | ||
==Enemies | ==Enemies and Mid-Boss== | ||
{| | {| width=25% | ||
|<tabs> | |||
<tab name="Enemies"> | |||
| | {| class="wikitable" | ||
| | !Sprite | ||
!Name | |||
!Copy Ability | |||
|- | |||
|align=center|[[File:KNiDL Bronto Burt sprite.png]] | |||
|[[Bronto Burt]] | |||
|None | |||
|- | |||
|align=center|[[File:KaTAM Leap.png]] | |||
| | |[[Leap]] | ||
|None | |||
|- | |- | ||
|align=center|[[File:KNiDL Sir Kibble sprite.png]] | |||
| | |[[Sir Kibble]] | ||
| | |[[Cutter]] | ||
|- | |||
|align=center|[[File:KNiDL Sword Knight sprite.png]] | |||
|[[Sword Knight]] | |||
|[[Sword]] | |||
|} | |||
</tab> | |||
<tab name="Mid-Boss"> | |||
{| class="wikitable" | |||
!Sprite | |||
!Name | |||
!Copy Ability | |||
|- | |||
|align=center|[[File:KatAMBombar.png]] | |||
|[[Bombar]] | |||
|[[Missile]] | |||
|} | |||
</tab> | |||
</tabs> | |||
|} | |} | ||
==Gallery== | |||
<gallery> | |||
KaTAM 4-G2 Map.png|Composite map of the room | |||
</gallery> | |||
{{ | {{Navmap-KaTAM-MuM|coord1=224|coord2=200}} | ||
{{Navbox- | {{Navbox-KaTAM}} | ||
[[Category:Rooms in Mustard Mountain]] | [[Category:Rooms in Mustard Mountain]] | ||
Latest revision as of 19:39, 19 January 2024
| ||||||||||||||||
| ||||||||||||||||
|
| ||||||||||||||||

Mustard Mountain - Goal 2 is a room in Mustard Mountain, the fourth area of Kirby & The Amazing Mirror.
Links[edit]
This room is one-way, leading directly into the Goal Game, then back to the Rainbow Route - Central Circle.
Overview[edit]
This room begins on a number of platforms suspended over a windy abyss and patrolled by enemies. Eventually, this leads past a 1-Up into a windless room patrolled by Sword Knights. One of them guards a chest containing the Cherry Spray Paint. From there, breaking a Bomb Block leads into a wind-swept arena where Kirby must deal with the Mid-Boss Bombar. After it is defeated, Kirby can proceed to the right to a room containing the Goal Game door. Above the door is a Bomb Block which, if broken, will give Kirby a Maxim Tomato and another 1-Up.
Enemies and Mid-Boss[edit]
Gallery[edit]

Composite map of the room
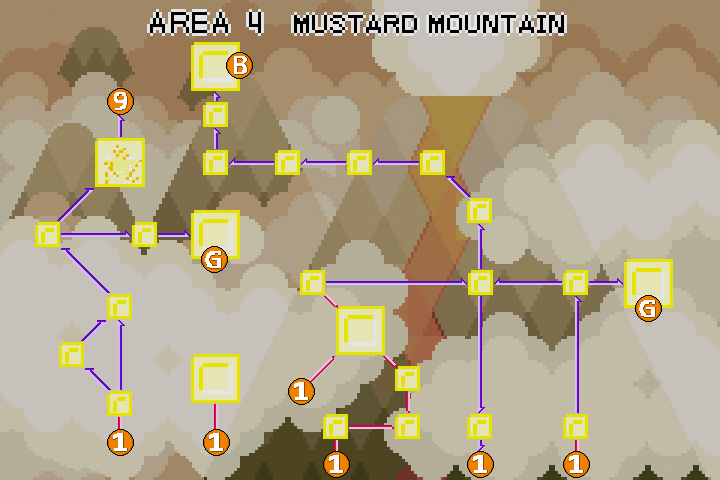
| Mustard Mountain Area Map | |
|---|---|
 | |
| |||||||||||||||||||||||||||||