|
|
| (66 intermediate revisions by 16 users not shown) |
| Line 1: |
Line 1: |
| {{construction}} | | {{Infobox-K&tAMLevel |
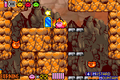
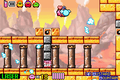
| '''Mustard Mountain''' is the fourth cardinal area of the [[Mirror World]]. This area is difficult to reach, so it's likely not the fourth area visited by [[Kirby]]. Many of the [[Mirror Portals]] leading to Mustard Mountain are in obscure locales, since parts of the entire area are not connected and has to be reached using mirrors in other areas, mainly [[Rainbow Route]]. The mountain area may be named for ''mustard'' as a reference to the overwhelmingly yellow color scheme of the area; the base and underground areas are visibly different. Mustard Mountain is mostly a yellowish orange colored rock surface, and characterized by pools of lava, pillars of fire, and cascading lava-falls. All of the fire hazards damage any Kirby that comes in contact with it, cause a [[Copy Ability]] to transform into a wayward star, and can destroy [[Stars]] upon contact. Some of the open pits drop Kirby into an area of [[Rainbow Route]], which increases the difficulty of traversing Mustard Mountain. | | |image= [[File:KaTAM Mustard Mountain Room 11.png]] |
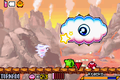
| | |caption= Kirby and his clones pondering in '''Mustard Mountain'''. |
| | |level= 4 |
| | |rooms= 25 |
| | |goal= 2 |
| | |connect= [[Rainbow Route]] <br> [[Candy Constellation]] |
| | |mid-boss= [[Batafire]] <br> [[Bombar]] <br> [[Box Boxer]] <br> [[Boxy]] <br> [[Phan Phan]] |
| | |boss= [[Kracko]] |
| | |theme music=[[File:KatAM Flame-Lava Area.mp3]] |
| | |theme title="[[Flame/Lava Area]]" |
| | |description=Clip of the "Flame/Lava Area" theme from ''[[Kirby & The Amazing Mirror]]'' |
| | |previous= [[Cabbage Cavern]] |
| | |next=[[Carrot Castle]] |
| | }} |
| | '''Mustard Mountain''' is the fourth cardinal area of the [[Mirror World]]. This area is difficult to reach, so it's likely not the fourth area visited by [[Kirby]]. Many of the [[Mirror Door]]s leading to Mustard Mountain are in obscure locales, since parts of the entire area are not connected and has to be reached using mirrors in other areas, mainly [[Rainbow Route]]. The mountain area may be named for ''mustard'' as a reference to the overwhelmingly yellow color scheme of the area; the base and underground areas are visibly different. Mustard Mountain is mostly a yellowish orange colored rock surface, and characterized by pools of lava, pillars of fire, and cascading lava-falls. All of the fire hazards damage any Kirby that comes in contact with it, cause a [[Copy Ability]] to transform into a wayward star, and can destroy [[Ability Star|Stars]] upon contact. Some of the open pits drop Kirby into an area of [[Rainbow Route]], which increases the difficulty of traversing Mustard Mountain. |
|
| |
|
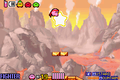
| The boss of Mustard Mountain is [[Kracko]], who guards one of the eight mirror shards. It is unknown if this Kracko is the same as the one in [[Dream Land]], or a different Kracko. | | The boss of Mustard Mountain is [[Kracko]], who guards one of the eight mirror shards. |
|
| |
|
| ==Enemies, Bosses, and Copy Abilities on Mustard Mountain== | | ==Enemies, Bosses, and Copy Abilities on Mustard Mountain== |
| {| border=1 | | {| width=60% |
| !width="90%"|'''Regular Enemies on Mustard Mountain''' | | |<tabs> |
| !width="10%"|'''Mid-Bosses on Mustard Mountain''' | | <tab name="Enemies"> |
| | {| class="wikitable" |
| | !Image |
| | !Name |
| | !style="border-style: solid; border-width: 1px 3px 1px 1px"|Copy Ability |
| | !Image |
| | !Name |
| | !style="border-style: solid; border-width: 1px 3px 1px 1px"|Copy Ability |
| | !Image |
| | !Name |
| | !style="border-style: solid; border-width: 1px 3px 1px 1px"|Copy Ability |
| | !Image |
| | !Name |
| | !style="border-style: solid; border-width: 1px 3px 1px 1px"|Copy Ability |
| | !Image |
| | !Name |
| | !Copy Ability |
| |- | | |- |
| | | | |align=center|[[File:KaTAM Batty.png]] |
| {{col-begin}}
| | |[[Batty]] |
| {{col-break|width=20%}}
| | |style="border-style: solid; border-width: 1px 3px 1px 1px" align=center|None |
| *[[Bang-Bang]]
| | |align=center|[[File:KaTAM Cookin.png]] |
| *[[Big Rocky]]
| | |[[Cookin]] |
| *[[Big Waddle Dee]]
| | |style="border-style: solid; border-width: 1px 3px 1px 1px" align=center|[[Cook]] |
| *[[Bomber]]
| | |align=center|[[File:KatAMHeavyKnight.png]] |
| *[[Bronto Burt]]
| | |[[Heavy Knight]] |
| *[[Chip]]
| | |style="border-style: solid; border-width: 1px 3px 1px 1px" align=center|[[Sword]] |
| {{col-break|width=20%}}
| | |align=center|[[File:KNiDL Pengi sprite.png]] |
| *[[Cupie]]
| | |[[Pengy]] |
| *[[Flamer]]
| | |style="border-style: solid; border-width: 1px 3px 1px 1px" align=center|[[Ice]] |
| *[[Foley]]
| | |align=center|[[File:KatAMSoarar.png]] |
| *[[Golem]]
| | |[[Soarar]] |
| *[[Gordo]]
| | |align=center|None |
| *[[Haley]]
| |
| {{col-break|width=20%}}
| |
| *[[Heavy Knight]]
| |
| *[[Hot Head]]
| |
| *[[Minny]]
| |
| *[[Noddy]]
| |
| *[[Pengi]]
| |
| *[[Rocky]]
| |
| {{col-break|width=20%}}
| |
| *[[Scarfy]]
| |
| *[[Shotzo]]
| |
| *[[Sir Kibble]]
| |
| *[[Soarar]]
| |
| *[[Sparky]]
| |
| *[[Sword Knight]]
| |
| {{col-break|width=20%}}
| |
| *[[Twister]]
| |
| *[[UFO]]
| |
| *[[Waddle Dee]]
| |
| *[[Wheelie]]
| |
| {{col-end}}
| |
| | | |
| {{col-begin}}
| |
| *Mid Bosses
| |
| **[[Batafire]]
| |
| **[[Bombar]]
| |
| **[[Box Boxer]]
| |
| **[[Phan Phan]]
| |
| *Bosses
| |
| **[[Kracko]]
| |
| {{col-end}}
| |
| |}
| |
| {| border=1
| |
| !width="400px"|'''Abilities on Mustard Mountain'''
| |
| |- | | |- |
| | | | |align=center|[[File:KaTAM Bang Bang.png]] |
| {{col-begin}}
| | |[[Bang-Bang]] |
| {{col-break|width=33%}}
| | |style="border-style: solid; border-width: 1px 3px 1px 1px" align=center|[[Missile]] |
| *[[Bomb]]
| | |align=center|[[File:KatAMCupie.png]] |
| *[[Burning]]
| | |[[Cupie]] |
| *[[Crash]]
| | |style="border-style: solid; border-width: 1px 3px 1px 1px" align=center|[[Cupid]] |
| *[[Cupid]]
| | |align=center|[[File:KNiDL Hot Head sprite.png]] |
| *[[Cutter]]
| | |[[Hot Head]] |
| *[[Fighter]]
| | |style="border-style: solid; border-width: 1px 3px 1px 1px" align=center|[[Fire]] |
| {{col-break|width=33%}}
| | |align=center|[[File:KNiDL Rocky sprite.png]] |
| *[[Fire]]
| | |[[Rocky]] |
| *[[Ice]]
| | |style="border-style: solid; border-width: 1px 3px 1px 1px" align=center|[[Stone]] |
| *[[Mini]]
| | |align=center|[[File:KNiDL Sparky sprite.png]] |
| *[[Missile]]
| | |[[Sparky]] |
| *[[Parasol (ability)|Parasol]]
| | |align=center|[[Spark]] |
| *[[Sleep]]
| |
| {{col-break|width=33%}}
| |
| *[[Spark]]
| |
| *[[Stone]]
| |
| *[[Sword]]
| |
| *[[Tornado]]
| |
| *[[U.F.O.]]
| |
| *[[Wheel]]
| |
| {{col-end}}
| |
| |} | |
| | |
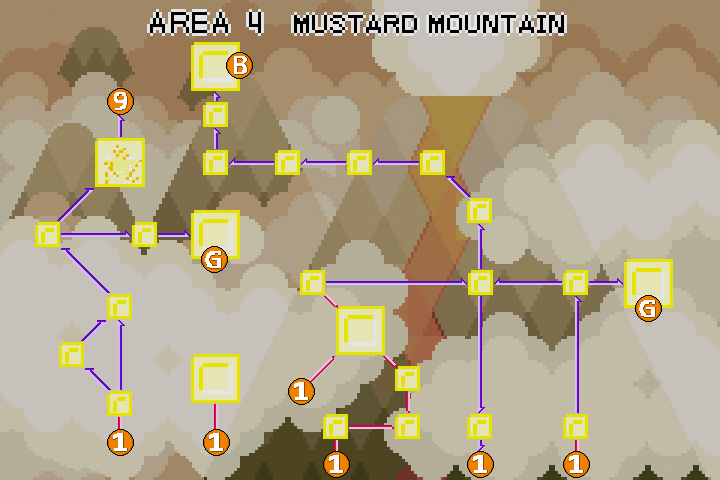
| ==Map== | |
| {{construction}}
| |
| {{AMMM2NavMap}}
| |
| Mustard Mountain is a very isolated area in the [[Mirror World]], and its layout consists almost solely of one-way paths, which will start to feel like the layout of a more traditional Kirby adventure. Traveling through Mustard Mountain is difficult, and Kirby will find himself repeatedly accessing the various entrance tunnels from Rainbow Route to re-enter this area. Overall, there are 19 normal rooms, one hub, one Chest room (containing the map) and two Goal rooms.
| |
| | |
| The only way into Mustard Mountain is by means of [[Rainbow Route]] to the south. However, there is a Warp Star that will take Kirby and his chromatic companions to [[Candy Constellation]] from this area.
| |
| | |
| Mustard Mountain has two Goal rooms. Completing these rooms takes Kirby and his clones to the [[Goal Game]], then returns them to the Grand Central Hub of Rainbow Route.
| |
| | |
| For a full synopsis of what's in each room, click on any room on the map to head to the corresponding page.
| |
| | |
| ==Full Synopsis==
| |
| ===Hub===
| |
| -links to other rooms-
| |
| | |
| -synopsis goes here-
| |
| | |
| ===Goal 1===
| |
| -links to other rooms-
| |
| | |
| -synopsis goes here-
| |
| | |
| ====Enemies, Mid-Bosses, and Abilities====
| |
| {| style="border: 3px solid #E47575; {{round}};background: #F69D99" cellspacing="2"
| |
| ! width="267px" | '''Regular Enemies'''
| |
| ! width="133px" | '''Mid-Bosses'''
| |
| |- bgcolor="E47575" | |
| | | |
| {{col-begin}}
| |
| {{col-break|width=50%}}
| |
| *[[enemy name]]
| |
| {{col-break|width=50%}}
| |
| *[[enemy name]]
| |
| {{col-end}}
| |
| | | |
| {{col-begin}}
| |
| *[[mid-boss name]]
| |
| {{col-end}}
| |
| |- | | |- |
| ! colspan="2" width="404px"| '''Abilities'''
| | |align=center|[[File:KaTAM Big Waddle Dee Sprite.png]] |
| |- bgcolor="#E47575" | | |[[Big Waddle Dee]] |
| | colspan="2" | | | |style="border-style: solid; border-width: 1px 3px 1px 1px" align=center|None |
| {{col-begin}}
| | |align=center|[[File:KNiDL Flamer sprite.png]] |
| {{col-break|width=50%}}
| | |[[Flamer]] |
| *[[ability name]]
| | |style="border-style: solid; border-width: 1px 3px 1px 1px" align=center|[[Burning]] |
| {{col-break|width=50%}}
| | |align=center|[[File:KatAMJack.png]] |
| *[[ability name]]
| | |[[Jack]] |
| {{col-end}}
| | |style="border-style: solid; border-width: 1px 3px 1px 1px" align=center|None |
| |} | | |align=center|[[File:KatAMRolyPoly.png]] |
| | | |[[Roly-Poly]] |
| ===Goal 2===
| | |style="border-style: solid; border-width: 1px 3px 1px 1px" align=center|None |
| -links to other rooms-
| | |align=center|[[File:KNiDL Sword Knight sprite.png]] |
| | | |[[Sword Knight]] |
| -synopsis goes here-
| | |align=center|[[Sword]] |
| | |
| ====Enemies, Mid-Bosses, and Abilities====
| |
| {| style="border: 3px solid #E47575; {{round}};background: #F69D99" cellspacing="2"
| |
| ! width="267px" | '''Regular Enemies'''
| |
| ! width="133px" | '''Mid-Bosses'''
| |
| |- bgcolor="E47575" | |
| | | |
| {{col-begin}}
| |
| {{col-break|width=50%}}
| |
| *[[enemy name]]
| |
| {{col-break|width=50%}}
| |
| *[[enemy name]]
| |
| {{col-end}}
| |
| | | |
| {{col-begin}}
| |
| *[[mid-boss name]]
| |
| {{col-end}}
| |
| |- | | |- |
| ! colspan="2" width="404px"| '''Abilities'''
| | |align=center|[[File:KatAMBlockin.png]] |
| |- bgcolor="#E47575" | | |[[Blockin]] |
| | colspan="2" | | | |style="border-style: solid; border-width: 1px 3px 1px 1px" align=center|N/A |
| {{col-begin}}
| | |align=center|[[File:KatAMFoley.png]] |
| {{col-break|width=50%}}
| | |[[Foley]] |
| *[[ability name]]
| | |style="border-style: solid; border-width: 1px 3px 1px 1px" align=center|[[Bomb]] |
| {{col-break|width=50%}}
| | |align=center|[[File:KNiDL Laser Ball sprite.png]] |
| *[[ability name]]
| | |[[Laser Ball]] |
| {{col-end}}
| | |style="border-style: solid; border-width: 1px 3px 1px 1px" align=center|[[Laser]] |
| |} | | |align=center|[[File:KNiDL Scarfy sprite.png]] |
| | | |[[Scarfy]] |
| ===Warp===
| | |style="border-style: solid; border-width: 1px 3px 1px 1px" align=center|N/A |
| -links to other rooms-
| | |align=center|[[File:KNiDL Twister sprite.png]] |
| | | |[[Twister]] |
| -synopsis goes here-
| | |align=center|[[Tornado]] |
| | |
| ====Enemies, Mid-Bosses, and Abilities====
| |
| {| style="border: 3px solid #E47575; {{round}};background: #F69D99" cellspacing="2"
| |
| ! width="267px" | '''Regular Enemies'''
| |
| ! width="133px" | '''Mid-Bosses'''
| |
| |- bgcolor="E47575" | |
| | | |
| {{col-begin}}
| |
| {{col-break|width=50%}}
| |
| *[[enemy name]]
| |
| {{col-break|width=50%}}
| |
| *[[enemy name]]
| |
| {{col-end}}
| |
| | | |
| {{col-begin}}
| |
| *[[mid-boss name]]
| |
| {{col-end}}
| |
| |- | | |- |
| ! colspan="2" width="404px"| '''Abilities'''
| | |align=center|[[File:KNiDL Bomber sprite.png]] |
| |- bgcolor="#E47575" | | |[[Bomber]] |
| | colspan="2" | | | |style="border-style: solid; border-width: 1px 3px 1px 1px" align=center|[[Crash]] |
| {{col-begin}}
| | |align=center|[[File:KatAMGiantRocky.png]] |
| {{col-break|width=50%}}
| | |[[Giant Rocky]] |
| *[[ability name]]
| | |style="border-style: solid; border-width: 1px 3px 1px 1px" align=center|[[Stone]] |
| {{col-break|width=50%}}
| | |align=center|[[File:KaTAM Leap.png]] |
| *[[ability name]]
| | |[[Leap]] |
| {{col-end}}
| | |style="border-style: solid; border-width: 1px 3px 1px 1px" align=center|None |
| |} | | |align=center|[[File:KatAMShadowKirby.png]] |
| | | |[[Shadow Kirby]] |
| ===Chest=== | | |style="border-style: solid; border-width: 1px 3px 1px 1px" align=center|[[Fire]] |
| -links to other rooms- | | |align=center|[[File:KNiDL UFO enemy sprite.png]] |
| | | |[[UFO (enemy)|UFO]] |
| -synopsis goes here-
| | |align=center|[[UFO]] |
| | |
| ====Enemies, Mid-Bosses, and Abilities====
| |
| {| style="border: 3px solid #E47575; {{round}};background: #F69D99" cellspacing="2"
| |
| ! width="267px" | '''Regular Enemies'''
| |
| ! width="133px" | '''Mid-Bosses'''
| |
| |- bgcolor="E47575" | |
| | | |
| {{col-begin}}
| |
| {{col-break|width=50%}}
| |
| *[[enemy name]]
| |
| {{col-break|width=50%}}
| |
| *[[enemy name]]
| |
| {{col-end}}
| |
| | | |
| {{col-begin}}
| |
| *[[mid-boss name]]
| |
| {{col-end}}
| |
| |- | | |- |
| ! colspan="2" width="404px"| '''Abilities'''
| | |align=center|[[File:KatAMBoxin.png]] |
| |- bgcolor="#E47575" | | |[[Boxin]] |
| | colspan="2" | | | |style="border-style: solid; border-width: 1px 3px 1px 1px" align=center|[[Fighter]] |
| {{col-begin}}
| | |align=center|[[File:KatAMGolemGray.png]] |
| {{col-break|width=50%}}
| | |[[Golem]] |
| *[[ability name]]
| | |style="border-style: solid; border-width: 1px 3px 1px 1px" align=center|[[Stone]] or [[Fighter]] |
| {{col-break|width=50%}}
| | |align=center|[[File:KatAMMinny.png]] |
| *[[ability name]]
| | |[[Minny]] |
| {{col-end}}
| | |style="border-style: solid; border-width: 1px 3px 1px 1px" align=center|[[Mini]] |
| |} | | |align=center|[[File:KatAMShooty.png]] |
| | | |[[Shooty]] |
| ===Room 1===
| | |style="border-style: solid; border-width: 1px 3px 1px 1px" align=center|None |
| -links to other rooms-
| | |align=center|[[File:KNiDL Waddle Dee sprite.png]] |
| | | |[[Waddle Dee]] |
| -synopsis goes here-
| | |align=center|None |
| | |
| ====Enemies, Mid-Bosses, and Abilities====
| |
| {| style="border: 3px solid #E47575; {{round}};background: #F69D99" cellspacing="2"
| |
| ! width="267px" | '''Regular Enemies'''
| |
| ! width="133px" | '''Mid-Bosses'''
| |
| |- bgcolor="E47575" | |
| | | |
| {{col-begin}}
| |
| {{col-break|width=50%}}
| |
| *[[enemy name]]
| |
| {{col-break|width=50%}}
| |
| *[[enemy name]]
| |
| {{col-end}}
| |
| | | |
| {{col-begin}}
| |
| *[[mid-boss name]]
| |
| {{col-end}}
| |
| |- | | |- |
| ! colspan="2" width="404px"| '''Abilities'''
| | |align=center|[[File:KNiDL Bronto Burt sprite.png]] |
| |- bgcolor="#E47575" | | |[[Bronto Burt]] |
| | colspan="2" | | | |style="border-style: solid; border-width: 1px 3px 1px 1px" align=center|None |
| {{col-begin}}
| | |align=center|[[File:KNiDL Gordo sprite.png]] |
| {{col-break|width=50%}}
| | |[[Gordo]] |
| *[[ability name]]
| | |style="border-style: solid; border-width: 1px 3px 1px 1px" align=center|N/A |
| {{col-break|width=50%}}
| | |align=center|[[File:KNiDL Noddy sprite.png]] |
| *[[ability name]]
| | |[[Noddy]] |
| {{col-end}}
| | |style="border-style: solid; border-width: 1px 3px 1px 1px" align=center|[[Sleep]] |
| |} | | |align=center|[[File:KNiDL Shotzo sprite.png]] |
| | | |[[Shotzo]] |
| ===Room 2=== | | |style="border-style: solid; border-width: 1px 3px 1px 1px" align=center|N/A |
| -links to other rooms- | | |align=center|[[File:KNiDL Waddle Doo sprite.png]] |
| | | |[[Waddle Doo]] |
| -synopsis goes here-
| | |align=center|[[Beam]] |
| | |
| ====Enemies, Mid-Bosses, and Abilities====
| |
| {| style="border: 3px solid #E47575; {{round}};background: #F69D99" cellspacing="2"
| |
| ! width="267px" | '''Regular Enemies'''
| |
| ! width="133px" | '''Mid-Bosses'''
| |
| |- bgcolor="E47575" | |
| | | |
| {{col-begin}}
| |
| {{col-break|width=50%}}
| |
| *[[enemy name]]
| |
| {{col-break|width=50%}}
| |
| *[[enemy name]]
| |
| {{col-end}}
| |
| | | |
| {{col-begin}}
| |
| *[[mid-boss name]]
| |
| {{col-end}}
| |
| |- | | |- |
| ! colspan="2" width="404px"| '''Abilities'''
| | |align=center|[[File:KatAMChip.png]] |
| |- bgcolor="#E47575" | | |[[Chip]] |
| | colspan="2" | | | |style="border-style: solid; border-width: 1px 3px 1px 1px" align=center|None |
| {{col-begin}}
| | |align=center|[[File:KatAMHaley.png]] |
| {{col-break|width=50%}}
| | |[[Haley]] |
| *[[ability name]]
| | |style="border-style: solid; border-width: 1px 3px 1px 1px" align=center|None |
| {{col-break|width=50%}}
| | |align=center|[[File:KNiDL Parasol enemy sprite.png]] |
| *[[ability name]]
| | |[[Parasol (enemy)|Parasol]] |
| {{col-end}}
| | |style="border-style: solid; border-width: 1px 3px 1px 1px" align=center|[[Parasol]] |
| | |align=center|[[File:KNiDL Sir Kibble sprite.png]] |
| | |[[Sir Kibble]] |
| | |style="border-style: solid; border-width: 1px 3px 1px 1px" align=center|[[Cutter]] |
| | |align=center|[[File:KNiDL Wheelie sprite.png]] |
| | |[[Wheelie]] |
| | |align=center|[[Wheel]] |
| |} | | |} |
| | | </tab> |
| ===Room 3=== | | <tab name="Mid-Bosses"> |
| -links to other rooms-
| | {| class="wikitable" |
| | | !Sprite |
| -synopsis goes here-
| | !Name |
| | | !Copy Ability |
| ====Enemies, Mid-Bosses, and Abilities====
| |
| {| style="border: 3px solid #E47575; {{round}};background: #F69D99" cellspacing="2" | |
| ! width="267px" | '''Regular Enemies''' | |
| ! width="133px" | '''Mid-Bosses''' | |
| |- bgcolor="E47575"
| |
| |
| |
| {{col-begin}}
| |
| {{col-break|width=50%}}
| |
| *[[enemy name]]
| |
| {{col-break|width=50%}}
| |
| *[[enemy name]]
| |
| {{col-end}}
| |
| |
| |
| {{col-begin}}
| |
| *[[mid-boss name]]
| |
| {{col-end}}
| |
| |- | | |- |
| ! colspan="2" width="404px"| '''Abilities'''
| | |align=center|[[File:KatAMBatafire.png]] |
| |- bgcolor="#E47575"
| | |[[Batafire]] |
| | colspan="2" | | | |[[Burning]] |
| {{col-begin}}
| |
| {{col-break|width=50%}}
| |
| *[[ability name]]
| |
| {{col-break|width=50%}}
| |
| *[[ability name]]
| |
| {{col-end}}
| |
| |}
| |
| | |
| ===Room 4===
| |
| -links to other rooms-
| |
| | |
| -synopsis goes here-
| |
| | |
| ====Enemies, Mid-Bosses, and Abilities====
| |
| {| style="border: 3px solid #E47575; {{round}};background: #F69D99" cellspacing="2"
| |
| ! width="267px" | '''Regular Enemies'''
| |
| ! width="133px" | '''Mid-Bosses'''
| |
| |- bgcolor="E47575"
| |
| |
| |
| {{col-begin}}
| |
| {{col-break|width=50%}}
| |
| *[[enemy name]]
| |
| {{col-break|width=50%}}
| |
| *[[enemy name]]
| |
| {{col-end}}
| |
| | | |
| {{col-begin}}
| |
| *[[mid-boss name]]
| |
| {{col-end}}
| |
| |- | | |- |
| ! colspan="2" width="404px"| '''Abilities'''
| | |align=center|[[File:KatAMBombar.png]] |
| |- bgcolor="#E47575"
| | |[[Bombar]] |
| | colspan="2" | | | |[[Missile]], [[Bomb]] (bombs) |
| {{col-begin}}
| |
| {{col-break|width=50%}}
| |
| *[[ability name]]
| |
| {{col-break|width=50%}}
| |
| *[[ability name]]
| |
| {{col-end}}
| |
| |}
| |
| | |
| ===Room 5===
| |
| -links to other rooms-
| |
| | |
| -synopsis goes here-
| |
| | |
| ====Enemies, Mid-Bosses, and Abilities====
| |
| {| style="border: 3px solid #E47575; {{round}};background: #F69D99" cellspacing="2"
| |
| ! width="267px" | '''Regular Enemies'''
| |
| ! width="133px" | '''Mid-Bosses'''
| |
| |- bgcolor="E47575"
| |
| | | |
| {{col-begin}}
| |
| {{col-break|width=50%}}
| |
| *[[enemy name]]
| |
| {{col-break|width=50%}}
| |
| *[[enemy name]]
| |
| {{col-end}}
| |
| |
| |
| {{col-begin}}
| |
| *[[mid-boss name]]
| |
| {{col-end}}
| |
| |- | | |- |
| ! colspan="2" width="404px"| '''Abilities'''
| | |align=center|[[File:KatAMBoxBoxer.png]] |
| |- bgcolor="#E47575"
| | |[[Box Boxer]] |
| | colspan="2" | | | |[[Fighter]] |
| {{col-begin}}
| |
| {{col-break|width=50%}}
| |
| *[[ability name]]
| |
| {{col-break|width=50%}}
| |
| *[[ability name]]
| |
| {{col-end}}
| |
| |}
| |
| | |
| ===Room 6===
| |
| -links to other rooms-
| |
| | |
| -synopsis goes here-
| |
| | |
| ====Enemies, Mid-Bosses, and Abilities====
| |
| {| style="border: 3px solid #E47575; {{round}};background: #F69D99" cellspacing="2"
| |
| ! width="267px" | '''Regular Enemies'''
| |
| ! width="133px" | '''Mid-Bosses'''
| |
| |- bgcolor="E47575"
| |
| |
| |
| {{col-begin}}
| |
| {{col-break|width=50%}}
| |
| *[[enemy name]]
| |
| {{col-break|width=50%}}
| |
| *[[enemy name]]
| |
| {{col-end}}
| |
| | | |
| {{col-begin}}
| |
| *[[mid-boss name]]
| |
| {{col-end}}
| |
| |- | | |- |
| ! colspan="2" width="404px"| '''Abilities'''
| | |align=center|[[File:KatAMBoxy.png]] |
| |- bgcolor="#E47575"
| | |[[Boxy]] |
| | colspan="2" | | | |[[Magic]] |
| {{col-begin}}
| |
| {{col-break|width=50%}}
| |
| *[[ability name]]
| |
| {{col-break|width=50%}}
| |
| *[[ability name]]
| |
| {{col-end}}
| |
| |}
| |
| | |
| ===Room 7===
| |
| -links to other rooms-
| |
| | |
| -synopsis goes here-
| |
| | |
| ====Enemies, Mid-Bosses, and Abilities====
| |
| {| style="border: 3px solid #E47575; {{round}};background: #F69D99" cellspacing="2"
| |
| ! width="267px" | '''Regular Enemies'''
| |
| ! width="133px" | '''Mid-Bosses'''
| |
| |- bgcolor="E47575"
| |
| |
| |
| {{col-begin}}
| |
| {{col-break|width=50%}}
| |
| *[[enemy name]]
| |
| {{col-break|width=50%}}
| |
| *[[enemy name]]
| |
| {{col-end}}
| |
| | | |
| {{col-begin}}
| |
| *[[mid-boss name]]
| |
| {{col-end}}
| |
| |- | | |- |
| ! colspan="2" width="404px"| '''Abilities'''
| | |align=center|[[File:KNiDL Phan Phan sprite.png]] |
| |- bgcolor="#E47575"
| | |[[Phan Phan]] |
| | colspan="2" | | | |[[Throw]] |
| {{col-begin}}
| |
| {{col-break|width=50%}}
| |
| *[[ability name]]
| |
| {{col-break|width=50%}}
| |
| *[[ability name]]
| |
| {{col-end}}
| |
| |} | | |} |
| | | </tab> |
| ===Room 8=== | | <tab name="Boss"> |
| -links to other rooms-
| | {| class="wikitable" |
| | | !Sprite |
| -synopsis goes here-
| | !Name |
| | | !Copy Ability |
| ====Enemies, Mid-Bosses, and Abilities====
| |
| {| style="border: 3px solid #E47575; {{round}};background: #F69D99" cellspacing="2" | |
| ! width="267px" | '''Regular Enemies''' | |
| ! width="133px" | '''Mid-Bosses''' | |
| |- bgcolor="E47575"
| |
| |
| |
| {{col-begin}}
| |
| {{col-break|width=50%}}
| |
| *[[enemy name]]
| |
| {{col-break|width=50%}}
| |
| *[[enemy name]]
| |
| {{col-end}}
| |
| |
| |
| {{col-begin}}
| |
| *[[mid-boss name]]
| |
| {{col-end}}
| |
| |- | | |- |
| ! colspan="2" width="404px"| '''Abilities'''
| | |align=center|[[File:KNiDL Kracko sprite.png]] |
| |- bgcolor="#E47575"
| | |[[Kracko]] |
| | colspan="2" | | | |N/A (various enemies he spawns can be swallowed for abilities) |
| {{col-begin}}
| |
| {{col-break|width=50%}}
| |
| *[[ability name]]
| |
| {{col-break|width=50%}}
| |
| *[[ability name]]
| |
| {{col-end}}
| |
| |} | | |} |
| | | </tab> |
| ===Room 9===
| | </tabs> |
| -links to other rooms-
| |
| | |
| -synopsis goes here-
| |
| | |
| ====Enemies, Mid-Bosses, and Abilities====
| |
| {| style="border: 3px solid #E47575; {{round}};background: #F69D99" cellspacing="2"
| |
| ! width="267px" | '''Regular Enemies'''
| |
| ! width="133px" | '''Mid-Bosses'''
| |
| |- bgcolor="E47575"
| |
| |
| |
| {{col-begin}}
| |
| {{col-break|width=50%}}
| |
| *[[enemy name]]
| |
| {{col-break|width=50%}}
| |
| *[[enemy name]]
| |
| {{col-end}}
| |
| |
| |
| {{col-begin}}
| |
| *[[mid-boss name]]
| |
| {{col-end}}
| |
| |-
| |
| ! colspan="2" width="404px"| '''Abilities'''
| |
| |- bgcolor="#E47575"
| |
| | colspan="2" |
| |
| {{col-begin}}
| |
| {{col-break|width=50%}}
| |
| *[[ability name]]
| |
| {{col-break|width=50%}}
| |
| *[[ability name]]
| |
| {{col-end}}
| |
| |} | | |} |
|
| |
|
| ===Room 10=== | | ==Map== |
| -links to other rooms- | | {{Navmap-KaTAM-MuM}} |
| | Mustard Mountain is a very isolated area in the [[Mirror World]], and its layout consists almost solely of one-way paths, which will start to feel like the layout of a more traditional Kirby adventure. Traveling through Mustard Mountain is difficult, and Kirby will find himself repeatedly accessing the various entrance tunnels from Rainbow Route to re-enter this area. Overall, there are 19 normal rooms, one hub, one Chest room (containing the map) and two Goal rooms. |
|
| |
|
| -synopsis goes here-
| | The only way into Mustard Mountain is by means of [[Rainbow Route]] to the south. However, there is a Warp Star that will take Kirby and his chromatic companions to [[Candy Constellation]] from this area. |
|
| |
|
| ====Enemies, Mid-Bosses, and Abilities====
| | Mustard Mountain has two Goal rooms. Completing these rooms takes Kirby and his clones to the [[Goal Game]], then returns them to the [[Rainbow Route - Central Circle|Central Circle]] of Rainbow Route. |
| {| style="border: 3px solid #E47575; {{round}};background: #F69D99" cellspacing="2"
| |
| ! width="267px" | '''Regular Enemies'''
| |
| ! width="133px" | '''Mid-Bosses'''
| |
| |- bgcolor="E47575"
| |
| |
| |
| {{col-begin}}
| |
| {{col-break|width=50%}}
| |
| *[[enemy name]]
| |
| {{col-break|width=50%}}
| |
| *[[enemy name]]
| |
| {{col-end}}
| |
| | | |
| {{col-begin}}
| |
| *[[mid-boss name]]
| |
| {{col-end}}
| |
| |-
| |
| ! colspan="2" width="404px"| '''Abilities'''
| |
| |- bgcolor="#E47575"
| |
| | colspan="2" |
| |
| {{col-begin}}
| |
| {{col-break|width=50%}}
| |
| *[[ability name]]
| |
| {{col-break|width=50%}}
| |
| *[[ability name]]
| |
| {{col-end}}
| |
| |}
| |
|
| |
|
| ===Room 11===
| | For a full synopsis of what's in each room, click on any room on the map to head to the corresponding page. |
| -links to other rooms-
| |
| | |
| -synopsis goes here-
| |
| | |
| ====Enemies, Mid-Bosses, and Abilities====
| |
| {| style="border: 3px solid #E47575; {{round}};background: #F69D99" cellspacing="2"
| |
| ! width="267px" | '''Regular Enemies'''
| |
| ! width="133px" | '''Mid-Bosses'''
| |
| |- bgcolor="E47575"
| |
| |
| |
| {{col-begin}}
| |
| {{col-break|width=50%}}
| |
| *[[enemy name]]
| |
| {{col-break|width=50%}}
| |
| *[[enemy name]]
| |
| {{col-end}}
| |
| |
| |
| {{col-begin}}
| |
| *[[mid-boss name]]
| |
| {{col-end}}
| |
| |-
| |
| ! colspan="2" width="404px"| '''Abilities'''
| |
| |- bgcolor="#E47575"
| |
| | colspan="2" |
| |
| {{col-begin}}
| |
| {{col-break|width=50%}}
| |
| *[[ability name]]
| |
| {{col-break|width=50%}}
| |
| *[[ability name]]
| |
| {{col-end}}
| |
| |}
| |
| | |
| ===Room 12===
| |
| -links to other rooms-
| |
| | |
| -synopsis goes here-
| |
| | |
| ====Enemies, Mid-Bosses, and Abilities====
| |
| {| style="border: 3px solid #E47575; {{round}};background: #F69D99" cellspacing="2"
| |
| ! width="267px" | '''Regular Enemies'''
| |
| ! width="133px" | '''Mid-Bosses'''
| |
| |- bgcolor="E47575"
| |
| |
| |
| {{col-begin}}
| |
| {{col-break|width=50%}}
| |
| *[[enemy name]]
| |
| {{col-break|width=50%}}
| |
| *[[enemy name]]
| |
| {{col-end}}
| |
| |
| |
| {{col-begin}}
| |
| *[[mid-boss name]]
| |
| {{col-end}}
| |
| |-
| |
| ! colspan="2" width="404px"| '''Abilities'''
| |
| |- bgcolor="#E47575"
| |
| | colspan="2" |
| |
| {{col-begin}}
| |
| {{col-break|width=50%}}
| |
| *[[ability name]]
| |
| {{col-break|width=50%}}
| |
| *[[ability name]]
| |
| {{col-end}}
| |
| |}
| |
| | |
| ===Room 13===
| |
| -links to other rooms-
| |
| | |
| -synopsis goes here-
| |
| | |
| ====Enemies, Mid-Bosses, and Abilities====
| |
| {| style="border: 3px solid #E47575; {{round}};background: #F69D99" cellspacing="2"
| |
| ! width="267px" | '''Regular Enemies'''
| |
| ! width="133px" | '''Mid-Bosses'''
| |
| |- bgcolor="E47575"
| |
| |
| |
| {{col-begin}}
| |
| {{col-break|width=50%}}
| |
| *[[enemy name]]
| |
| {{col-break|width=50%}}
| |
| *[[enemy name]]
| |
| {{col-end}}
| |
| |
| |
| {{col-begin}}
| |
| *[[mid-boss name]]
| |
| {{col-end}}
| |
| |-
| |
| ! colspan="2" width="404px"| '''Abilities'''
| |
| |- bgcolor="#E47575"
| |
| | colspan="2" |
| |
| {{col-begin}}
| |
| {{col-break|width=50%}}
| |
| *[[ability name]]
| |
| {{col-break|width=50%}}
| |
| *[[ability name]]
| |
| {{col-end}}
| |
| |}
| |
| | |
| ===Room 14===
| |
| -links to other rooms-
| |
| | |
| -synopsis goes here-
| |
| | |
| ====Enemies, Mid-Bosses, and Abilities====
| |
| {| style="border: 3px solid #E47575; {{round}};background: #F69D99" cellspacing="2"
| |
| ! width="267px" | '''Regular Enemies'''
| |
| ! width="133px" | '''Mid-Bosses'''
| |
| |- bgcolor="E47575"
| |
| |
| |
| {{col-begin}}
| |
| {{col-break|width=50%}}
| |
| *[[enemy name]]
| |
| {{col-break|width=50%}}
| |
| *[[enemy name]]
| |
| {{col-end}}
| |
| |
| |
| {{col-begin}}
| |
| *[[mid-boss name]]
| |
| {{col-end}}
| |
| |-
| |
| ! colspan="2" width="404px"| '''Abilities'''
| |
| |- bgcolor="#E47575"
| |
| | colspan="2" |
| |
| {{col-begin}}
| |
| {{col-break|width=50%}}
| |
| *[[ability name]]
| |
| {{col-break|width=50%}}
| |
| *[[ability name]]
| |
| {{col-end}}
| |
| |}
| |
| | |
| ===Room 15===
| |
| -links to other rooms-
| |
| | |
| -synopsis goes here-
| |
| | |
| ====Enemies, Mid-Bosses, and Abilities====
| |
| {| style="border: 3px solid #E47575; {{round}};background: #F69D99" cellspacing="2"
| |
| ! width="267px" | '''Regular Enemies'''
| |
| ! width="133px" | '''Mid-Bosses'''
| |
| |- bgcolor="E47575"
| |
| |
| |
| {{col-begin}}
| |
| {{col-break|width=50%}}
| |
| *[[enemy name]]
| |
| {{col-break|width=50%}}
| |
| *[[enemy name]]
| |
| {{col-end}}
| |
| |
| |
| {{col-begin}}
| |
| *[[mid-boss name]]
| |
| {{col-end}}
| |
| |-
| |
| ! colspan="2" width="404px"| '''Abilities'''
| |
| |- bgcolor="#E47575"
| |
| | colspan="2" |
| |
| {{col-begin}}
| |
| {{col-break|width=50%}}
| |
| *[[ability name]]
| |
| {{col-break|width=50%}}
| |
| *[[ability name]]
| |
| {{col-end}}
| |
| |}
| |
| | |
| ===Room 16===
| |
| -links to other rooms-
| |
|
| |
|
| -synopsis goes here-
| | ==Gallery== |
| | <gallery> |
| | KaTAM Mustard Mountain Chest.png|Kirby calls for help. |
| | KaTAM Mustard Mountain Room 1.png|Sliding across the mountains |
| | KaTAM Mustard Mountain Room 2.png|Working through the tunnels |
| | KaTAM Mustard Mountain Room 4.png|Traversing hot tunnels |
| | KaTAM Mustard Mountain Room 9.png|Finding the way forward |
| | KaTAM Mustard Mountain Room 12.png|Encounter with Shadow Kirby |
| | KaTAM Mustard Mountain Room 16.png|Working through large chambers |
| | KaTAM Mustard Mountain Warp.png|Finding the [[Warp Star]] |
| | KaTAM Mustard Mountain Goal 2.png|Getting smooched |
| | K&TAM Kracko.png|Battle with [[Kracko]] |
| | </gallery> |
|
| |
|
| ====Enemies, Mid-Bosses, and Abilities==== | | ==Names in other languages== |
| {| style="border: 3px solid #E47575; {{round}};background: #F69D99" cellspacing="2"
| | {{Names |
| ! width="267px" | '''Regular Enemies'''
| | |ja=マスタードマウンテン |
| ! width="133px" | '''Mid-Bosses'''
| | |jaR=Masutādo Maunten |
| |- bgcolor="E47575"
| | |jaM=Mustard Mountain |
| |
| | |de=Senf-Massiv |
| {{col-begin}}
| | |deM=Mustard Massif |
| {{col-break|width=50%}}
| | |es=Montaña Mostaza |
| *[[enemy name]]
| | |esM=Mustard Mountain |
| {{col-break|width=50%}}
| | |fr=Mont Moutarde |
| *[[enemy name]]
| | |frM=Mustard Mountain |
| {{col-end}}
| | |it=Monte Mostarda |
| |
| | |itM=Mustard Mountain |
| {{col-begin}}
| | }} |
| *[[mid-boss name]]
| |
| {{col-end}}
| |
| |-
| |
| ! colspan="2" width="404px"| '''Abilities'''
| |
| |- bgcolor="#E47575"
| |
| | colspan="2" |
| |
| {{col-begin}}
| |
| {{col-break|width=50%}}
| |
| *[[ability name]]
| |
| {{col-break|width=50%}}
| |
| *[[ability name]]
| |
| {{col-end}}
| |
| |}
| |
| | |
| ===Room 17===
| |
| -links to other rooms-
| |
| | |
| -synopsis goes here-
| |
| | |
| ====Enemies, Mid-Bosses, and Abilities====
| |
| {| style="border: 3px solid #E47575; {{round}};background: #F69D99" cellspacing="2"
| |
| ! width="267px" | '''Regular Enemies'''
| |
| ! width="133px" | '''Mid-Bosses'''
| |
| |- bgcolor="E47575" | |
| |
| |
| {{col-begin}}
| |
| {{col-break|width=50%}}
| |
| *[[enemy name]]
| |
| {{col-break|width=50%}}
| |
| *[[enemy name]]
| |
| {{col-end}}
| |
| | | |
| {{col-begin}}
| |
| *[[mid-boss name]]
| |
| {{col-end}}
| |
| |-
| |
| ! colspan="2" width="404px"| '''Abilities'''
| |
| |- bgcolor="#E47575" | |
| | colspan="2" | | |
| {{col-begin}}
| |
| {{col-break|width=50%}}
| |
| *[[ability name]]
| |
| {{col-break|width=50%}}
| |
| *[[ability name]]
| |
| {{col-end}}
| |
| |} | |
| | |
| ===Room 18===
| |
| -links to other rooms-
| |
| | |
| -synopsis goes here-
| |
| | |
| ====Enemies, Mid-Bosses, and Abilities====
| |
| {| style="border: 3px solid #E47575; {{round}};background: #F69D99" cellspacing="2"
| |
| ! width="267px" | '''Regular Enemies'''
| |
| ! width="133px" | '''Mid-Bosses'''
| |
| |- bgcolor="E47575"
| |
| |
| |
| {{col-begin}}
| |
| {{col-break|width=50%}}
| |
| *[[enemy name]]
| |
| {{col-break|width=50%}}
| |
| *[[enemy name]]
| |
| {{col-end}}
| |
| |
| |
| {{col-begin}}
| |
| *[[mid-boss name]]
| |
| {{col-end}}
| |
| |-
| |
| ! colspan="2" width="404px"| '''Abilities'''
| |
| |- bgcolor="#E47575"
| |
| | colspan="2" |
| |
| {{col-begin}}
| |
| {{col-break|width=50%}}
| |
| *[[ability name]]
| |
| {{col-break|width=50%}}
| |
| *[[ability name]]
| |
| {{col-end}}
| |
| |}
| |
| | |
| ===Room 19===
| |
| -links to other rooms-
| |
| | |
| -synopsis goes here-
| |
| | |
| ====Enemies, Mid-Bosses, and Abilities====
| |
| {| style="border: 3px solid #E47575; {{round}};background: #F69D99" cellspacing="2"
| |
| ! width="267px" | '''Regular Enemies'''
| |
| ! width="133px" | '''Mid-Bosses'''
| |
| |- bgcolor="E47575"
| |
| |
| |
| {{col-begin}}
| |
| {{col-break|width=50%}}
| |
| *[[enemy name]]
| |
| {{col-break|width=50%}}
| |
| *[[enemy name]]
| |
| {{col-end}}
| |
| |
| |
| {{col-begin}}
| |
| *[[mid-boss name]]
| |
| {{col-end}}
| |
| |-
| |
| ! colspan="2" width="404px"| '''Abilities'''
| |
| |- bgcolor="#E47575"
| |
| | colspan="2" |
| |
| {{col-begin}}
| |
| {{col-break|width=50%}}
| |
| *[[ability name]]
| |
| {{col-break|width=50%}}
| |
| *[[ability name]]
| |
| {{col-end}}
| |
| |}
| |
|
| |
|
| {{AMNavmap}} | | {{Navmap-KaTAM|coord1=10|coord2=120}} |
| {{KatAM}} | | {{Navbox-KaTAM}} |
| [[Category:Places]]
| |
| [[Category:Mirror World locations]]
| |
| [[Category:Levels in Kirby & the Amazing Mirror]]
| |