Mustard Mountain: Difference between revisions
| Line 46: | Line 46: | ||
|[[Heavy Knight]] | |[[Heavy Knight]] | ||
|style="border-style: solid; border-width: 1px 3px 1px 1px" align=center|[[Sword]] | |style="border-style: solid; border-width: 1px 3px 1px 1px" align=center|[[Sword]] | ||
|align=center|[[File: | |align=center|[[File:KNiDL Pengi sprite.png]] | ||
|[[Pengy]] | |[[Pengy]] | ||
|style="border-style: solid; border-width: 1px 3px 1px 1px" align=center|[[Ice]] | |style="border-style: solid; border-width: 1px 3px 1px 1px" align=center|[[Ice]] | ||
| Line 59: | Line 59: | ||
|[[Cupie]] | |[[Cupie]] | ||
|style="border-style: solid; border-width: 1px 3px 1px 1px" align=center|[[Cupid]] | |style="border-style: solid; border-width: 1px 3px 1px 1px" align=center|[[Cupid]] | ||
|align=center|[[File: | |align=center|[[File:KNiDL Hot Head sprite.png]] | ||
|[[Hot Head]] | |[[Hot Head]] | ||
|style="border-style: solid; border-width: 1px 3px 1px 1px" align=center|[[Fire]] | |style="border-style: solid; border-width: 1px 3px 1px 1px" align=center|[[Fire]] | ||
|align=center|[[File: | |align=center|[[File:KNiDL Rocky sprite.png]] | ||
|[[Rocky]] | |[[Rocky]] | ||
|style="border-style: solid; border-width: 1px 3px 1px 1px" align=center|[[Stone]] | |style="border-style: solid; border-width: 1px 3px 1px 1px" align=center|[[Stone]] | ||
|align=center|[[File: | |align=center|[[File:KNiDL Sparky sprite.png]] | ||
|[[Sparky]] | |[[Sparky]] | ||
|align=center|[[Spark]] | |align=center|[[Spark]] | ||
| Line 72: | Line 72: | ||
|[[Big Waddle Dee]] | |[[Big Waddle Dee]] | ||
|style="border-style: solid; border-width: 1px 3px 1px 1px" align=center|None | |style="border-style: solid; border-width: 1px 3px 1px 1px" align=center|None | ||
|align=center|[[File: | |align=center|[[File:KNiDL Flamer sprite.png]] | ||
|[[Flamer]] | |[[Flamer]] | ||
|style="border-style: solid; border-width: 1px 3px 1px 1px" align=center|[[Burning]] | |style="border-style: solid; border-width: 1px 3px 1px 1px" align=center|[[Burning]] | ||
| Line 81: | Line 81: | ||
|[[Roly-Poly]] | |[[Roly-Poly]] | ||
|style="border-style: solid; border-width: 1px 3px 1px 1px" align=center|None | |style="border-style: solid; border-width: 1px 3px 1px 1px" align=center|None | ||
|align=center|[[File: | |align=center|[[File:KNiDL Sword Knight sprite.png]] | ||
|[[Sword Knight]] | |[[Sword Knight]] | ||
|align=center|[[Sword]] | |align=center|[[Sword]] | ||
| Line 91: | Line 91: | ||
|[[Foley]] | |[[Foley]] | ||
|style="border-style: solid; border-width: 1px 3px 1px 1px" align=center|[[Bomb]] | |style="border-style: solid; border-width: 1px 3px 1px 1px" align=center|[[Bomb]] | ||
|align=center|[[File: | |align=center|[[File:KNiDL Laser Ball sprite.png]] | ||
|[[Laser Ball]] | |[[Laser Ball]] | ||
|style="border-style: solid; border-width: 1px 3px 1px 1px" align=center|[[Laser]] | |style="border-style: solid; border-width: 1px 3px 1px 1px" align=center|[[Laser]] | ||
|align=center|[[File: | |align=center|[[File:KNiDL Scarfy sprite.png]] | ||
|[[Scarfy]] | |[[Scarfy]] | ||
|style="border-style: solid; border-width: 1px 3px 1px 1px" align=center|N/A | |style="border-style: solid; border-width: 1px 3px 1px 1px" align=center|N/A | ||
|align=center|[[File: | |align=center|[[File:KNiDL Twister sprite.png]] | ||
|[[Twister]] | |[[Twister]] | ||
|align=center|[[Tornado]] | |align=center|[[Tornado]] | ||
|- | |- | ||
|align=center|[[File: | |align=center|[[File:KNiDL Bomber sprite.png]] | ||
|[[Bomber]] | |[[Bomber]] | ||
|style="border-style: solid; border-width: 1px 3px 1px 1px" align=center|[[Crash]] | |style="border-style: solid; border-width: 1px 3px 1px 1px" align=center|[[Crash]] | ||
| Line 113: | Line 113: | ||
|[[Shadow Kirby]] | |[[Shadow Kirby]] | ||
|style="border-style: solid; border-width: 1px 3px 1px 1px" align=center|None | |style="border-style: solid; border-width: 1px 3px 1px 1px" align=center|None | ||
|align=center|[[File: | |align=center|[[File:KNiDL UFO enemy sprite.png]] | ||
|[[UFO (enemy)|UFO]] | |[[UFO (enemy)|UFO]] | ||
|align=center|[[UFO]] | |align=center|[[UFO]] | ||
| Line 133: | Line 133: | ||
|align=center|None | |align=center|None | ||
|- | |- | ||
|align=center|[[File: | |align=center|[[File:KNiDL Bronto Burt sprite.png]] | ||
|[[Bronto Burt]] | |[[Bronto Burt]] | ||
|style="border-style: solid; border-width: 1px 3px 1px 1px" align=center|None | |style="border-style: solid; border-width: 1px 3px 1px 1px" align=center|None | ||
|align=center|[[File: | |align=center|[[File:KNiDL Gordo sprite.png]] | ||
|[[Gordo]] | |[[Gordo]] | ||
|style="border-style: solid; border-width: 1px 3px 1px 1px" align=center|N/A | |style="border-style: solid; border-width: 1px 3px 1px 1px" align=center|N/A | ||
|align=center|[[File: | |align=center|[[File:KNiDL Noddy sprite.png]] | ||
|[[Noddy]] | |[[Noddy]] | ||
|style="border-style: solid; border-width: 1px 3px 1px 1px" align=center|[[Sleep]] | |style="border-style: solid; border-width: 1px 3px 1px 1px" align=center|[[Sleep]] | ||
|align=center|[[File: | |align=center|[[File:KNiDL Shotzo sprite.png]] | ||
|[[Shotzo]] | |[[Shotzo]] | ||
|style="border-style: solid; border-width: 1px 3px 1px 1px" align=center|N/A | |style="border-style: solid; border-width: 1px 3px 1px 1px" align=center|N/A | ||
|align=center|[[File: | |align=center|[[File:KNiDL Waddle Doo sprite.png]] | ||
|[[Waddle Doo]] | |[[Waddle Doo]] | ||
|align=center|[[Beam]] | |align=center|[[Beam]] | ||
| Line 155: | Line 155: | ||
|[[Haley]] | |[[Haley]] | ||
|style="border-style: solid; border-width: 1px 3px 1px 1px" align=center|None | |style="border-style: solid; border-width: 1px 3px 1px 1px" align=center|None | ||
|align=center|[[File: | |align=center|[[File:KNiDL Parasol enemy sprite.png]] | ||
|[[Parasol (enemy)|Parasol]] | |[[Parasol (enemy)|Parasol]] | ||
|style="border-style: solid; border-width: 1px 3px 1px 1px" align=center|[[Parasol]] | |style="border-style: solid; border-width: 1px 3px 1px 1px" align=center|[[Parasol]] | ||
|align=center|[[File: | |align=center|[[File:KNiDL Sir Kibble sprite.png]] | ||
|[[Sir Kibble]] | |[[Sir Kibble]] | ||
|style="border-style: solid; border-width: 1px 3px 1px 1px" align=center|[[Cutter]] | |style="border-style: solid; border-width: 1px 3px 1px 1px" align=center|[[Cutter]] | ||
|align=center|[[File: | |align=center|[[File:KNiDL Wheelie sprite.png]] | ||
|[[Wheelie]] | |[[Wheelie]] | ||
|align=center|[[Wheel]] | |align=center|[[Wheel]] | ||
Revision as of 21:09, 13 November 2021
| ||||||||||||||||||
| ||||||||||||||||||
|
| ||||||||||||||||||
Mustard Mountain is the fourth cardinal area of the Mirror World. This area is difficult to reach, so it's likely not the fourth area visited by Kirby. Many of the Mirror Doors leading to Mustard Mountain are in obscure locales, since parts of the entire area are not connected and has to be reached using mirrors in other areas, mainly Rainbow Route. The mountain area may be named for mustard as a reference to the overwhelmingly yellow color scheme of the area; the base and underground areas are visibly different. Mustard Mountain is mostly a yellowish orange colored rock surface, and characterized by pools of lava, pillars of fire, and cascading lava-falls. All of the fire hazards damage any Kirby that comes in contact with it, cause a Copy Ability to transform into a wayward star, and can destroy Stars upon contact. Some of the open pits drop Kirby into an area of Rainbow Route, which increases the difficulty of traversing Mustard Mountain.
The boss of Mustard Mountain is Kracko, who guards one of the eight mirror shards.
Enemies, Bosses, and Copy Abilities on Mustard Mountain
|

Map
| Mustard Mountain Area Map | |
|---|---|
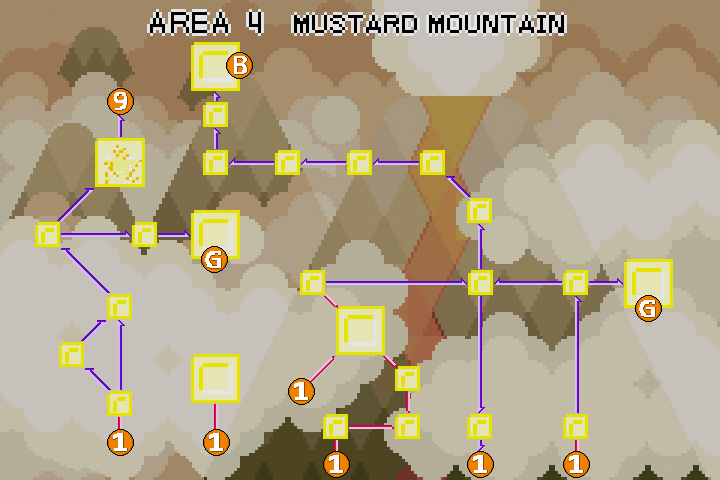 | |
Mustard Mountain is a very isolated area in the Mirror World, and its layout consists almost solely of one-way paths, which will start to feel like the layout of a more traditional Kirby adventure. Traveling through Mustard Mountain is difficult, and Kirby will find himself repeatedly accessing the various entrance tunnels from Rainbow Route to re-enter this area. Overall, there are 19 normal rooms, one hub, one Chest room (containing the map) and two Goal rooms.
The only way into Mustard Mountain is by means of Rainbow Route to the south. However, there is a Warp Star that will take Kirby and his chromatic companions to Candy Constellation from this area.
Mustard Mountain has two Goal rooms. Completing these rooms takes Kirby and his clones to the Goal Game, then returns them to the Central Circle of Rainbow Route.
For a full synopsis of what's in each room, click on any room on the map to head to the corresponding page.
Gallery
- Mustard Mountain Chest.png
Kirby calls for help.
- Mustard Mountain Room 1.png
Sliding across the mountains
- Mustard Mountain Room 2.png
Working through the tunnels
- Mustard Mountain Room 4.png
Traversing hot tunnels
- Mustard Mountain Room 9.png
Finding the way forward
- Mustard Mountain Room 12.png
Encounter with Shadow Kirby
- Mustard Mountain Room 16.png
Working through large chambers
- Mustard Mountain Warp.png
Finding the Warp Star
- Mustard Mountain Goal 2.png
Getting smooched
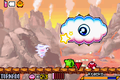
Battle with Kracko

Names in other languages
| Language | Name | Meaning |
|---|---|---|
| Japanese | マスタードマウンテン Masutādo Maunten |
Mustard Mountain |
| French | Mont Moutarde | Mustard Mountain |
| German | Senf-massiv | Massive mustard Figuratively "a mass of mustard". |
| Italian | Monte Mostarda | Mustard Mountain |
| Spanish | Montaña Mostaza | Mustard Mountain |
| Regions in the Mirror World | |
|---|---|
 | |
| |||||||||||||||||||||||||||||