Rainbow Route - Room 9: Difference between revisions
m (Text replacement - "{{Navbox-K&TAM}}" to "{{Navbox-KaTAM}}") |
m (Text replacement - "{{AMRRNavMap" to "{{Navmap-KaTAM-RRo") |
||
| Line 47: | Line 47: | ||
</gallery> | </gallery> | ||
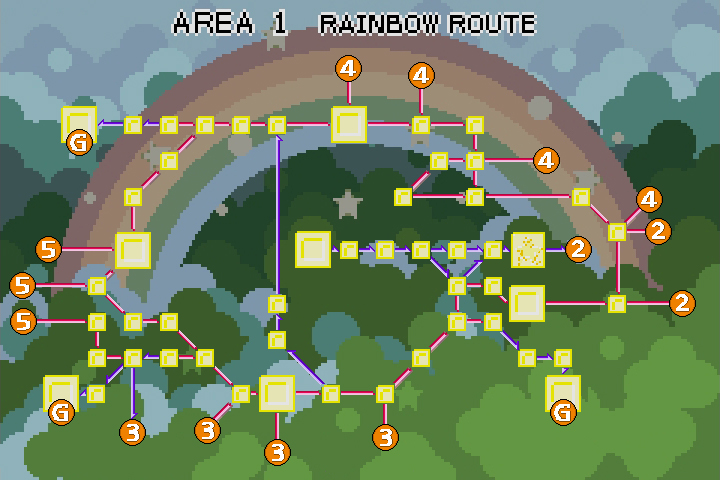
{{ | {{Navmap-KaTAM-RRo|coord1=312|coord2=482}} | ||
{{Navbox-KaTAM}} | {{Navbox-KaTAM}} | ||
[[Category:Rooms in Rainbow Route]] | [[Category:Rooms in Rainbow Route]] | ||
Revision as of 19:48, 12 February 2021
| ||||||||||||||
|
| ||||||||||||||
Rainbow Route - Room 9 is a room in Rainbow Route, the first area of Kirby & The Amazing Mirror.
Links
Two doors link to this area; Rainbow Route - Room 8 to the upper-left and Rainbow Route - Room 10 to the right.
Overview
This room consists of a wide underground grassy cavern, with sloped terrain and some suspended platforms. Numerous Rockies and Noddys patrol it. At the upper-right end is a Ham guarded by a Roly-Poly. The primary slope leads downward and to the right, where Kirby can find the door to Room 10. Also, he may find a bomb block barrier, which opens a very thin passageway to the left. In this passageway are some more enemies, and a pocket room containing a Cell Phone Battery. This path eventually leads back up to the door to Room 8.
Enemies
| Sprite | Name | Copy Ability |
|---|---|---|
| File:KNiD E HotHead.png | Hot Head | Fire |
| File:KNiD E Noddy.png | Noddy | Sleep |
| File:KNiD E Rocky.png | Rocky | Stone |
| Roly-Poly | None | |
| File:KNiD E Sparky.png | Sparky | Spark |
Gallery
- KTAM 1-9 Map.png
Ripped composite map of the room
| Rainbow Route Area Map | |
|---|---|
 | |
| |||||||||||||||||||||||||||||