|
|
| (38 intermediate revisions by 13 users not shown) |
| Line 1: |
Line 1: |
| {{Infobox-KPRLevel | | {{Infobox-KPRLevel |
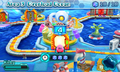
| |image=[[File:Overload Ocean.jpg|300px]] | | |image=[[File:KPR Overload Ocean World Hub.png|300px]] |
| |caption=Screenshot from ''Kirby: Planet Robobot''. | | |caption=Screenshot of '''Overload Ocean''' from ''[[Kirby: Planet Robobot]]''. |
| |level=3 | | |level=3 |
| |stages=6 | | |stages=6 |
| Line 9: |
Line 9: |
| |robobotarmor=All but Boss stage and Stage 5 | | |robobotarmor=All but Boss stage and Stage 5 |
| |boss=[[Susie]] | | |boss=[[Susie]] |
| | |theme music=[[File:Overload Ocean sample KPR.oga]] |
| | |theme title="[[The Noble Haltmann|Overload Ocean]]" |
| | |description=The stage select theme for Overload Ocean. |
| |previous=[[Resolution Road]] | | |previous=[[Resolution Road]] |
| |next=[[Gigabyte Grounds]] | | |next=[[Gigabyte Grounds]] |
| }} | | }} |
| '''Overload Ocean''' (known in Japan as '''Octarn Ocean''') is the third level of ''[[Kirby: Planet Robobot]]''. It has five regular stages, a boss stage, and an EX stage. The level consists mainly of locations both above and below water, contains a dessert factory, and also features a laboratory like the stages before it. There are eighteen [[Code Cube]]s to collect in this level, with three in every stage except the Boss one. The boss is [[Susie]]. | | '''Overload Ocean''' is the third level of ''[[Kirby: Planet Robobot]]''. It has five regular stages, a boss stage, and an EX stage. The level consists mainly of locations both above and below [[Water (environment)|water]], contains a dessert factory, and also features a laboratory like the stages before it. There are eighteen [[Code Cube]]s to collect in this level, with three in every stage except the Boss one. The boss is [[Susie]]. |
|
| |
|
| ==Stages== | | ==Stages== |
| Note that the following synopsis focuses on Kirby's playthrough in the main Story Mode. In [[Extra Game|Meta Knightmare Returns]], some sections are not played at all, and the remaining sections are played in one long continuous run.
| | For details on each stage individually, click the name of the stage. |
| ===Stage 1=== | | {| class="sortable wikitable" border=1 cellpadding=2 |
| [[File:Overload Ocean 1.jpg|thumb|right|250px|SHORYUKEN!]] | | !class=unsortable|Stage |
| '''Section 1''': The stage begins on a metal dock, overlooking a body of water. A [[Knuckle Joe]] appears right in front of Kirby, just asking to be swallowed or pummeled. Further right is a swim past several aquatic enemies, cargo boats and other obstructions. An underwater bomb block barrier yields the way forward from here, which leads to an assault by the [[MechFlotzo]], large octopuses that harass Kirby with their ink. The door to the next section can be found on a boat at the right end of the area.
| | !class=unsortable|Unlock Req. |
| | | !class=unsortable|Code Cubes |
| '''Section 2''': The door leads to another boat, with the water continuing to the right. Here, however, the water is bottomless, so Kirby should take care not to swim too deep. Under a wall of crates, two [[Copy Pedestal]]s containing the [[Poison]] and [[Sword]] abilities can be found, along with [[Bandana Waddle Dee]] on a boat. Further right, Kirby must contend with the [[Mid-Boss]] [[Blocky]] on a dock. Defeating and swallowing him yields the [[Stone]] ability. From there, a couple of [[Cannon]]s will take Kirby to the next section.
| | !class=unsortable|Robobot Armor? |
| | | !class=unsortable|Boss/Mid-Boss |
| '''Section 3''': Kirby lands on a series of sloped catwalks leading downward. The Stone ability will allow him to slide down effortlessly, smacking any enemies that get in the way. Along the path, another slope can be accessed off the side that leads to a [[Code Cube]]. From there, the catwalks dump into the water, where the door to the next section can be found to the left on the underwater floor.
| | !class=unsortable|Notes |
| | |- |
| | |{{center|[[File:KPR Overload Ocean Stage 1 select.png|200px]]<br>[[Overload Ocean - Stage 1|Stage 1]]}} |
| | |N/A |
| | |3 |
| | |{{Y}} |
| | |[[Blocky]] |
| | |A [[Smash Bros. room]] is hidden in this stage. |
|
| |
|
| '''Section 4''': The door leads to a pool, which leads out to a path made of docks and crates. Here, the [[Robobot Armor]] can be accessed, and used to reveal a [[Fuse Cannon]]. Using the armor, Kirby can carry this cannon, and place it in an area with a fuse so that it can be used. Doing this successfully will allow Kirby to bypass some enemies on ladders and gain a [[1Up]]. Further right, a [[Warp Star|3D Warp Star]] will take Kirby to the background, where another Fuse Cannon can be found. To obtain the Code Cube here, the cannon must be moved to the other base, or else Kirby will just get a face-ful of [[Gordo]]. The door to the next section can be found up a ladder from that area.
| |
|
| |
| '''Section 5''': The door leads to a walkway leading right past more MechFlotzo. Granted Kirby still has the armor, he can use it to take these pesky cephalopods out, and get some tasty calamari for his trouble. Along the way, a Code Cube can be seen in the background underwater. To reach it, Kirby will need to clear a path, then ditch the armor to fit through the narrow passages. To the right from there, the stage exit can be found, obscured by breakable boxes.
| |
|
| |
| (there is a secret room in this stage which contains the [[Smash|Smash Bros.]] ability, and some other goodies)
| |
|
| |
| ====Enemies, Mid-bosses, and Abilities====
| |
| {| style="border: 3px solid #E47575; {{round}};background: #F69D99" cellspacing="2"
| |
| ! width="420px" | '''Regular Enemies'''
| |
| ! width="180px" | '''Mid-Boss'''
| |
| |- bgcolor="E47575"
| |
| |
| |
| {{col-begin}}
| |
| {{col-break|width=33%}}
| |
| *[[Blade Knight]]
| |
| *[[Blipper]]
| |
| *[[Cappy]]
| |
| *[[Chip]]
| |
| *[[MechFlotzo]]
| |
| *[[Craby]]
| |
| *[[Flamer]]
| |
| {{col-break|width=33%}}
| |
| *[[Foley]]
| |
| *[[Glunk]]
| |
| *[[Gordo]]
| |
| *[[Knuckle Joe]]
| |
| *[[Mamanti]]
| |
| *[[Parasol Waddle Dee]]
| |
| *[[Rocky]]
| |
| {{col-break|width=34%}}
| |
| *[[Scarfy]]
| |
| *[[Simirror]]
| |
| *[[Squishy]]
| |
| *[[Venog]]
| |
| *[[Waddle Dee]]
| |
| *[[Walf]]
| |
| {{col-end}}
| |
| |
| |
| {{col-begin|width=50%}}
| |
| *[[Blocky]]
| |
| {{col-end}}
| |
| |- | | |- |
| ! width="420px"| '''Abilities'''
| | |{{center|[[File:KPR Overload Ocean Stage 2 select.png|200px]]<br>[[Overload Ocean - Stage 2|Stage 2]]}} |
| ! width="300px" | '''Robobot Armor Modes'''
| | |Complete Stage 1. |
| |- bgcolor="#E47575" | | |3 |
| | |{{Y}} |
| | |{{N}} |
| | | | | |
| {{col-begin}}
| |
| {{col-break|width=50%}}
| |
| *[[Fighter]]
| |
| *[[Fire]]
| |
| *[[Mirror]]
| |
| *[[Parasol (ability)|Parasol]]
| |
| {{col-break|width=50%}}
| |
| *[[Poison]]
| |
| *[[Smash|Smash Bros.]]
| |
| *[[Stone]]
| |
| *[[Sword]]
| |
| {{col-end}}
| |
| |
| |
| {{col-begin}}
| |
| {{col-break|width=50%}}
| |
| *[[Bomb (Robobot Armor)|Bomb]]
| |
| *[[Fire (Robobot Armor)|Fire]]
| |
| {{col-break|width=50%}}
| |
| *[[Parasol (Robobot Armor)|Parasol]]
| |
| *[[Sword (Robobot Armor)|Sword]]
| |
| {{col-end}}
| |
| |}
| |
|
| |
| ===Stage 2===
| |
| [[File:Overload Ocean 2.jpg|thumb|right|250px|Kirby rides along in his Wheel Armor in Stage 2.]]
| |
| '''Section 1:''' The stage begins in the docks region, with a [[Wheelie]] available right at the start, who will run over Kirby immediately if he is not swallowed. From there, Kirby can use [[Wheel]] to ride on the water to the other end, and find some [[Robobot Armor]] in front of the doorway.
| |
|
| |
|
| '''Section 2:''' Another Wheelie appears from a hatch, which the armor can scan to retrieve the [[Wheel (Robobot Armor)|Wheel Mode]] for the first time. This mode allows Kirby to hop between the foreground and background at will, and cannot be discarded until the stage is complete. The path ahead will require utilizing this trick and a [[Code Cube]] can be gotten along the way.
| |
|
| |
| '''Section 3:''' Along this path, a [[Switch]] will need to be pressed to unlock an optional doorway that leads to another Code Cube, but Kirby will need to be quick to get in there before the gate closes.
| |
|
| |
| '''Section 4:''' This path involves a lot of hopping back and forth. The last Code Cube can be found here after a series of jumps. The unique [[Sticker]] can also be found here, in a [[Treasure Chest]] off the beaten path. At the end, Kirby uses a machine that relies on the Wheel Armor's revving power to carve the stage exit out of a rock using a laser.
| |
|
| |
| ====Enemies, Mid-bosses, and Abilities====
| |
| {| style="border: 3px solid #E47575; {{round}};background: #F69D99" cellspacing="2"
| |
| ! width="420px" | '''Regular Enemies'''
| |
| ! width="180px" | '''Mid-Boss'''
| |
| |- bgcolor="E47575"
| |
| |
| |
| {{col-begin}}
| |
| {{col-break|width=33%}}
| |
| *[[Blipper]]
| |
| *[[MechFlotzo]]
| |
| *[[Craby]]
| |
| {{col-break|width=33%}}
| |
| *[[Glunk]]
| |
| *[[Mamanti]]
| |
| *[[Squishy]]
| |
| {{col-break|width=34%}}
| |
| *[[Walf]]
| |
| *[[Wheelie]]
| |
| {{col-end}}
| |
| |
| |
| {{col-begin|width=50%}}
| |
| *None.
| |
| {{col-end}}
| |
| |- | | |- |
| ! width="420px"| '''Abilities'''
| | |{{center|[[File:KPR Overload Ocean Stage 3 select.png|200px]]<br>[[Overload Ocean - Stage 3|Stage 3]]}} |
| ! width="180px" | '''Robobot Armor Modes'''
| | |Complete Stage 2. |
| |- bgcolor="#E47575" | | |3 |
| | | | |{{Y}} |
| {{col-begin}} | | |{{N}} |
| *[[Wheel]]
| |
| {{col-end}} | |
| | | | | |
| {{col-begin}}
| |
| *[[Wheel (Robobot Armor)|Wheel]]
| |
| {{col-end}}
| |
| |}
| |
|
| |
| ===Stage 3===
| |
| [[File:Overload Ocean 3.jpg|thumb|right|250px|Kirby contends with some lasers in a scrolling section in Stage 3.]]
| |
| '''Prelude:''' Like most labs, this one starts off outside, as Kirby must make his way up the path to the door. This lab is partially submerged in the water.
| |
|
| |
| '''Section 1:''' The first section of the lab is an auto-scrolling area with a small detour.
| |
|
| |
| '''Section 2:''' This is an area with a screen showing Kirby the preferred way through the area. Taking this path as instructed leads to the first Code Cube. This is done via 3-D Warp Stars in another auto-scrolling section.
| |
|
| |
| '''Section 3:''' The Robobot Armor is obtained in this area. The unique Sticker can be collected in one of the background areas. The second Code Cube can be found in a treasure chest in the foreground. Kirby will then need to abandon the armor to continue.
| |
|
| |
| '''Section 4:''' This section is another auto scroller. Kirby can take a [[Sleep|nap]] here if he is brave. The last Code Cube can be obtained by pressing an extra Switch along the route. The stage exit is at the end of this path, guarded by laser turrets.
| |
|
| |
|
| ====Enemies, Mid-bosses, and Abilities====
| |
| {| style="border: 3px solid #E47575; {{round}};background: #F69D99" cellspacing="2"
| |
| ! width="420px" | '''Regular Enemies'''
| |
| ! width="180px" | '''Mid-Boss'''
| |
| |- bgcolor="E47575"
| |
| |
| |
| {{col-begin}}
| |
| {{col-break|width=33%}}
| |
| *[[Clubmech]]
| |
| *[[Craby]]
| |
| *[[Esper]]
| |
| *[[Elec]]
| |
| *[[Glunk]]
| |
| *[[Gordo]]
| |
| *[[Hot Head]]
| |
| {{col-break|width=33%}}
| |
| *[[Leafan]]
| |
| *[[Mamanti]]
| |
| *[[Metal Guardian]]
| |
| *[[Moonja]]
| |
| *[[Noddy]]
| |
| *[[Parasol Waddle Dee]]
| |
| *[[Propeller]]
| |
| {{col-break|width=34%}}
| |
| *[[Sir Kibble]]
| |
| *[[Sparky]]
| |
| *[[Squishy]]
| |
| *[[Venog]]
| |
| *[[Waddle Doo]]
| |
| *[[Walf]]
| |
| *[[Walky]]
| |
| {{col-end}}
| |
| |
| |
| {{col-begin|width=50%}}
| |
| *None.
| |
| {{col-end}}
| |
| |- | | |- |
| ! width="420px"| '''Abilities'''
| | |{{center|[[File:KPR Overload Ocean Stage 4 select.png|200px]]<br>[[Overload Ocean - Stage 4|Stage 4]]}} |
| ! width="300px" | '''Robobot Armor Modes'''
| | |Complete Stage 3. |
| |- bgcolor="#E47575"
| | |3 |
| |
| | |{{Y}} |
| {{col-begin}} | | |{{N}} |
| {{col-break|width=50%}}
| |
| *[[Beam]]
| |
| *[[Cutter]]
| |
| *[[ESP]]
| |
| *[[Fire]]
| |
| *[[Leaf]]
| |
| *[[Mike]]
| |
| {{col-break|width=50%}} | |
| *[[Ninja]]
| |
| *[[Parasol (ability)|Parasol]]
| |
| *[[Poison]]
| |
| *[[Sleep]]
| |
| *[[Spark]]
| |
| {{col-end}} | |
| | | | | |
| {{col-begin}}
| |
| {{col-break|width=50%}}
| |
| *[[Beam (Robobot Armor)|Beam]]
| |
| *[[ESP (Robobot Armor)|ESP]]
| |
| {{col-break|width=50%}}
| |
| *[[Parasol (Robobot Armor)|Parasol]]
| |
| *[[Spark (Robobot Armor)|Spark]]
| |
| {{col-end}}
| |
| |}
| |
|
| |
| ===Stage 4===
| |
| [[File:Overload Ocean 4.jpg|thumb|right|250px|Kirby skates up the popsicle slope in Stage 4.]]
| |
| '''Section 1:''' This stage takes place in a huge ice cream factory. Unfortunately for Kirby, the ice cream will not be very much fun if it falls on him. The door forward can be found past several tumbling cones.
| |
|
| |
|
| '''Section 2:''' This area is a duo of popsicle slopes, which are fun to skate on.
| |
|
| |
| '''Section 3:''' In this area, Kirby gets an [[Invincibility Candy]], can use it to run amok in the place, and obtain a Code Cube being guarded by a bunch of [[Glunk]]s at the end of the room.
| |
|
| |
| '''Section 4:''' This room consists of several smaller chambers. Along the way, an optional doorway can be found under some fire blocks, which yields a Code Cube (and maybe a unique Sticker too).
| |
|
| |
| '''Section 5:''' The Robobot Armor is found in this room, and the [[Ice (Robobot Armor)|Ice Mode]] makes its debut here. In this room, Kirby is tasked with returning the heads of three ice-cream statues to their bodies. Done successfully, this will yield the last Code Cube right before the stage exit.
| |
|
| |
| ====Enemies, Mid-bosses, and Abilities====
| |
| {| style="border: 3px solid #E47575; {{round}};background: #F69D99" cellspacing="2"
| |
| ! width="420px" | '''Regular Enemies'''
| |
| ! width="180px" | '''Mid-Boss'''
| |
| |- bgcolor="E47575"
| |
| |
| |
| {{col-begin}}
| |
| {{col-break|width=33%}}
| |
| *[[Blade Knight]]
| |
| *[[Broom Hatter]]
| |
| *[[Waddle Dee|Cannon Mech Waddle Dee]]
| |
| *[[Chilly]]
| |
| *[[Craby]]
| |
| *[[Elec]]
| |
| {{col-break|width=33%}}
| |
| *[[Glunk]]
| |
| *[[Gordo]]
| |
| *[[Hairy Dee]]
| |
| *[[Pillah]]
| |
| *[[Parasol Waddle Dee]]
| |
| {{col-break|width=34%}}
| |
| *[[Propeller]]
| |
| *[[Sheld]]
| |
| *[[Squishy]]
| |
| *[[Waddle Dee]]
| |
| *[[Walf]]
| |
| {{col-end}}
| |
| |
| |
| {{col-begin|width=50%}}
| |
| *None.
| |
| {{col-end}}
| |
| |- | | |- |
| ! width="420px"| '''Abilities'''
| | |{{center|[[File:KPR Overload Ocean Stage 5 select.png|200px]]<br>[[Overload Ocean - Stage 5|Stage 5]]}} |
| ! width="180px" | '''Robobot Armor Modes'''
| | |Complete Stage 4. |
| |- bgcolor="#E47575"
| | |3 |
| |
| | |{{N}} |
| {{col-begin}} | | |[[Bonkers]] |
| {{col-break|width=50%}}
| |
| *[[Bomb]]
| |
| *[[Doctor]]
| |
| *[[Ice]]
| |
| {{col-break|width=50%}} | |
| *[[Parasol (ability)|Parasol]]
| |
| *[[Sword]]
| |
| {{col-end}}
| |
| | | | | |
| {{col-begin}}
| |
| *[[Ice (Robobot Armor)|Ice]]
| |
| *[[Spark (Robobot Armor)|Spark]]
| |
| {{col-end}}
| |
| |}
| |
|
| |
|
| ===Stage 5===
| | |- |
| [[File:Overload Ocean 5.jpg|thumb|right|250px|Kirby swims with the sharks in Stage 5.]] | | |{{center|[[File:KPR Overload Ocean Stage 6 select.png|200px]]<br>[[Overload Ocean - Stage 6|Stage 6]]}} |
| This stage takes place almost exclusively underwater. It does not feature the Robobot Armor.
| | |Collect 6 [[Code Cube]]s from prior Overload Ocean stages and complete Stage 5. |
| | |0 |
| | |{{N}} |
| | |[[Susie]] |
| | |Completing this stage unlocks [[Gigabyte Grounds]]. |
|
| |
|
| ====Enemies, Mid-bosses, and Abilities====
| |
| {| style="border: 3px solid #E47575; {{round}};background: #F69D99" cellspacing="2"
| |
| ! width="420px" | '''Regular Enemies'''
| |
| ! width="180px" | '''Mid-Boss'''
| |
| |- bgcolor="E47575"
| |
| |
| |
| {{col-begin}}
| |
| {{col-break|width=33%}}
| |
| *[[Blipper]]
| |
| *[[Craby]]
| |
| *[[Esper]]
| |
| {{col-break|width=33%}}
| |
| *[[Glunk]]
| |
| *[[Mamanti]]
| |
| *shark enemy
| |
| {{col-break|width=34%}}
| |
| *[[Simirror]]
| |
| *[[Squishy]]
| |
| {{col-end}}
| |
| |
| |
| {{col-begin|width=50%}}
| |
| *[[Bonkers]]
| |
| {{col-end}}
| |
| |- | | |- |
| ! width="420px"| '''Abilities'''
| | |{{center|[[File:KPR Overload Ocean Stage 7 EX select.png|200px]]<br>[[Overload Ocean - Stage 7 EX|Stage 7 EX]]}} |
| ! width="180px" | '''Robobot Armor Modes'''
| | |Collect all Code Cubes from prior Overload Ocean stages. |
| |- bgcolor="#E47575"
| | |3 |
| |
| | |{{Y}} |
| {{col-begin}} | | |[[King Doo]] 2.0 |
| {{col-break|width=50%}}
| | |This is an EX stage, so completing it is not required to finish the game. |
| *[[ESP]]
| | |
| *[[Hammer]]
| |
| {{col-break|width=50%}} | |
| *[[Mirror]]
| |
| {{col-end}}
| |
| | | |
| {{col-begin}}
| |
| *None.
| |
| {{col-end}}
| |
| |} | | |} |
|
| |
|
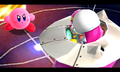
| ===Stage 6 (Boss: [[Susie]])=== | | ==In Meta Knightmare Returns== |
| [[File:Susie Encounter.jpg|thumb|right|250px|Kirby and Susie prepare to fight.]] | | All stages of Overload Ocean are played in one sequence in [[Meta Knightmare Returns]] except for certain sections involving the [[Robobot Armor]]. Through this sequence, five [[Sticker (Kirby: Planet Robobot)|sticker]]s can be found. |
| At least six Code Cubes are required to unlock this stage.
| |
|
| |
|
| Kirby starts out in the water, and must swim upward. Once above water, Bandana Waddle Dee gives Kirby an item, then the [[Fighter]], [[Poison]] and [[Circus]] abilities are available above on [[Copy Pedestal]]s. Higher still, the door to the boss chamber can be found.
| | In addition, many enemies are re-sized - changing their [[Health]] and also possibly movement speed - and [[Susie]] and the [[Mid-Bosses]] are changed to their 2.0 forms. |
|
| |
|
| The room itself is a domed chamber underwater. Here, Kirby runs into [[Susie]] for the very first time. She introduces herself to him, and explains why the [[Haltmann Works Company]] is here on [[Pop Star]]. She then declares Kirby an obstacle to her plans, and jumps into a large mech suit, prompting the fight to begin.
| | Finally, in place of [[Code Cube]]s, side areas yield Meta-Points, which can be used to power [[Meta Knight]]'s special abilities. |
|
| |
|
| The fight itself takes place in three phases, with the first being on a flat arena, and the next two being a circular loop. Susie attacks by slamming Kirby with her mech, and firing drones at him. Once she is defeated, she escapes using a helicopter device, leaving Kirby to do his dance, destroy the third leg of the UFO, and proceed to the next level, [[Gigabyte Grounds]].
| | ==Gallery== |
| | <gallery> |
| | KPR Overload Ocean Level Hub.png|A portion of the Overload Ocean Stage Select area. |
| | KPR Susie Encounter.png|Kirby and Susie prepare to fight. |
| | </gallery> |
|
| |
|
| ===Stage 7 EX=== | | ==Names in other languages== |
| [[File:Overload Ocean EX.jpg|thumb|right|250px|It was... too much... sugar...]]
| | {{Names |
| All 15 of the Code Cubes from the previous stages are required to unlock this one. It is a mash-up of various areas from the level, culminating in a fight with [[King Doo]] 2.0.
| | |ja=オクターン オーシャン |
| | | |jaR=Okutān Ōshan |
| ====Enemies, Mid-bosses, and Abilities====
| | |jaM=Octarn Ocean<br><small>This is the official English rendering of the Japanese name in-game. "Octarn" likely derives from "[[wikipedia:octal|octal]]" or "[[wikipedia:octet (computing)|octet]]", which both describe the units of data used by 8-bit systems (and indeed, the Spanish translation does use "octal").</small> |
| {| style="border: 3px solid #E47575; {{round}};background: #F69D99" cellspacing="2" | | |ko=오버로드 오션 |
| ! width="420px" | '''Regular Enemies'''
| | |koR=Obeorodeu Oseyeon |
| ! width="180px" | '''Mid-Boss'''
| | |koM=Overload Ocean |
| |- bgcolor="E47575" | | |de=Bildschöne Brandung |
| |
| | |deM=Beautiful Breakers |
| {{col-begin}}
| | |fr=Océan Optique |
| {{col-break|width=33%}}
| | |frM=Optical Ocean |
| *[[Bronto Burt]]
| | |it=Spiaggia Ottica |
| *[[Broom Hatter]]
| | |itM=Optical Beach |
| *[[Cappy]]
| | |es=Océano Octal |
| *[[Capsule J3]]
| | |esM=Octal Ocean |
| *[[Chilly]]
| | }} |
| *[[Labo]]
| |
| {{col-break|width=33%}}
| |
| *[[MechFlotzo]]
| |
| *[[Craby]]
| |
| *[[Esper]]
| |
| *[[Gigatzo]]
| |
| *[[Glunk]]
| |
| *[[Gordo]]
| |
| {{col-break|width=34%}}
| |
| *[[Waddle Dee|Mech Waddle Dee]]
| |
| *[[Propeller]]
| |
| *[[Parasol Waddle Dee]]
| |
| *[[Scarfy]]
| |
| *[[Waddle Dee]]
| |
| *[[Walf]]
| |
| {{col-end}}
| |
| | | |
| {{col-begin|width=50%}}
| |
| *[[King Doo]] 2.0
| |
| {{col-end}}
| |
| |- | |
| ! width="420px"| '''Abilities'''
| |
| ! width="180px" | '''Robobot Armor Modes'''
| |
| |- bgcolor="#E47575" | |
| | | |
| {{col-begin}}
| |
| {{col-break|width=50%}}
| |
| *[[Beam]]
| |
| *[[ESP]]
| |
| *[[Jet]]
| |
| {{col-break|width=50%}}
| |
| *[[Parasol (ability)|Parasol]]
| |
| *[[Wheel]]
| |
| {{col-end}}
| |
| | | |
| {{col-begin}}
| |
| *[[Ice (Robobot Armor)|Ice]]
| |
| *[[Spark (Robobot Armor)|Spark]]
| |
| {{col-end}}
| |
| |}
| |
|
| |
|
| ==Trivia==
| | {{Navbox-KPR}} |
| [[File:Overload Ocean Stage Select.jpg|thumb|right|250px|A portion of the Overload Ocean Stage Select area.]]
| |
| *Two songs that play in the EX stage are from ''[[Kirby Air Ride]]''.
| |
|
| |
|
| <br clear=all>
| | [[Category:Popstar locations]] |
| {{KirbyPR}}
| |
| [[Category:Places]] | |
| [[Category:Levels in Kirby: Planet Robobot]]
| |
| [[Category:Pop Star locations]]
| |