Mad Mechanism: Difference between revisions
*>Axiomist (saving my minscule progress, gotta run) |
m (Text replacement - "\|theme title="\[\[(.*) theme\]\]"" to "|theme title="$1"") |
||
| (30 intermediate revisions by 16 users not shown) | |||
| Line 1: | Line 1: | ||
[[File: | {{Infobox-KCCStage | ||
|image=[[File:KCC Mad Mechanism select.png]] | |||
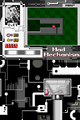
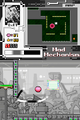
|caption= Opening screen for '''Mad Mechanism''' | |||
'''Mad Mechanism''' is the second stage of [[Wonder Lilane]] in ''[[Kirby: | |level= [[Wonder Lilane]] | ||
|time= 1:00:00<br>1:35:00<br>1:50:00 | |||
|line= 1300ml<br>0600ml<br>0001ml | |||
|previousstage= [[Frozen Fantasy]] | |||
|nextstage= [[Spectacle Space]] | |||
|theme music=[[File:KCC Studying the Factory Sample.mp3]] | |||
|theme title="[[Studying the Factory|Mad Mechanism]]" | |||
|description=Clip of the stage music that plays in Mad Mechanism | |||
}} | |||
'''Mad Mechanism''' is the second stage of [[Wonder Lilane]] in ''[[Kirby: Canvas Curse]]''. Mad Mechanism is similar in style to [[Machine Mansion]], as both have black and white backgrounds and foregrounds in a mechanical art style. [[Kirby]] traverses this stage during his quest to break the curse cast upon him by [[Drawcia]]. | |||
Mad Mechanism offers three [[medal]]s, one in each stage, in the main game mode. In [[Rainbow Run]], six more medals can be obtained via Time Trial and Line Trial challenges. | Mad Mechanism offers three [[medal]]s, one in each stage, in the main game mode. In [[Rainbow Run]], six more medals can be obtained via Time Trial and Line Trial challenges. | ||
==Area 1 | == Stage overview == | ||
{| class="wikitable" border=1 cellpadding=2 | |||
!Area / map | |||
!Description | |||
!Medal guide | |||
|- | |||
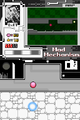
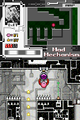
|{{Center|[[File:KCC Mad Mechanism area 01 map.png|150px]]<br>'''Area 1'''}} | |||
|Mad Mechanism's first room is a small, empty, and calm enclosure. A portion of the wall must be broken by tapping it with the stylus. After falling through a tube to the lower portion, the area is never as tranquil as the entrance. Throughout the remainder of the stage, a gray floor will rise and fall, similar to the magma in the volcanic areas. When Kirby is squished between the rising ground and stationary ceiling, a life will be lost and Kirby respawns at a previous [[checkpoint]]. Small nooks in the ceiling allow for safe refuge, although they are somewhat difficult to reach as the automatically scrolling screen limits impedes travel. Halfway through, the nooks are closed with stone blocks, requiring a well hidden [[Bomb Block]] to be struck with the stylus in order to reach safety. Also the tight passageway becomes more treacherous as the floor spikes prevent Kirby from touching the ground to recharge the [[Ink|ink gauge]]. | |||
[[Needlous]] are the only [[Copy Ability]] granting enemies present, giving the [[Needle]] ability. [[Shotzo]]s, lasers, [[Bronto Burt]]s and [[Gordo]]s are the only other enemies in the area. Two [[Energy Drink]]s can be found, and [[Point Star]]s infrequently appear. | |||
|This medal can be found in a ceiling cache barricaded by blocks that can be removed by tapping a Bomb Block slightly up ahead. The medal will drop behind the crusher wall if Kirby does not collect it quickly though. | |||
|- | |||
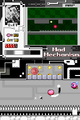
[[File: | |{{Center|[[File:KCC Mad Mechanism area 02 map.png|150px]]<br>'''Area 2'''}} | ||
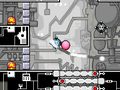
|No-draw zones dominate the second area of Mad Mechanism. [[Waddle Dee]], Gordos, and [[Bouncy]] appear near the entrance; and [[Topper]]s show up midway through. This area is mostly devoid of enemy confrontations as the challenge focuses on Kirby's travel without the aid of Rainbow Lines. The layout is mostly horizontal with cranes used to carry Kirby over some portions and descending steps in others. The cranes carry Kirby over several open pits, all containing point stars, but with only one pit bypassing the pipe connecting the other pits. Falling down the wrong pit will merely pipe Kirby to a green pole and the crane for another attempt. | |||
The area ends with a locked room challenge. Four [[switch]]es are placed in nooks along the margins of the room. Stone blocks prevent access to them, but require the floating bombs to be pushed to them in order to destroy the blocks. Each switch controls a retractable shutter located on the floor. After all four are opened, the exit door takes Kirby the Mad Mechanism's final area. | |||
This area also appears as the Time Trial of [[Rainbow Run]]. | |||
|This medal can be found shortly past the Gordos on patrol, tucked high in the upper-right corner of the room. Kirby will need to make use of the small gap in the no-draw zone to jump up to it. | |||
|- | |||
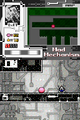
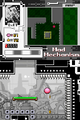
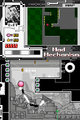
|{{Center|[[File:KCC Mad Mechanism area 03 map.png|150px]]<br>'''Area 3'''}} | |||
|The third and final area of Mad Mechanism employs enough devices to keep the stylus busy. Lasers found on the floors, walls, and ceiling often alternate points of beam origin. Green pads that limit Kirby's movements and occasionally transport him along a defined path are frequently encountered. [[Block|Electrical Block]]s and spikes also dominate much of the area, in addition to a large open pit. Reaching the final door requires another challenge, in which the door disappears and appears in another location. The portion of the challenge takes place in a large room lined with electrical blocks in every direction. Kirby must remain airborne and attempt to guess where the door will appear before running out of ink and falling to the ground. | |||
As with the other Mad Mechanism areas, few enemies are present, although spear Waddle Dees appear near the beginning and [[Bronto Burt]]s chase Kirby, if they are not defeated. A well hidden [[1Up]] can be found in the upper right-most portion of the map. Point Stars appear near the beginning and seldom thereafter. | |||
This area also appears as the Line Trial of [[Rainbow Run]]. | |||
|This medal is nestled in a nook just to the left of the big square room in the lower-right. To reach it, a sneaky Bomb Block inside the left wall of the square room needs to be hit, then, Kirby needs to climb up into the nook to get the medal. | |||
|} | |||
=== Enemies and Copy Abilities === | |||
{| class="wikitable" | |||
!Sprite | |||
!Name | |||
!style="border-style: solid; border-width: 1px 3px 1px 1px"|Copy Ability | |||
!Sprite | |||
!Name | |||
!Copy Ability | |||
|- | |||
|align=center|[[File:KCC Bouncy sprite.png]] | |||
|[[Bouncy]] | |||
|style="border-style: solid; border-width: 1px 3px 1px 1px"|None | |||
|align=center|[[File:KCC Shotzo sprite.png]] | |||
|[[Shotzo]] | |||
|N/A | |||
|- | |||
|align=center|[[File:KCC Bronto Burt sprite.png]] | |||
|[[Bronto Burt]] | |||
|style="border-style: solid; border-width: 1px 3px 1px 1px"|None | |||
|align=center|[[File:KCC Spear Waddle Dee sprite.png]] | |||
|[[Spear Waddle Dee]] | |||
|None | |||
|- | |||
|align=center|[[File:KCC Gordo sprite.png]] | |||
|[[Gordo]] | |||
|style="border-style: solid; border-width: 1px 3px 1px 1px"|N/A | |||
|align=center|[[File:KCC Topper sprite.png]] | |||
|[[Topper]] | |||
|None | |||
|- | |||
|align=center|[[File:KCC Needlous sprite.png]] | |||
|[[Needlous]] | |||
|[[Needle]] | |||
!colspan=3| | |||
|} | |||
==Gallery== | |||
<gallery> | |||
KCC Mad Mechanism 1.png|Kirby peeks out behind the seem. | |||
KCC Mad Mechanism 2.png|Kirby has to find a safe place as the floor rises up. | |||
KCC Mad Mechanism 3.png|Kirby finds the medal, but he must hit the bomb block in the corner to get it. | |||
KCC Mad Mechanism 4.png|Kirby finds a lone [[Gordo]] in the large world. | |||
KCC Mad Mechanism 5.png|Kirby rolls toward a [[Topper]]. | |||
KCC Mad Mechanism 6.png|Kirby is picked up by a claw and needs to find which hole to fall in. | |||
KCC Mad Mechanism 7.png|Kirby guides the mine to blow up some gray blocks. | |||
KCC Mad Mechanism 8.png|Kirby plays a dangerous game as he jumps through a pit of spikes. | |||
KCC Mad Mechanism 9.png|Kirby navigates through the electric field. | |||
KCC Mad Mechanism 10.png|Kirby finds the exit, but it fades away before he gets there. | |||
</gallery> | |||
==Names in other languages== | |||
{{Names | |||
|ja=マッドメカニズム | |||
|jaR=Maddomekanizumu | |||
|jaM=Mad Mechanism | |||
|fr=Méchante Machine | |||
|frM=Nasty Machine | |||
|it=Meccano Matto | |||
|itM=Mad Machine | |||
|de=Mecha-Mix | |||
|deM=Mecha-Mix | |||
}} | |||
{{clear}} | |||
{{Navbox-KCC}} | |||
[[Category:Places]] | [[Category:Places]] | ||
[[Category:Stages in Kirby: Canvas Curse]] | |||
[[Category:Wonder Lilane locations]] | |||
Latest revision as of 20:48, 19 January 2024
| ||||||||||||
| ||||||||||||
| ||||||||||||
|
| ||||||||||||

Mad Mechanism is the second stage of Wonder Lilane in Kirby: Canvas Curse. Mad Mechanism is similar in style to Machine Mansion, as both have black and white backgrounds and foregrounds in a mechanical art style. Kirby traverses this stage during his quest to break the curse cast upon him by Drawcia.
Mad Mechanism offers three medals, one in each stage, in the main game mode. In Rainbow Run, six more medals can be obtained via Time Trial and Line Trial challenges.
Stage overview[edit]
| Area / map | Description | Medal guide |
|---|---|---|
Area 1 |
Mad Mechanism's first room is a small, empty, and calm enclosure. A portion of the wall must be broken by tapping it with the stylus. After falling through a tube to the lower portion, the area is never as tranquil as the entrance. Throughout the remainder of the stage, a gray floor will rise and fall, similar to the magma in the volcanic areas. When Kirby is squished between the rising ground and stationary ceiling, a life will be lost and Kirby respawns at a previous checkpoint. Small nooks in the ceiling allow for safe refuge, although they are somewhat difficult to reach as the automatically scrolling screen limits impedes travel. Halfway through, the nooks are closed with stone blocks, requiring a well hidden Bomb Block to be struck with the stylus in order to reach safety. Also the tight passageway becomes more treacherous as the floor spikes prevent Kirby from touching the ground to recharge the ink gauge.
Needlous are the only Copy Ability granting enemies present, giving the Needle ability. Shotzos, lasers, Bronto Burts and Gordos are the only other enemies in the area. Two Energy Drinks can be found, and Point Stars infrequently appear. |
This medal can be found in a ceiling cache barricaded by blocks that can be removed by tapping a Bomb Block slightly up ahead. The medal will drop behind the crusher wall if Kirby does not collect it quickly though. |
 Area 2 |
No-draw zones dominate the second area of Mad Mechanism. Waddle Dee, Gordos, and Bouncy appear near the entrance; and Toppers show up midway through. This area is mostly devoid of enemy confrontations as the challenge focuses on Kirby's travel without the aid of Rainbow Lines. The layout is mostly horizontal with cranes used to carry Kirby over some portions and descending steps in others. The cranes carry Kirby over several open pits, all containing point stars, but with only one pit bypassing the pipe connecting the other pits. Falling down the wrong pit will merely pipe Kirby to a green pole and the crane for another attempt.
The area ends with a locked room challenge. Four switches are placed in nooks along the margins of the room. Stone blocks prevent access to them, but require the floating bombs to be pushed to them in order to destroy the blocks. Each switch controls a retractable shutter located on the floor. After all four are opened, the exit door takes Kirby the Mad Mechanism's final area. This area also appears as the Time Trial of Rainbow Run. |
This medal can be found shortly past the Gordos on patrol, tucked high in the upper-right corner of the room. Kirby will need to make use of the small gap in the no-draw zone to jump up to it. |
 Area 3 |
The third and final area of Mad Mechanism employs enough devices to keep the stylus busy. Lasers found on the floors, walls, and ceiling often alternate points of beam origin. Green pads that limit Kirby's movements and occasionally transport him along a defined path are frequently encountered. Electrical Blocks and spikes also dominate much of the area, in addition to a large open pit. Reaching the final door requires another challenge, in which the door disappears and appears in another location. The portion of the challenge takes place in a large room lined with electrical blocks in every direction. Kirby must remain airborne and attempt to guess where the door will appear before running out of ink and falling to the ground.
As with the other Mad Mechanism areas, few enemies are present, although spear Waddle Dees appear near the beginning and Bronto Burts chase Kirby, if they are not defeated. A well hidden 1Up can be found in the upper right-most portion of the map. Point Stars appear near the beginning and seldom thereafter. This area also appears as the Line Trial of Rainbow Run. |
This medal is nestled in a nook just to the left of the big square room in the lower-right. To reach it, a sneaky Bomb Block inside the left wall of the square room needs to be hit, then, Kirby needs to climb up into the nook to get the medal. |
Enemies and Copy Abilities[edit]
| Sprite | Name | Copy Ability | Sprite | Name | Copy Ability |
|---|---|---|---|---|---|
| Bouncy | None | Shotzo | N/A | ||
| Bronto Burt | None | Spear Waddle Dee | None | ||
| Gordo | N/A | Topper | None | ||
| Needlous | Needle | ||||
Gallery[edit]
Kirby peeks out behind the seem.
Kirby has to find a safe place as the floor rises up.
Kirby finds the medal, but he must hit the bomb block in the corner to get it.
Kirby finds a lone Gordo in the large world.

Kirby rolls toward a Topper.
Kirby is picked up by a claw and needs to find which hole to fall in.
Kirby guides the mine to blow up some gray blocks.
Kirby plays a dangerous game as he jumps through a pit of spikes.
Kirby navigates through the electric field.
Kirby finds the exit, but it fades away before he gets there.


Names in other languages[edit]
| Language | Name | Meaning |
|---|---|---|
| Japanese | マッドメカニズム Maddomekanizumu |
Mad Mechanism |
| French | Méchante Machine | Nasty Machine |
| German | Mecha-Mix | Mecha-Mix |
| Italian | Meccano Matto | Mad Machine |