Through the Tunnel
| ||||||||||||
| ||||||||||||
| ||||||||||||
|
| ||||||||||||

Through the Tunnel is the second stage of Natural Plains in Kirby and the Forgotten Land. In this stage, Kirby ventures into an abandoned maintenance tunnel where he can light the way and activate devices using the Fire Copy Ability. Further in, he can make use of a new Mouthful Mode - Stairs Mouth - to crush his enemies and get himself up high ledges. After emerging from the tunnel, Kirby can free the last set of Waddle Dees and move on.
There are three Capsules from Vol. 1 to collect in this stage, and five missions to complete. There are a total of ten Waddle Dees to rescue here, when including the mission objectives.
Stage overviewEdit

Through the Tunnel consists of five main areas.
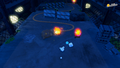
The first area places Kirby at the mouth of a big maintenance tunnel patrolled by Cappies and a Hot Head. Using Hot Head's power, Kirby can scorch these foes and light a Lantern Switch just inside before proceeding through a narrow passage. On the other end, the path widens to a still somewhat narrow passage with bottomless pits patrolled by Bronto Burts. A water silo can be found along the way which Kirby can wrap his mouth around to access a hidden room. Near the end of this main path, Kirby finds an area with a crack in the ceiling, letting some light in to reveal a big gaping open pit spanned by a bridge.
The second area is a large open cave where more Hot Heads and Lantern Switches can be found. Intermixed are moving platforms and Gordo Bars which Kirby will need to navigate around. Kirby can stray off the main path in places, guided by the Lantern Switches, to collect goodies and fulfill other objectives.
The third area is a straight path through a dim area where Kirby can light a fuse and chase it to a cannon past a few obstacles. From here, the main path leads past a narrow bridge guarded by an Awoofy.
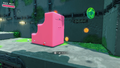
The fourth area takes place in an open well-lit area, where the path bends to the right past a Big Kabu. Here, Kirby comes across a large set of stairs, which he can wrap himself around to gain Stairs Mouth. Using this, Kirby can flatten enemies and obstacles in the way and get up to high ledges. A number of different suck ledges and obstacles need to be traversed before reaching the door to the right at the end of the hall.
The last area is one open to the sky. Here, Kirby simply needs to dispatch one last pair of enemies before reaching the gold cage and completing the stage. There is a hidden Treasure Chest in this room, though.
Differences between difficultiesEdit
There do not appear to be any differences in the number of enemies in this stage between Spring-Breeze Mode and Wild Mode.
MissionsEdit

Through the Tunnel has five missions to complete, as follows:
- "Clear the stage" - Kirby must complete the stage.
- "Save the hidden Waddle Dees" - Kirby must find and rescue the four hidden Waddle Dees in silver cages. Their locations are as follows:
- Waddle Dee 1: This Waddle Dee is hidden inside the "secret room" in the first area, inside a Treasure Chest guarded by four Awoofies.
- Waddle Dee 2: This Waddle Dee can be found in the second area near the end, behind a wall of barrier blocks. To open these, Kirby can follow the path pointed out by the Lantern Switch nearby to climb up some footholds and press a switch on the platform above the barrier.
- Waddle Dee 3: This Waddle Dee is hidden in the third area. To reach him, Kirby must light the fuse at the start and get to the attached cannon, and be shot through some metal blocks to get to where the Waddle Dee is.
- Waddle Dee 4: This Waddle Dee is hidden near the end of the fourth area. To reach him, Kirby must use a set of stairs to get to a fuse cannon and light the fuse to use it. Kirby needs to keep the stairs out of the way of the fuse spark before moving them into place.
- "Find the secret room" - Kirby must enter a hidden side room. This room can be found in the first area by using Dome Mouth to reveal a switch that opens up a hole in the wall to the left when pressed.
- "Light 4 Lantern Switches" - Kirby must find and light all four Lantern Switches using the Fire ability. Their locations are as follows:
- Lantern 1: Found in the first area, just inside the tunnel entrance.
- Lantern 2: Found in the second area, just to the left shortly after the start.
- Lantern 3: Found in the second area, off to the right near the gate containing a capsule.
- Lantern 4: Found in the second area, near the end on a post orbited by three Gordos.
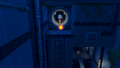
- "Remove the wanted poster" - Kirby must find and remove the Beast Pack's "wanted poster" of him. This can be found in the fourth area on the wall, and Stairs Mouth can be used to reach it.
Enemies and AbilitiesEdit
| Regular Enemies | Bosses & Mid-Bosses | ||||
|---|---|---|---|---|---|
|
|
| ||||
| Abilities | Mouthful Mode(s) | ||||
|
|
|
TriviaEdit
- A glitch can cause a third set of stairs in the Stairs Mouth section to spawn alongside the two that normally spawn in. Exactly how to trigger this is unknown.
GalleryEdit
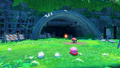
The entrance to the eponymous tunnel
Lighting the first Lantern Switch

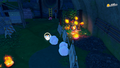
Plowing through a Bronto Burt using Fire
Leaping over a Gordo Bar
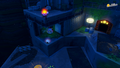
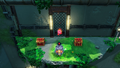
Revealing a caged Waddle Dee by pressing an out-of-the-way switch
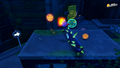
Chasing a lit fuse to the cannon
Entering a pipe containing another hidden Waddle Dee
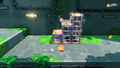
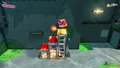
Finding a conspicuous set of stairs
Kirby taking on the shape of the stairs for his own purposes
Kirby using the stairs to take down some Beast Pack propaganda
Kirby launching up to find another hidden Waddle Dee and some treasure
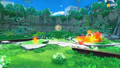
Kirby entering the final open area back outside


Video walkthroughEdit
100% walkthrough of Through the Tunnel.
|
Names in other languagesEdit
| Language | Name | Meaning |
|---|---|---|
| Japanese | トンネルくぐって Tonneru Kugutte |
Through the Tunnel |
| Traditional Chinese | 穿過隧道 Chuānguò Suìdào |
Passing Through the Tunnel |
| Simplified Chinese | 穿过隧道 Chuānguò Suìdào | |
| Dutch | Door de tunnel | Through the tunnel |
| French | Traversée du tunnel | Crossing of the tunnel |
| German | Ab durch den Tunnel | Off through the Tunnel |
| Italian | Tunnel profondo | Deep tunnel |
| Korean | 터널을 지나서 Teoneoreul Jinaseo |
Through the Tunnel |
| Spanish | Túnel Profundo | Deep Tunnel |