Course 6 - Hole 6
| ||||||||||
| ||||||||||
|
| ||||||||||


Course 6 - Hole 6 is the sixth hole of Course 6 in Kirby's Dream Course. It takes place on a long path consisting mostly of tall slopes.
SummaryEdit
The board here is long and straight, though most of it is dominated with steep slopes, with a particularly long one on the left side leading upward and a shorter one leading up on the right before reaching a small flat area split off into two pockets by bumper walls, which also line the sides of the board. One more bumper formation forms a diamond shape in the lowest flat portion of the board in the middle. Kirby starts in the left pocket on the right side of the board, and a Waddle Dee can be found in the other one. After heading down to the flat zone in the middle, Kirby can either take a Warp Panel to return to his starting position, or he can use a Kick Panel and Dash Panel to rocket up the big slope on the left past a Togezo. On the slope are four Kabu and a small sand bunker which juts out of the slope near the bottom.
Extra GameEdit
In the Extra Game, Kirby starts out on top of the left slope. The Togezo has been moved near the top of the slope, and the four Kabu have been shifted into an even square formation closer to the bottom. There are now two Waddle Dees on the right side of the board, one of which is in Kirby's main game starting position.
EnemiesEdit
|
ObstaclesEdit
| Sprite | Obstacle |
|---|---|
| Bumper | |
| Bunker | |
| Dash Panel | |
| Kick Panel | |
| Warp Panel |
GalleryEdit
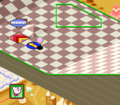
Moving across the panels in the middle
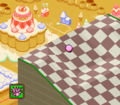
Making the loop at the top

