From WiKirby, your independent source of Kirby knowledge.
| Course 3 - Hole 3
|
|
|
| Details
|
| Course
|
Course 3
|
| Copy Abilities
|
Main Game
None
Extra Game
Hi-Jump
|
|
|
|
|
|
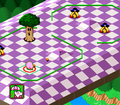
Course 3 - Hole 3 is the third hole of Course 3 in Kirby's Dream Course. It takes place in a small area defined by two encirclements of bumpers.
Summary
The hole consists of a small rectangular board, on which are two separate areas which are mostly encircled by bumper walls. Kirby starts in the left of these bumper-bordered areas along with a Broomhatter and Whispy Woods. In the right encirclement are two more Broomhatters. Two Gordos can be seen further right outside of the bumper walls. Each encirclement also contains a small dimple in the terrain which may be useful for launching Kirby from one to the other.
In the Extra Game, Kirby starts inside the small opening in the left-hand bumper encirclement. In the left pocket is a Gordo and a Starman, and in the right is another Gordo and a Broomhatter. All other enemies are removed.
Enemies
Obstacles
Gallery
Surveying the surrounding board
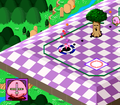
Planning a leap over Whispy Woods
| Kirby's Dream Course |
|---|
| | Characters | | | | Single-Player Courses and Holes | | | | Two-Player Courses and Holes | | | | Copy Abilities | | | | Enemies | | | | Course Obstacles | | | | Extra | |
|