From WiKirby, your independent source of Kirby knowledge.
Course 3 - Hole 2 is the second hole of Course 3 in Kirby's Dream Course. This area features extensive fields of obstacles, and introduces the Conveyor Belt along with red Warp Panels.
Summary
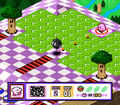
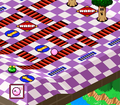
This hole takes place on a wide board that features an array of numerous stage obstacles along with mild elevation changes. Kirby starts on the upper-right behind a large Lawn field pointing to the upper-left. He'll need to cross this first and pass the Gordo to reach the lower area which is lined with many other elements, including Danger Zones, Air Curtains, Kick Panels, Warp Panels, and the newly introduced lines of Conveyor Belts that may all assist or impede Kirby's path to the other side. At the left end of the board, past all of this, are three ability-granting enemies; Parasol Waddle Doo, Sparky, and Starman. Kirby's ability going into the next hole will depend on which enemy he chooses to tackle second, so he should choose carefully.
In the Extra Game, Kirby starts out at the left where the ability-providing enemies used to be in the main game. He will need to cross the board in the other direction in order to reach the right side, where Togezo and Broomhatter wait where Gordo used to be in the main game.
Enemies
Obstacles
Gallery
Preparing the first shot carefully
Navigating the maze of conveyor belts
| Kirby's Dream Course |
|---|
| | Characters | | | | Single-Player Courses and Holes | | | | Two-Player Courses and Holes | | | | Copy Abilities | | | | Enemies | | | | Course Obstacles | | | | Extra | |
|